
Recently, we kicked off a beginner-friendly blog series about Docker. In part one of the series, we introduced Docker and discussed the basics of “images” and “containers”. We then used Docker’s command-line interface (CLI) to build and run some simple containerized applications.
In part two, we introduced Docker Compose, a powerful tool for easily configuring a multi-service deployment. In that post we transitioned from using one-off docker run commands introduced in part one,
to using a declarative docker-compose.yaml configuration file. Once our configuration file was written, we only needed to run the docker compose up command to bring our deployment online. This greatly simplified the deployment process of our two-service example application.
Now, in blog number three, we’ll wrap up our series by introducing you to Docker Swarm: a mode of Docker that lets you deploy, scale, and update containers across one or more host machines using the same, familiar Docker Compose syntax we saw in blog two!
Before we jump into some Docker Swarm example deployments, let’s first discuss this mode of the Docker Engine at a high level.
Docker Swarm is multi-host container orchestration#
As we learned from the first blog in this series, the standalone Docker CLI can be used to build and run a single Docker container. In the second blog, we learned that multiple containers can be built and run
using Docker Compose and its accompanying docker-compose.yaml file. However, the key limitations these Docker modes share are that they only support deployments to a single host machine and, by default, run a single instance per service. While Compose can scale services, it does so on a single host without cluster-level scheduling or rolling updates.
This means that if you wanted to horizontally scale a standalone Docker CLI or Docker Compose deployment, you would need a bespoke, manual solution to do so.
Enter Docker Swarm.
Docker Swarm turns one or more host machines into a cluster, or “swarm” (like a swarm of bees). A swarm has at least one manager node and any number of worker nodes. The manager schedules, monitors, and maintains services while the worker nodes run the containerized tasks. A lot of the difficulty and complexity of managing services across a multi-host containerized deployment is handled automatically by the Docker Engine!
In Docker Swarm jargon, you deploy “stacks,” or collections of services, by running a single command in combination with a Docker Compose-like configuration file. Then, Docker Swarm takes care of scheduling containers on the worker nodes, load balancing traffic across all nodes and services, and performing rolling updates.
This makes deploying highly-scalable, highly-available, production applications with Docker easy and efficient. In fact, DoltLab Enterprise uses Docker Swarm for its multi-host deployments!
Let’s get started working through a couple of Docker Swarm deployment examples. To do so, we’ll need to provision a couple of host machines with the required Docker Swarm settings, so let’s start there.
Provisioning hosts#
Docker Swarm requires a minimum of one node to run. In a single-node swarm, that node acts as both manager and worker. We’ll provision two nodes for this demo: one manager and one worker.
I’ll be using AWS EC2 instances for this example, but any hosts will work fine as long as they can reach each other’s IP addresses and have Docker installed on them.
Crucially, Docker Swarm requires that a specific set of ports is open on every host in the swarm. These ports are 2377/TCP, 4789/UDP, 7946/TCP, and 7946/UDP. On these ports, Docker Swarm structures its internal networking, executes data transfer, and coordinates host and service communication, so be sure
that these ports are open and reachable between all hosts from within the swarm, but not reachable externally. This can often be accomplished with a firewall or network security group.
For our example, I’ve created a custom security group for the two EC2 instances that will be part of our swarm. This security group opens the ports specified above, but only permits ingress from within this same security group.
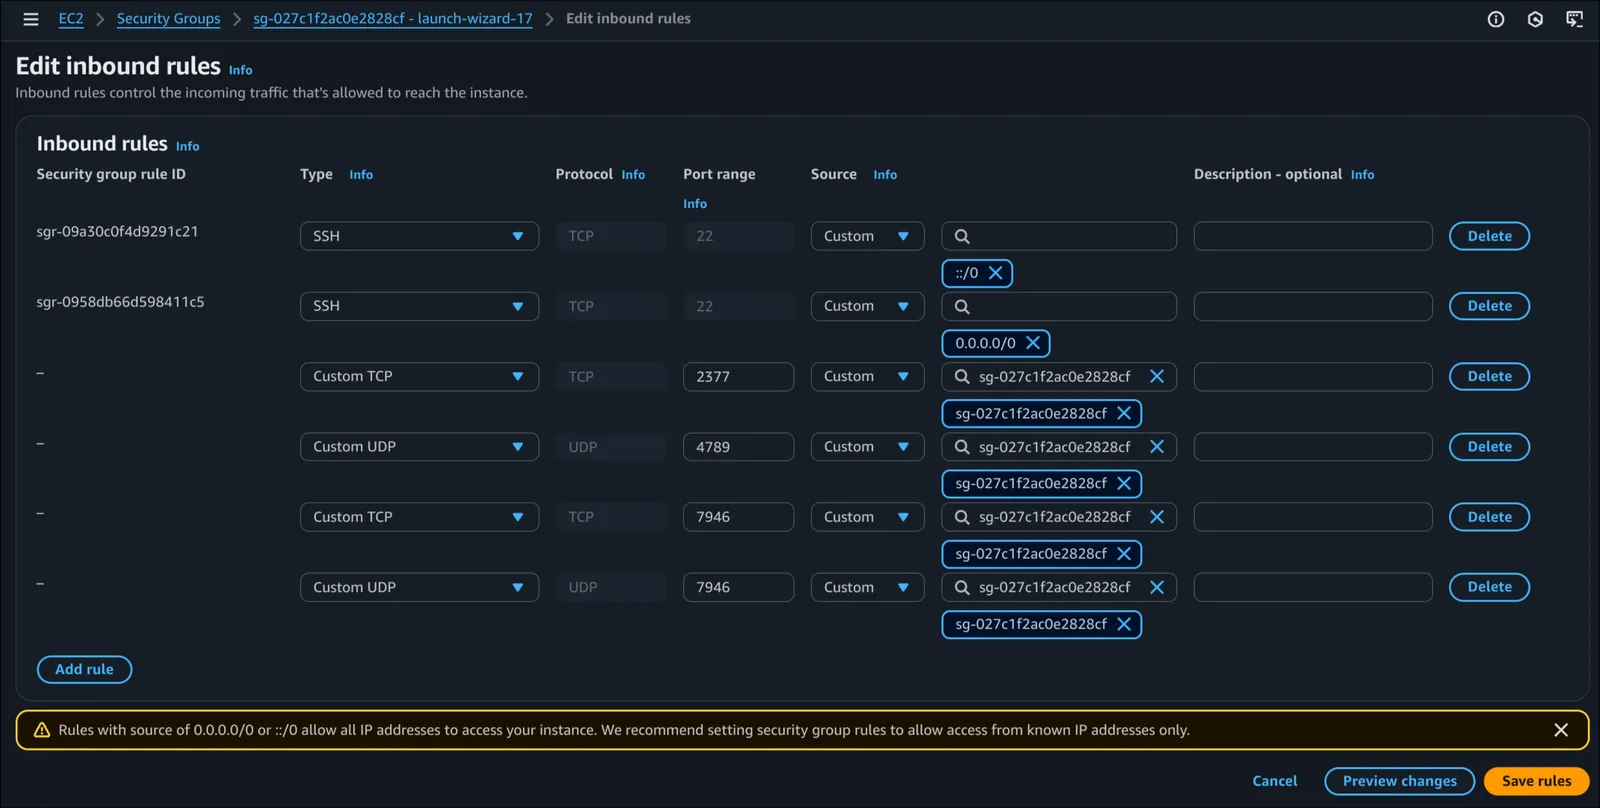
Additionally, I’ve created a second security group that is also associated with the two instances in our swarm. This one allows ingress traffic from the internet to the ports where we will run our applications.
Like before, any ports you publish must be open on every host in the swarm, since Swarm’s routing mesh load balances requests across all hosts automatically.

With our hosts online and the required ports open, let’s verify that we’ve got Docker installed on both hosts and can run the docker command without using sudo.
root@ip-10-2-2-162:/home/ubuntu# docker version
Client: Docker Engine - Community
 Version:           28.3.3
 API version:       1.51
 Go version:        go1.24.5
 Git commit:        980b856
 Built:             Fri Jul 25 11:34:09 2025
 OS/Arch:           linux/amd64
 Context:           default

Server: Docker Engine - Community
 Engine:
  Version:          28.3.3
  API version:      1.51 (minimum version 1.24)
  Go version:       go1.24.5
  Git commit:       bea959c
  Built:            Fri Jul 25 11:34:09 2025
  OS/Arch:          linux/amd64
  Experimental:     false
 containerd:
  Version:          1.7.27
  GitCommit:        05044ec0a9a75232cad458027ca83437aae3f4da
 runc:
  Version:          1.2.5
  GitCommit:        v1.2.5-0-g59923ef
 docker-init:
  Version:          0.19.0
  GitCommit:        de40ad0
root@ip-10-2-2-162:/home/ubuntu# docker ps
CONTAINER ID   IMAGE     COMMAND   CREATED   STATUS    PORTS     NAMES
root@ip-10-2-2-91:/home/ubuntu# docker version
Client: Docker Engine - Community
Version: 28.3.3
API version: 1.51
Go version: go1.24.5
Git commit: 980b856
Built: Fri Jul 25 11:34:09 2025
OS/Arch: linux/amd64
Context: default
Server: Docker Engine - Community
Engine:
Version: 28.3.3
API version: 1.51 (minimum version 1.24)
Go version: go1.24.5
Git commit: bea959c
Built: Fri Jul 25 11:34:09 2025
OS/Arch: linux/amd64
Experimental: false
containerd:
Version: 1.7.27
GitCommit: 05044ec0a9a75232cad458027ca83437aae3f4da
runc:
Version: 1.2.5
GitCommit: v1.2.5-0-g59923ef
docker-init:
Version: 0.19.0
GitCommit: de40ad0
root@ip-10-2-2-91:/home/ubuntu# docker ps
CONTAINER ID IMAGE COMMAND CREATED STATUS PORTS NAMESGreat! We’re now ready to initialize our swarm and assign the manager and worker roles to our nodes.
Configuring the Swarm#
First, we need to choose one of our hosts to be the manager node. On this node, we initialize our swarm by running the docker swarm init command. Importantly,
when initializing a swarm, we’ll need to specify the IP address that we want the manager node to broadcast to all other nodes in the swarm. This will be used for node discovery and
internal routing. To do this we supply the --advertise-addr flag, with the internal IP of our manager node.
root@ip-10-2-2-162:/home/ubuntu# docker swarm init --advertise-addr 10.2.2.162
Swarm initialized: current node (5l0gw9xvziby19kgndqgtu1u0) is now a manager.

To add a worker to this swarm, run the following command:

    docker swarm join --token SWMTKN-1-5im3sfzg7z9xgqsn8zweqxah4l7cl4tianjmjg8bpvtz6a5m2n-6ef41qyz8jb7etk6nhlblb22g 10.2.2.162:2377

To add a manager to this swarm, run 'docker swarm join-token manager' and follow the instructions.
You’ll notice that after initializing the swarm on the manager node, the Docker Engine will provide you with a command you can run on the worker node in order to get this node to join the swarm as a worker. We’ll go ahead and copy this output command, and prepare to run it on the host we want to be the worker node.
Before we do so, as with the init command above, we’ll supply the --advertise-addr flag so this worker node advertises the correct IP address other nodes can reach.
root@ip-10-2-2-91:/home/ubuntu# docker swarm join --token SWMTKN-1-5im3sfzg7z9xgqsn8zweqxah4l7cl4tianjmjg8bpvtz6a5m2n-6ef41qyz8jb7etk6nhlblb22g --advertise-addr 10.2.2.91 10.2.2.162:2377
This node joined a swarm as a worker.
Just like that our worker has joined the swarm.
If we go back to our manager node, we can view all of the registered nodes within our swarm by running the docker node ls command to list all nodes.
root@ip-10-2-2-162:/home/ubuntu# docker node ls
ID                            HOSTNAME        STATUS    AVAILABILITY   MANAGER STATUS   ENGINE VERSION
8teg9wbf2zvwe0wfidl184z54     ip-10-2-2-91    Ready     Active                          28.3.3
5l0gw9xvziby19kgndqgtu1u0 *   ip-10-2-2-162   Ready     Active         Leader           28.3.3
Now that we officially have a swarm, we’re ready to deploy a service!
From Compose to Swarm: a single-service nginx deployment#
In the previous blog, we served a simple index.html page with nginx using Docker Compose. To do this, we specified a volume mount and port binding in the docker-compose.yaml configuration file.
Now that we’re running Docker Swarm, we’ll express the same deployment as a Swarm stack.yaml file and add orchestration fields to a new section of the YAML file under the block deploy:.
We’ll also take advantage of Docker “configs” to distribute our static index.html to our worker node, which is a better fit than host bind mounts for clustered deployments.
First, on the manager node, create a new directory and within it, add the following index.html:
<!DOCTYPE html>
<html>
<head>
  <title>Hello Swarm</title>
</head>
<body>
  <h1>Hello, World from Docker Swarm + NGINX!</h1>
</body>
</html>
root@ip-10-2-2-162:/home/ubuntu# mkdir swarm_hello
root@ip-10-2-2-162:/home/ubuntu# cd swarm_hello
root@ip-10-2-2-162:/home/ubuntu/swarm_hello# cat > index.html <<'HTML'
<!DOCTYPE html>
<html>
<head>
<title>Hello Swarm</title>
</head>
<body>
<h1>Hello, World from Docker Swarm + NGINX!</h1>
</body>
</html>
HTMLThen, create a stack.yaml file containing the following:
version: "3.9"

services:
  web:
    image: nginx:alpine

    # Publish port 80 once, Swarm load balances across replicas
    ports:
      - target: 80
        published: 80
        protocol: tcp
        mode: ingress

    # Distribute our static page via Swarm config
    configs:
      - source: index_html
        target: /usr/share/nginx/html/index.html
        mode: 0444

    deploy:
      replicas: 2
      restart_policy:
        condition: any
      update_config:
        parallelism: 1
        delay: 5s
      placement:
        constraints:
          - node.role == worker

configs:
  index_html:
    file: ./index.html
root@ip-10-2-2-162:/home/ubuntu/swarm_hello# cat > stack.yaml <<'YAML'
version: "3.9"
services:
web:
image: nginx:alpine
# Publish port 80 once, Swarm load balances across replicas
ports:
- target: 80
published: 80
protocol: tcp
mode: ingress
# Distribute our static page via Swarm config
configs:
- source: index_html
target: /usr/share/nginx/html/index.html
mode: 0444
deploy:
replicas: 2
restart_policy:
condition: any
update_config:
parallelism: 1
delay: 5s
placement:
constraints:
- node.role == worker
configs:
index_html:
file: ./index.html
YAMLNotice how similar the stack.yaml file is to a docker-compose.yaml file. Just like we did before, we define each service we want to deploy within the top-level services field, then
configure each service deployment within its deploy field.
We’ve once again called our service web, and we’ll make sure that port 80 is open for ingress traffic on this service. This port is also open via the security group on all of our swarm hosts.
The configs block defines a Docker config that Docker Swarm will automatically propagate to all hosts running our web service. This means the static index.html only needs to exist on the manager when deploying. Docker Swarm will write it to the relevant worker nodes automatically.
Finally, in the deploy block we specify that we want two instances of our web service running at all times by defining replicas: 2. We also provide a policy for when to restart a service instance. This is indicated with condition: any. This condition means the task is restarted whenever it exits, for any reason. We also define a policy for how rolling updates should be performed by adding the update_config field. By setting parallelism to one,
which tells Docker Swarm to update one instance at a time, and delay to five seconds, which tells it to wait five seconds between successful updates, we can trust Docker Swarm will handle our rolling service updates smoothly.
The placement block tells Docker Swarm to make sure our web service is constrained to, or only deploy on, our worker nodes. Without this block, by default, Docker Swarm would also run services on the manager node, which is perfectly
fine to do.
With our configuration in place, we can deploy the stack from our manager node with the docker stack deploy command.
root@ip-10-2-2-162:/home/ubuntu/swarm_hello# docker stack deploy -c stack.yaml hello
Creating network hello_default
Creating config hello_index_html
Creating service hello_web
With the stack deployed, we can view the status of the deployment using the docker stack ps command.
root@ip-10-2-2-162:/home/ubuntu/swarm_hello# docker stack ps hello
ID             NAME          IMAGE          NODE           DESIRED STATE   CURRENT STATE           ERROR     PORTS
r7wk550yqbyq   hello_web.1   nginx:alpine   ip-10-2-2-91   Running         Running 8 seconds ago
7ynqhaufcn44   hello_web.2   nginx:alpine   ip-10-2-2-91   Running         Running 8 seconds ago
In the output above, we can see that our stack is deployed and running on our designated worker node. Now we can test our simple application by sending a request to the public IP of one of our swarm nodes. Either node will route our request to the deployed service.
(base) ➜ ✗ curl http://54.167.33.82
<!DOCTYPE html>
<html>
<head>
  <title>Hello Swarm</title>
</head>
<body>
  <h1>Hello, World from Docker Swarm + NGINX!</h1>
</body>
</html>
And there’s our simple web page, just like that!
Now let’s say we receive an unexpectedly high traffic load on our simple web service and need to scale up to serve these requests. We can easily do so
by going back to the manager node and running the docker service update command, specifying the new number of replicas we want deployed. Docker Swarm
will ensure that our desired number of replicas equals the actual number of replicas by adding another service replica on our worker node.
root@ip-10-2-2-162:/home/ubuntu/swarm_hello# docker service update --replicas 3 hello_web
hello_web
overall progress: 3 out of 3 tasks
1/3: running
2/3: running
3/3: running
verify: Service hello_web converged
And we can inspect the rollout of our additional replica by using the docker service ps command.
root@ip-10-2-2-162:/home/ubuntu/swarm_hello# docker service ps hello_web
ID             NAME          IMAGE          NODE           DESIRED STATE   CURRENT STATE                ERROR     PORTS
r7wk550yqbyq   hello_web.1   nginx:alpine   ip-10-2-2-91   Running         Running 39 minutes ago
7ynqhaufcn44   hello_web.2   nginx:alpine   ip-10-2-2-91   Running         Running 39 minutes ago
mf4udwssfkjo   hello_web.3   nginx:alpine   ip-10-2-2-91   Running         Running about a minute ago
Above we can see that our new replica is online, and Docker Swarm will automatically load balance requests to this service replica as well.
Let’s try one more example deployment with Docker Swarm, but before we do, let’s tear down our existing stack using the docker stack rm command.
root@ip-10-2-2-162:/home/ubuntu/swarm_hello# docker stack rm hello
Removing service hello_web
Removing config hello_index_html
Removing network hello_default
Multi-host, multi-service apps with Docker Swarm#
For our final example deployment, we’ll reuse the same Python code and custom Dockerfile from the previous blog to deploy a Flask and Redis application again. But because Docker Swarm doesn’t build images from a stack file, we’ll first need to build the image.
On our worker node, let’s create a new directory for this deployment, with a subdirectory named app that contains the following requirements.txt, app.py and Dockerfile.
flask==3.0.3
redis==5.0.7
from flask import Flask
import os
import redis
redis_host = os.environ.get("REDIS_HOST", "redis")
redis_port = int(os.environ.get("REDIS_PORT", "6379"))
redis_client = redis.Redis(host=redis_host, port=redis_port, decode_responses=True)
app = Flask(__name__)
@app.route("/")
def index():
count = redis_client.incr("hits")
return f"Hello from Flask! This page has been viewed {count} times.\n"
if __name__ == "__main__":
app.run(host="0.0.0.0", port=5000)# syntax=docker/dockerfile:1
FROM python:3.12-slim
WORKDIR /app
COPY app/requirements.txt /app/
RUN pip install --no-cache-dir -r requirements.txt
COPY app /app
EXPOSE 5000
CMD ["python", "app.py"]root@ip-10-2-2-91:/home/ubuntu# mkdir swarm_example
root@ip-10-2-2-91:/home/ubuntu# cd swarm_example
root@ip-10-2-2-91:/home/ubuntu/swarm_example# mkdir app
root@ip-10-2-2-91:/home/ubuntu/swarm_example# cat > app/requirements.txt <<'REQ'
flask==3.0.3
redis==5.0.7
REQ
root@ip-10-2-2-91:/home/ubuntu/swarm_example# cat > app/app.py <<'PY'
from flask import Flask
import os
import redis

redis_host = os.environ.get("REDIS_HOST", "redis")
redis_port = int(os.environ.get("REDIS_PORT", "6379"))
redis_client = redis.Redis(host=redis_host, port=redis_port, decode_responses=True)

app = Flask(__name__)

@app.route("/")
def index():
    count = redis_client.incr("hits")
    return f"Hello from Flask! This page has been viewed {count} times.\n"

if __name__ == "__main__":
    app.run(host="0.0.0.0", port=5000)
PY
root@ip-10-2-2-91:/home/ubuntu/swarm_example# cat > Dockerfile <<'DOCKER'
# syntax=docker/dockerfile:1
FROM python:3.12-slim
WORKDIR /app
COPY app/requirements.txt /app/
RUN pip install --no-cache-dir -r requirements.txt
COPY app /app
EXPOSE 5000
CMD ["python", "app.py"]
DOCKERJust like before, the application above will persist the number of page views in Redis and display the latest count to the user when they view the page.
Now, we need to build and tag our api service image using the standalone docker build command, since Docker Swarm does not perform the build step for us.
root@ip-10-2-2-91:/home/ubuntu/swarm_example# docker build -t api:latest .
[+] Building 8.6s (12/12) FINISHED                          docker:default
...
Now that we’ve built the api:latest image on our worker node where our api service will run, we can simply reference it in the stack.yaml file we create on our manager node.
Note: in multi-node swarms, push your image to a registry (or ensure it exists on every node) so tasks can pull it wherever they are scheduled.
But first, let’s add some labels to our two swarm nodes.
Labels are arbitrary key-value pairs associated with a particular node that can be used to differentiate one node from another. In our case, we want to label one node as an api-node and the other as a redis-node. Then,
when we deploy our services, we’ll instruct Docker Swarm to place api services only on the api-node, and likewise, place redis services only on the redis-node.
To do this we can use the docker node update command on our manager node to apply labels to all nodes. On the manager node, get the node IDs from the docker node ls command.
root@ip-10-2-2-162:/home/ubuntu/swarm_example# docker node ls
ID                            HOSTNAME        STATUS    AVAILABILITY   MANAGER STATUS   ENGINE VERSION
8teg9wbf2zvwe0wfidl184z54     ip-10-2-2-91    Ready     Active                          28.3.3
5l0gw9xvziby19kgndqgtu1u0 *   ip-10-2-2-162   Ready     Active         Leader           28.3.3
root@ip-10-2-2-162:/home/ubuntu/swarm_example# docker node update --label-add api-node=true 8teg9wbf2zvwe0wfidl184z54
8teg9wbf2zvwe0wfidl184z54
root@ip-10-2-2-162:/home/ubuntu/swarm_example# docker node update --label-add redis-node=true 5l0gw9xvziby19kgndqgtu1u0
5l0gw9xvziby19kgndqgtu1u0
In the output above, we’ve successfully applied the label api-node=true to our worker node, and the label redis-node=true to our manager node.
Now let’s create the stack.yaml for this deployment.
version: "3.9"

services:
  api:
    image: api:latest
    environment:
      - REDIS_HOST=redis
      - REDIS_PORT=6379
    ports:
      - target: 5000
        published: 5000
        protocol: tcp
        mode: ingress
    deploy:
      replicas: 2
      restart_policy:
        condition: any
      update_config:
        parallelism: 1
        delay: 5s
      placement:
        constraints:
          - node.labels.api-node == true

  redis:
    image: redis:7-alpine
    command: ["redis-server", "--save", "60", "1", "--loglevel", "warning"]
    volumes:
      - redis-data:/data
    deploy:
      restart_policy:
        condition: any
      update_config:
        parallelism: 1
        delay: 5s
      placement:
        constraints:
          - node.labels.redis-node == true

volumes:
  redis-data:
root@ip-10-2-2-162:/home/ubuntu# mkdir swarm_example
root@ip-10-2-2-162:/home/ubuntu# cd swarm_example
root@ip-10-2-2-162:/home/ubuntu/swarm_example# cat > stack.yaml <<'EOF'
version: "3.9"
services:
api:
image: api:latest
environment:
- REDIS_HOST=redis
- REDIS_PORT=6379
ports:
- target: 5000
published: 5000
protocol: tcp
mode: ingress
deploy:
replicas: 2
restart_policy:
condition: any
update_config:
parallelism: 1
delay: 5s
placement:
constraints:
- node.labels.api-node == true
redis:
image: redis:7-alpine
command: ["redis-server", "--save", "60", "1", "--loglevel", "warning"]
volumes:
- redis-data:/data
deploy:
restart_policy:
condition: any
update_config:
parallelism: 1
delay: 5s
placement:
constraints:
- node.labels.redis-node == true
volumes:
redis-data:
EOFNotice that in the stack.yaml we deploy two replicas of the api service but constrain the deployments to nodes labeled with api-node=true. Similarly,
we constrain the redis service to nodes with the label redis-node=true. We also do not deploy more than a single instance of this service so that we avoid inconsistent state.
Finally, we can deploy!
root@ip-10-2-2-162:/home/ubuntu/swarm_example# docker stack deploy -c stack.yaml swarm_example
Creating network swarm_example_default
Creating service swarm_example_redis
Creating service swarm_example_api
root@ip-10-2-2-162:/home/ubuntu/swarm_example# docker stack ps swarm_example
ID             NAME                    IMAGE            NODE            DESIRED STATE   CURRENT STATE           ERROR     PORTS
tfyebaomgcvr   swarm_example_api.1     api:latest       ip-10-2-2-91    Running         Running 7 seconds ago
9wmhv4qf1hhw   swarm_example_api.2     api:latest       ip-10-2-2-91    Running         Running 7 seconds ago
87ybqvn27ok5   swarm_example_redis.1   redis:7-alpine   ip-10-2-2-162   Running         Running 8 seconds ago
Just like with our previous deployment, we can use the docker stack ps command to watch everything come online. Then, we can hit our application
and watch the view count increase.
(base) ➜ ✗ curl http://54.167.33.82:5000
Hello from Flask! This page has been viewed 1 times.
(base) ➜ ✗ curl http://13.220.187.30:5000
Hello from Flask! This page has been viewed 2 times.
(base) ➜ ✗ curl http://54.167.33.82:5000
Hello from Flask! This page has been viewed 3 times.
(base) ➜ ✗ curl http://13.220.187.30:5000
Hello from Flask! This page has been viewed 4 times.
Perfect, it’s working as expected! As you can see, either public IP will work to reach our application since Docker Swarm is load balancing requests across all hosts.
When you’re done, bring it down by running the following on the manager node:
root@ip-10-2-2-162:/home/ubuntu/swarm_example# docker stack rm swarm_example
Removing service swarm_example_api
Removing service swarm_example_redis
Removing network swarm_example_default
To remove nodes from your swarm, you can use the docker swarm leave command. You should remove all worker nodes from the swarm before removing the manager node from the swarm.
root@ip-10-2-2-91:/home/ubuntu/swarm_example# docker swarm leave
Node left the swarm.
root@ip-10-2-2-162:/home/ubuntu/swarm_example# docker swarm leave
Node left the swarm.Conclusion#
This concludes our beginner-friendly series on Docker, Docker Compose, and Docker Swarm. We hope it has encouraged you to give these tools a try and sparked your curiosity to explore what else is possible.