Hosted Dolt is a cloud-deployed Dolt database. The application itself runs on React and is backed by a GraphQL server. DoltHub and DoltLab have an official API, documented here. Hosted Dolt is meant more for serving live queries rather than building offline workflows using version control, but if you did want to programmatically access or update certain information that’s not available via your Hosted SQL server, such as pull requests, there is an unofficial way to use the GraphQL API to automate such actions.
Warning: this is not an official API and the structure is subject to change at any point.
The Hosted SQL Workbench is an example of an application that can be built on top of your live Hosted SQL server. It utilizes Dolt’s SQL procedures and system tables to display and edit version control metadata. Pull requests are the exception - this metadata is stored in the website’s Hosted API database rather than your deployed user database. It may be helpful for you to be able to programmatically create, view, and merge pull requests like you can with other version control on Hosted. While we wouldn’t recommend building an application with this workflow, we will show you how to use the hidden GraphQL API behind Hosted to manage a pull request workflow.
Getting set up#
This tutorial will assume you have an account on hosted.doltdb.com and you have created a deployment. We cloned a database from DoltHub called employees so we have some data readily available to work with.
mysql> call dolt_clone('dolthub/employees');
+--------+
| status |
+--------+
|      0 |
+--------+
1 row in set (1.94 sec)
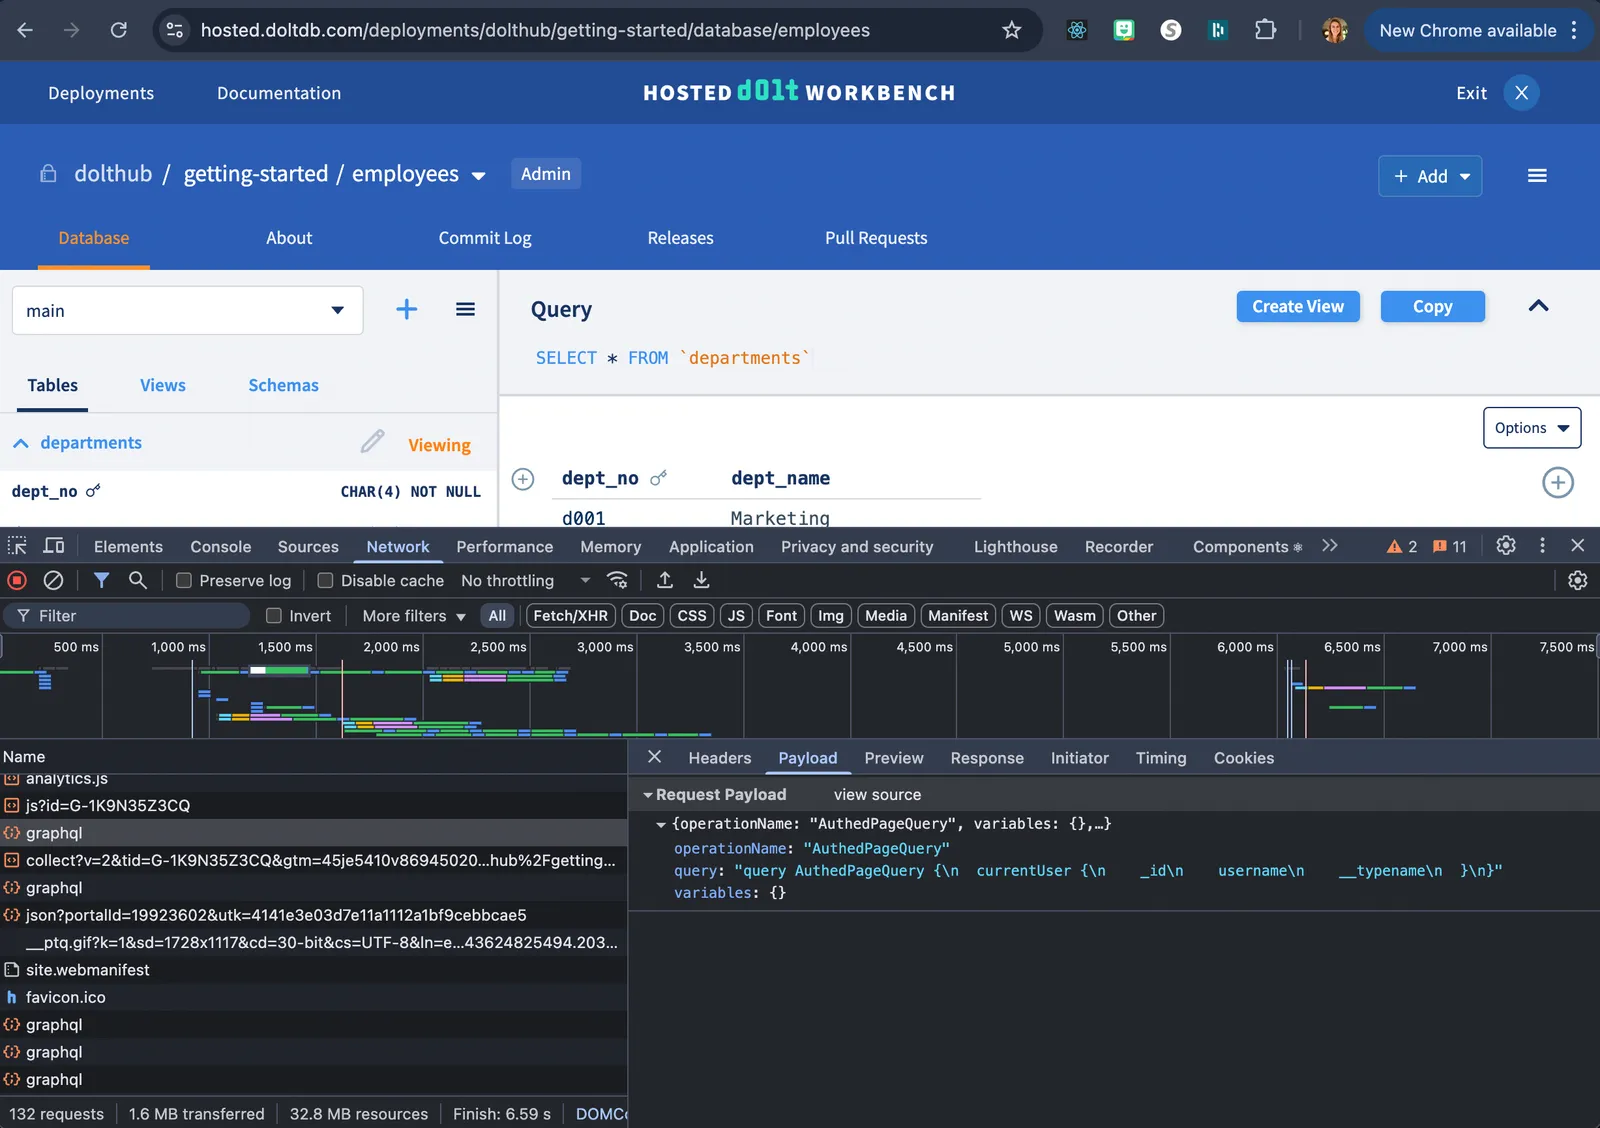
Once you’re logged in, open up your browser developer tools and navigate to the Network tab, where you will see a bunch of requests named graphql. You can inspect these when you load the page to see what the requests to the GraphQL API look like:

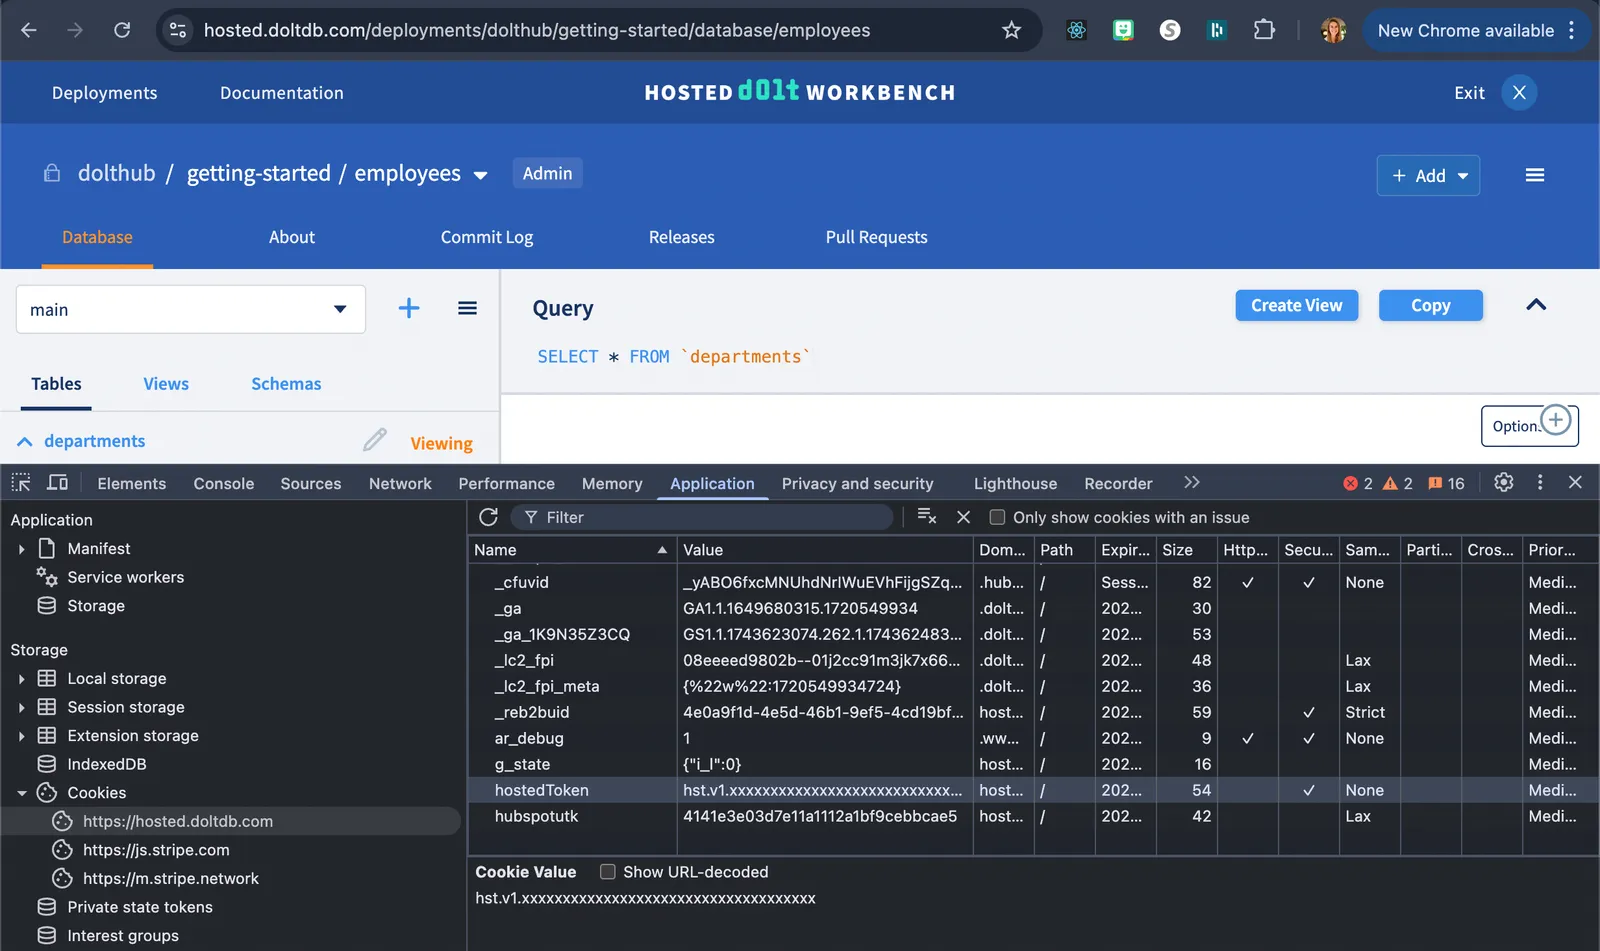
To test authentication, we can send a simple query like the one above to get the current user. We will use a cookie called hostedToken in order to authenticate our request. You can find this by going to the Application tab of your dev tools and finding the Cookie named hostedToken.

This will be used in the request header.
const headers = {
  "Content-Type": "application/json",
  cookie: "hostedToken=hst.v1.xxxxxxxxxxxxxxxxxxxxxxxxxxxxxxxxxxxxxxxxx;",
};
The GraphQL query will go in the body of the request.
const body = JSON.stringify({
  query: `{ currentUser { username } }`,
});
And then using Node’s built in fetch API we can send a POST request to the Hosted GraphQL API url and log the returned data (note that all requests should use the POST verb):
const url = "https://hosted.doltdb.com/graphql";

fetch(url, {
  method: "POST",
  headers: headers,
  body: body,
})
  .then((response) => response.json())
  .then((data) => console.log(data))
  .catch((error) => console.error("Error:", error));
If the query is successful you will see data returned in this structure: { data: { currentUser: { username: 'taylor' } } }.
Implementing a pull request workflow#
In order to create a pull request, we need to create a change on a branch, which we will call update, and commit the change.
We will use the createPull mutation to create a pull request between our two branches: main and update.
Using the same fetch code above, we can update the body to use the new GraphQL query. This time our body will also include variables that will populate the arguments in the query.
const body = JSON.stringify({
  query: `mutation($title: String!, $description: String!, $fromBranchName: String!, $toBranchName: String!, $deploymentName: String!, $ownerName: String!, $databaseName: String!) {
    createPull(
      title: $title,
      description: $description,
      fromBranchName: $fromBranchName,
      toBranchName: $toBranchName,
      ownerName: $ownerName,
      deploymentName: $deploymentName,
      databaseName: $databaseName
    ) {
      pullId
    }
  }`,
  variables: {
    title: "update row",
    description: "updated a row in the `salaries` table",
    fromBranchName: "update",
    toBranchName: "main",
    ownerName: "dolthub",
    deploymentName: "getting-started",
    databaseName: "employees",
  },
});
If successful, this will return the pullId of the new pull request: { data: { createPull: { pullId: '1' } } }.
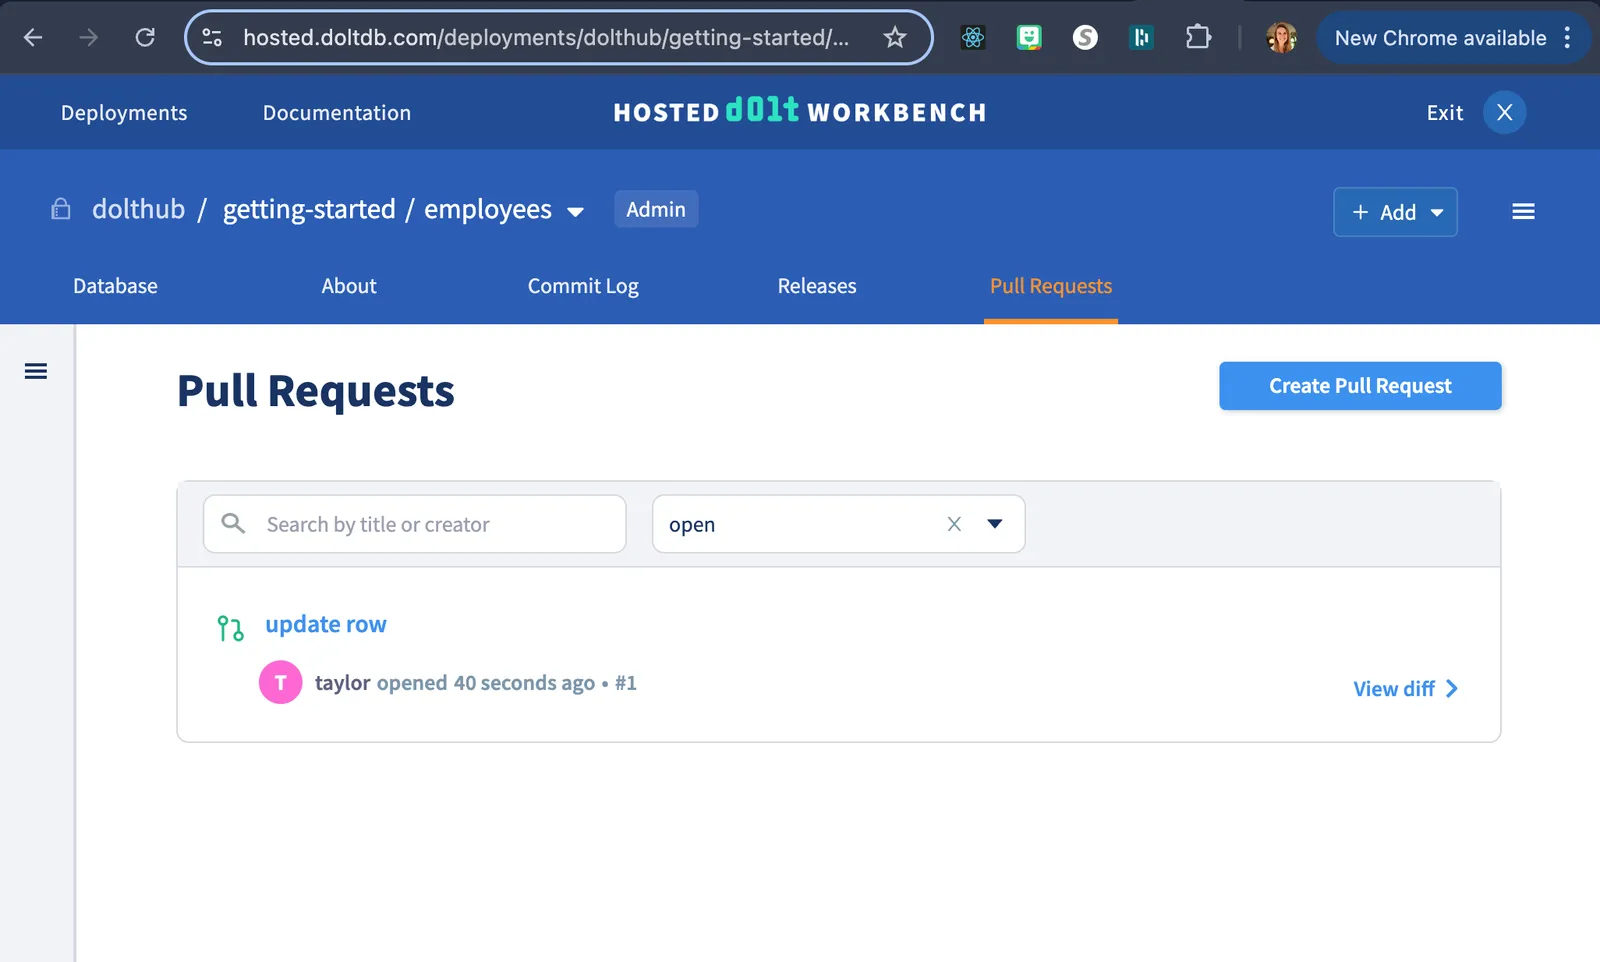
We will be able to see this pull request in the SQL workbench.

Next we want to view the contents of our pull request. We will use the pull query to get the pull state and branch names.
const body = JSON.stringify({
  query: `query($deploymentName: String!, $databaseName: String!, $ownerName: String!, $pullId: String!) {
    pull(
      deploymentName: $deploymentName,
      databaseName: $databaseName,
      ownerName: $ownerName,
      pullId: $pullId
    ) {
      ownerName
      deploymentName
      databaseName
      state
      fromBranchName
      toBranchName
    }
  }`,
  variables: {
    ownerName: "dolthub",
    deploymentName: "getting-started",
    databaseName: "employees",
    pullId: "1",
  },
});
Which will return the pull information.
{
  data: {
    pull: {
      ownerName: 'dolthub',
      deploymentName: 'getting-started',
      databaseName: 'employees',
      state: 'Open',
      fromBranchName: 'update',
      toBranchName: 'main'
    }
  }
}
We can learn more about what changed in the pull request by connecting to our Hosted database and using Dolt system tables and functions.
We copy the MySQL Connection String from the Database tab of the deployment page and use this in a function that connects to the database and executes a query.
async function queryDatabase(query) {
  let connection;
  try {
    connection = await mysql.createConnection({
      uri: "mysql://user:pass@dolthub-getting-started.dbs.hosted.doltdb.com/employees",
      ssl: {
        rejectUnauthorized: false,
      },
    });
    const [rows] = await connection.execute(query);
    return rows;
  } catch (error) {
    console.error("Database error:", error);
    throw error;
  } finally {
    if (connection) {
      await connection.end();
    }
  }
}
We can first look at the summary of changes between branches.
queryDatabase("SELECT * FROM dolt_diff_summary('main...update')")
  .then((results) => console.log(results))
  .catch((error) => console.error(error));
Which returns:
[
  {
    from_table_name: "salaries",
    to_table_name: "salaries",
    diff_type: "modified",
    data_change: 1,
    schema_change: 0,
  },
];
Then we can look deeper at what changed at a cellwise level in the salaries table using the dolt_diff table function.
queryDatabase("SELECT * FROM dolt_diff('main...update', 'salaries')")
  .then((results) => console.log(results))
  .catch((error) => console.error(error));
Which returns:
[
  {
    to_emp_no: 10001,
    to_salary: 61000,
    to_from_date: 1986-06-26T07:00:00.000Z,
    to_to_date: 1987-06-26T07:00:00.000Z,
    to_commit: 'update',
    to_commit_date: 2025-04-03T03:24:46.502Z,
    from_emp_no: 10001,
    from_salary: 60117,
    from_from_date: 1986-06-26T07:00:00.000Z,
    from_to_date: 1987-06-26T07:00:00.000Z,
    from_commit: 'a3p5ulod2rerno98191lhqnuhhfgppno',
    from_commit_date: 2023-11-28T07:28:41.854Z,
    diff_type: 'modified'
  }
]
You can see that one row was modified and the salary column for employee 10001 was updated from 60117 to 61000.
Once we have verified the changes look correct, we can use the mergePull mutation to merge the pull request.
const body = JSON.stringify({
  query: `mutation($deploymentName: String!, $ownerName: String!, $databaseName: String!, $pullId: String!) {
    mergePull(
      ownerName: $ownerName
      deploymentName: $deploymentName
      databaseName: $databaseName
      pullId: $pullId
    ) {
      pullId
    }
  }`,
  variables: {
    ownerName: "dolthub",
    deploymentName: "getting-started",
    databaseName: "employees",
    pullId: "1",
  },
});
And if you hit the pull query one more time you will see that the status will have been updated to Merged.
{
  data: {
    pull: {
      ownerName: 'dolthub',
      deploymentName: 'getting-started',
      databaseName: 'employees',
      state: 'Merged',
      fromBranchName: 'update',
      toBranchName: 'main'
    }
  }
}
You can also query for that row in the database to make sure it has the correct value.
queryDatabase("SELECT * FROM salaries AS OF 'main' WHERE emp_no=10001")
  .then((results) => console.log(results))
.catch((error) => console.error(error));Conclusion#
The hidden GraphQL API on Hosted Dolt can be useful for automating certain actions or workflows depending on your needs. It is not an official API so we would not recommend building production applications using this API, however we do plan on supporting a more official API (similar to DoltHub and DoltLab’s API) in the near future.
As always, feel free to reach out on Discord with any questions or use cases.
