
AI is all the rage right now, and if you’re like me, you’re probably looking for quick and easy ways to try out this new technology yourself. There are some great ways to get started using AI locally on your own machine; I’ve personally been using Ollama to test out different models locally for different use-cases.
But, if your local machine isn’t a Chad-box, you’ll likely need to use a cloud provider to provision a host with some GPU horsepower.

In today’s blog I’ll share some quick tips for provisioning a GPU host on AWS for your AI workloads.
TRIGGER WARNING: This is not a comprehensive guide for running AI workloads on AWS. I hadn’t even heard the word CUDA before I started getting deeper into the weeds of gpu deployment myself. This is primarily for beginners. My hope is that describing my own experience doing this can help you get going quickly.
Step 1: Decide on an instance type#
To start, you’ll need to choose an AWS instance type that has a GPU. There are multiple options here and I believe they’re contained under the Accelerated Computing instances section.
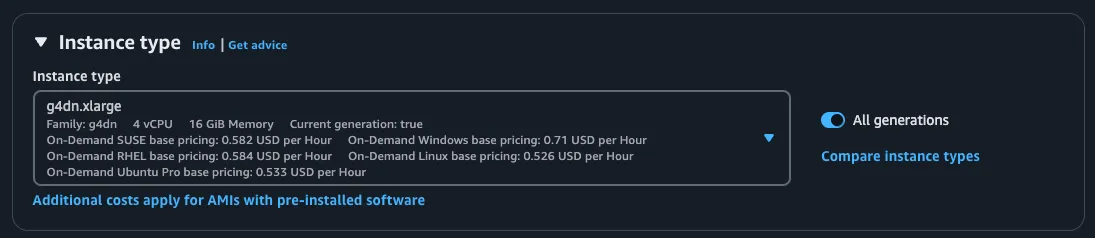
Now, when choosing an instance type, the two primary factors to consider are likely going to be the cost and the GPU power. Obviously, determining the right balance of cost and power will depend on your specific use-case and budget, but I tend to lean towards the cheapest options to start with. From what I can tell, the most cost effective instance type with GPU are the G4 instances, specifically the g4dn series.
Step 2: (Don’t) Install the GPU Drivers#
Here was the real gotcha for me. Initially, I assumed that simply choosing and launching the g4dn instance type would automatically enable me to use/access the GPU on the host, but this is not the case. In order to use the GPU, you’ll need to install the drivers.
Now, you can do this manually, but don’t 🤓. Instead, use an AWS-provided AMI that has the drivers already installed for the instance/GPU type you need. I didn’t know this was a thing until I was investigating why the Ollama server installed on my g4dn was not using the underlying GPU. Turns out the AMI I chose didn’t have the drivers installed.
For posterity, AWS creates AMI’s specifically for deep learning/AI workloads under the name Deep Learning AMIs. Definitely choose one of these when you’re preparing to launch your instance.
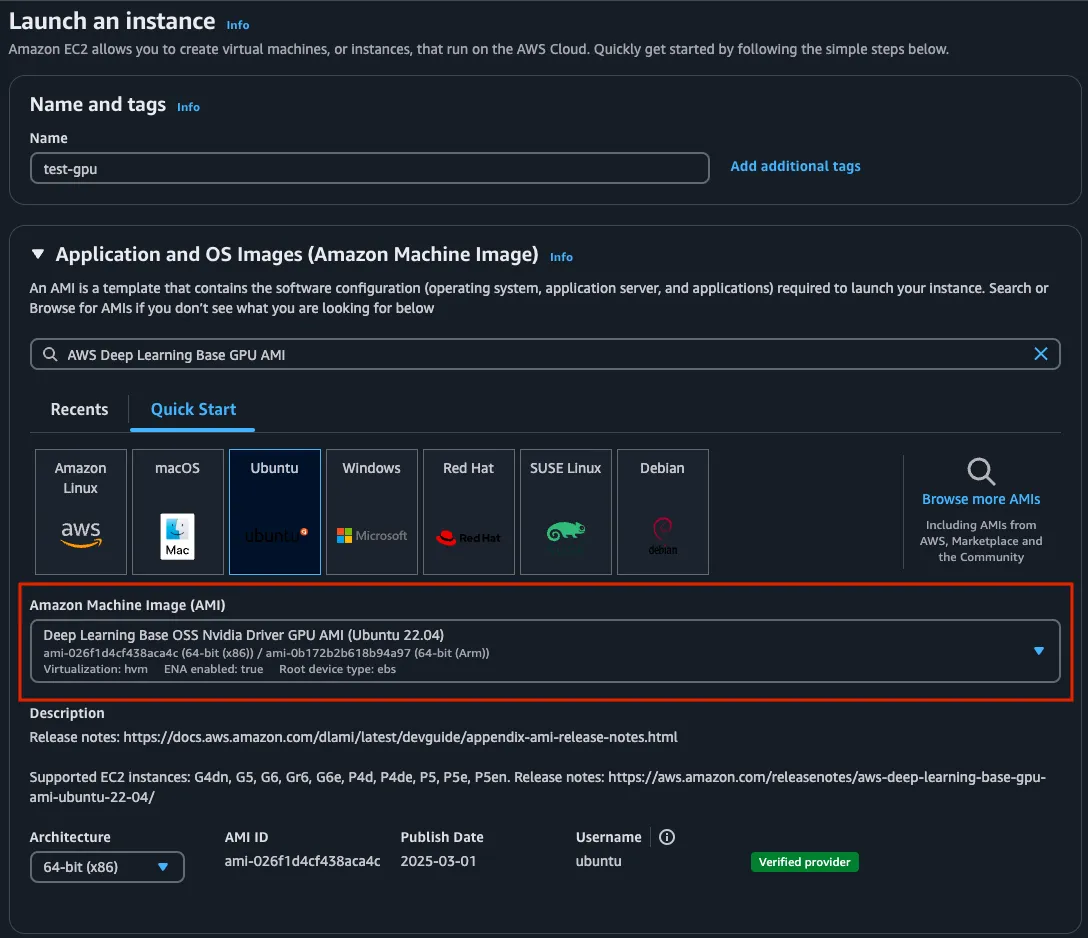
In the screenshot above, you can see that I’ve selected the Deep Learning Base for the NVIDIA GPU. Helpfully, AWS displays the supported instance types for the AMI just below the AMI selection dropdown, so you can confirm your instance type is supported by the AMI you’ve chosen.
Then, just make sure you’ve selected the correct instance in the instance selection dropdown.
Cool! You’re ready to launch your instance!
EKS Gotcha#
If you’re trying to deploy a GPU host to your AWS EKS cluster, you’ll need an AMI that has the EKS kubelet and the GPU drivers installed. Be sure to choose an EKS AMI image from their GitHub releases page. I’ve had success with the amazon-eks-gpu-node-* images in our EKS clusters.
Step 3: Verify you’re using the GPU#
Once your instance is running, you should have access to the GPU. To verify this, you can use the nvidia-smi command to check the status of the GPU.
:~$ nvidia-smi
Tue Mar 11 20:07:43 2025
+-----------------------------------------------------------------------------------------+
| NVIDIA-SMI 550.144.03             Driver Version: 550.144.03     CUDA Version: 12.4     |
|-----------------------------------------+------------------------+----------------------+
| GPU  Name                 Persistence-M | Bus-Id          Disp.A | Volatile Uncorr. ECC |
| Fan  Temp   Perf          Pwr:Usage/Cap |           Memory-Usage | GPU-Util  Compute M. |
|                                         |                        |               MIG M. |
|=========================================+========================+======================|
|   0  Tesla T4                       On  |   00000000:00:1E.0 Off |                    0 |
| N/A   23C    P8             11W /   70W |       3MiB /  15360MiB |      0%      Default |
|                                         |                        |                  N/A |
+-----------------------------------------+------------------------+----------------------+

+-----------------------------------------------------------------------------------------+
| Processes:                                                                              |
|  GPU   GI   CI        PID   Type   Process name                              GPU Memory |
|        ID   ID                                                               Usage      |
|=========================================================================================|
|  No running processes found                                                             |
+-----------------------------------------------------------------------------------------+
Additionally, if you run a service like Ollama, you should see information about the GPU being used in the service logs.
:~$ journalctl -u ollama.service
Mar 11 20:04:48 ip-10-3-0-123 systemd[1]: Started Ollama Service.
Mar 11 20:04:48 ip-10-3-0-123 ollama[1711]: Couldn't find '/usr/share/ollama/.ollama/id_ed25519'. Generating new private key.
Mar 11 20:04:48 ip-10-3-0-123 ollama[1711]: Your new public key is:
Mar 11 20:04:48 ip-10-3-0-123 ollama[1711]: ssh-ed25519 AAAAC3NzaC1lZDI1NTE5AAAAIBSaESETXvT99hok01D1sys3ceZTkZ5oa0dI9o/khHFH
Mar 11 20:04:48 ip-10-3-0-123 ollama[1711]: 2025/03/11 20:04:48 routes.go:1215: INFO server config env="map[CUDA_VISIBLE_DEVICES: GPU_DEVICE_ORDINAL: HIP_VISIBLE_DEVICES: HSA_OVERRIDE_GFX_VERSIO>
Mar 11 20:04:48 ip-10-3-0-123 ollama[1711]: time=2025-03-11T20:04:48.271Z level=INFO source=images.go:432 msg="total blobs: 0"
Mar 11 20:04:48 ip-10-3-0-123 ollama[1711]: time=2025-03-11T20:04:48.272Z level=INFO source=images.go:439 msg="total unused blobs removed: 0"
Mar 11 20:04:48 ip-10-3-0-123 ollama[1711]: time=2025-03-11T20:04:48.272Z level=INFO source=routes.go:1277 msg="Listening on 127.0.0.1:11434 (version 0.5.13)"
Mar 11 20:04:48 ip-10-3-0-123 ollama[1711]: time=2025-03-11T20:04:48.272Z level=INFO source=gpu.go:217 msg="looking for compatible GPUs"
Mar 11 20:04:50 ip-10-3-0-123 ollama[1711]: time=2025-03-11T20:04:50.688Z level=INFO source=types.go:130 msg="inference compute" id=GPU-99c00ea6-39af-8d04-abdf-aa4efb67a7c2 library=cuda variant=
Not so fast!#
The above steps will work if you’re planning on accessing the GPU directly from the host’s OS environment, however, if you’re planning on accessing the GPU from a Docker container, you’ll need to note the following.
:~$ docker run ollama/ollama:latest
Unable to find image 'ollama/ollama:latest' locally
latest: Pulling from ollama/ollama
d9802f032d67: Pull complete
161508c220d5: Pull complete
5a0e2ab85a93: Pull complete
069c5bd57bd6: Pull complete
Digest: sha256:a79fc15cecf33ed3b05c09a28415db7291c85c4c9d5945f4597317ca02456532
Status: Downloaded newer image for ollama/ollama:latest
Couldn't find '/root/.ollama/id_ed25519'. Generating new private key.
Your new public key is:

ssh-ed25519 AAAAC3NzaC1lZDI1NTE5AAAAIFMYng4jJD1i18yEEqlIYEXk7td7jQKwAW5z43FXtRDg

2025/03/11 20:11:25 routes.go:1215: INFO server config env="map[CUDA_VISIBLE_DEVICES: GPU_DEVICE_ORDINAL: HIP_VISIBLE_DEVICES: HSA_OVERRIDE_GFX_VERSION: HTTPS_PROXY: HTTP_PROXY: NO_PROXY: OLLAMA_CONTEXT_LENGTH:2048 OLLAMA_DEBUG:false OLLAMA_FLASH_ATTENTION:false OLLAMA_GPU_OVERHEAD:0 OLLAMA_HOST:http://0.0.0.0:11434 OLLAMA_INTEL_GPU:false OLLAMA_KEEP_ALIVE:5m0s OLLAMA_KV_CACHE_TYPE: OLLAMA_LLM_LIBRARY: OLLAMA_LOAD_TIMEOUT:5m0s OLLAMA_MAX_LOADED_MODELS:0 OLLAMA_MAX_QUEUE:512 OLLAMA_MODELS:/root/.ollama/models OLLAMA_MULTIUSER_CACHE:false OLLAMA_NEW_ENGINE:false OLLAMA_NOHISTORY:false OLLAMA_NOPRUNE:false OLLAMA_NUM_PARALLEL:0 OLLAMA_ORIGINS:[http://localhost https://localhost http://localhost:* https://localhost:* http://127.0.0.1 https://127.0.0.1 http://127.0.0.1:* https://127.0.0.1:* http://0.0.0.0 https://0.0.0.0 http://0.0.0.0:* https://0.0.0.0:* app://* file://* tauri://* vscode-webview://* vscode-file://*] OLLAMA_SCHED_SPREAD:false ROCR_VISIBLE_DEVICES: http_proxy: https_proxy: no_proxy:]"
time=2025-03-11T20:11:25.200Z level=INFO source=images.go:432 msg="total blobs: 0"
time=2025-03-11T20:11:25.200Z level=INFO source=images.go:439 msg="total unused blobs removed: 0"
time=2025-03-11T20:11:25.200Z level=INFO source=routes.go:1277 msg="Listening on [::]:11434 (version 0.5.13)"
time=2025-03-11T20:11:25.200Z level=INFO source=gpu.go:217 msg="looking for compatible GPUs"
time=2025-03-11T20:11:25.203Z level=INFO source=gpu.go:377 msg="no compatible GPUs were discovered"
time=2025-03-11T20:11:25.203Z level=INFO source=types.go:130 msg="inference compute" id=0 library=cpu variant="" compute="" driver=0.0 name="" total="15.4 GiB" available="14.4 GiB"
As you can see, the containerized Ollama server running on this same host can only use the CPU and not the GPU, as indicated by the log line “no compatible GPUs were discovered”. This is because the container is not able to access the GPU on the host by default.
To fix this, you’ll need to run your container with the --gpus flag.
:~$ docker run --gpus=all ollama/ollama:latest
Couldn't find '/root/.ollama/id_ed25519'. Generating new private key.
Your new public key is:

ssh-ed25519 AAAAC3NzaC1lZDI1NTE5AAAAIFrBwN+XSwnUToS7GHgldhYMgKBr1ayyc0XMo5oGTe7o

2025/03/11 20:16:09 routes.go:1215: INFO server config env="map[CUDA_VISIBLE_DEVICES: GPU_DEVICE_ORDINAL: HIP_VISIBLE_DEVICES: HSA_OVERRIDE_GFX_VERSION: HTTPS_PROXY: HTTP_PROXY: NO_PROXY: OLLAMA_CONTEXT_LENGTH:2048 OLLAMA_DEBUG:false OLLAMA_FLASH_ATTENTION:false OLLAMA_GPU_OVERHEAD:0 OLLAMA_HOST:http://0.0.0.0:11434 OLLAMA_INTEL_GPU:false OLLAMA_KEEP_ALIVE:5m0s OLLAMA_KV_CACHE_TYPE: OLLAMA_LLM_LIBRARY: OLLAMA_LOAD_TIMEOUT:5m0s OLLAMA_MAX_LOADED_MODELS:0 OLLAMA_MAX_QUEUE:512 OLLAMA_MODELS:/root/.ollama/models OLLAMA_MULTIUSER_CACHE:false OLLAMA_NEW_ENGINE:false OLLAMA_NOHISTORY:false OLLAMA_NOPRUNE:false OLLAMA_NUM_PARALLEL:0 OLLAMA_ORIGINS:[http://localhost https://localhost http://localhost:* https://localhost:* http://127.0.0.1 https://127.0.0.1 http://127.0.0.1:* https://127.0.0.1:* http://0.0.0.0 https://0.0.0.0 http://0.0.0.0:* https://0.0.0.0:* app://* file://* tauri://* vscode-webview://* vscode-file://*] OLLAMA_SCHED_SPREAD:false ROCR_VISIBLE_DEVICES: http_proxy: https_proxy: no_proxy:]"
time=2025-03-11T20:16:09.700Z level=INFO source=images.go:432 msg="total blobs: 0"
time=2025-03-11T20:16:09.700Z level=INFO source=images.go:439 msg="total unused blobs removed: 0"
time=2025-03-11T20:16:09.701Z level=INFO source=routes.go:1277 msg="Listening on [::]:11434 (version 0.5.13)"
time=2025-03-11T20:16:09.701Z level=INFO source=gpu.go:217 msg="looking for compatible GPUs"
time=2025-03-11T20:16:09.959Z level=INFO source=types.go:130 msg="inference compute" id=GPU-99c00ea6-39af-8d04-abdf-aa4efb67a7c2 library=cuda variant=v12 compute=7.5 driver=12.4 name="Tesla T4" total="14.6 GiB" available="14.5 GiB"
Now, the containerized Ollama server is using the GPU on the host.
Conclusion#
Hopefully this short guide helps you get going without too much trouble. We are excited to continue working with these growing technologies and would love to chat with you if you have any suggestions or feedback, or just want to share your own experiences. Come by our Discord and give us a shout. Don’t forget to check out each of our cool products below:
- Dolt—it’s Git for data.
- Doltgres—it’s Dolt + PostgreSQL.
- DoltHub—it’s GitHub for data.
- DoltLab—it’s GitLab for data.
- Hosted Dolt—it’s RDS for Dolt databases.
- Dolt Workbench—it’s a SQL workbench for Dolt databases.