
When building desktop applications with Electron, the default title bar is functional but often limiting. It takes up valuable space and doesn’t always blend well with custom app designs. More importantly, it lacks flexibility—you can’t add interactive controls or modify its appearance easily. In the Dolt Workbench desktop application, we built a custom title bar that integrates directly into the app’s interface. In this blog post, I’ll walk you through how you can implement your own custom title bar in Electron with TypeScript and React.
Why Build a Custom Title bar?#

The default title bar in Electron is functional, but if you want a better user experience, a custom solution offers significant benefits:
-
Cohesive UI and Branding : Match the rest of your app’s UI and style guidelines.
-
Custom Controls: Add buttons, dropdowns, or other interactive elements that aren’t possible in a standard title bar.
The New Title Bar Design in Dolt Workbench#
On Windows, apps typically have a title bar that handles window controls (close, minimize, maximize) and a menu bar for app functionality. On macOS, apps often integrate functionality directly into the title bar, creating a more unified and compact design. We’ll focus on building a custom title bar for macOS apps in this post.
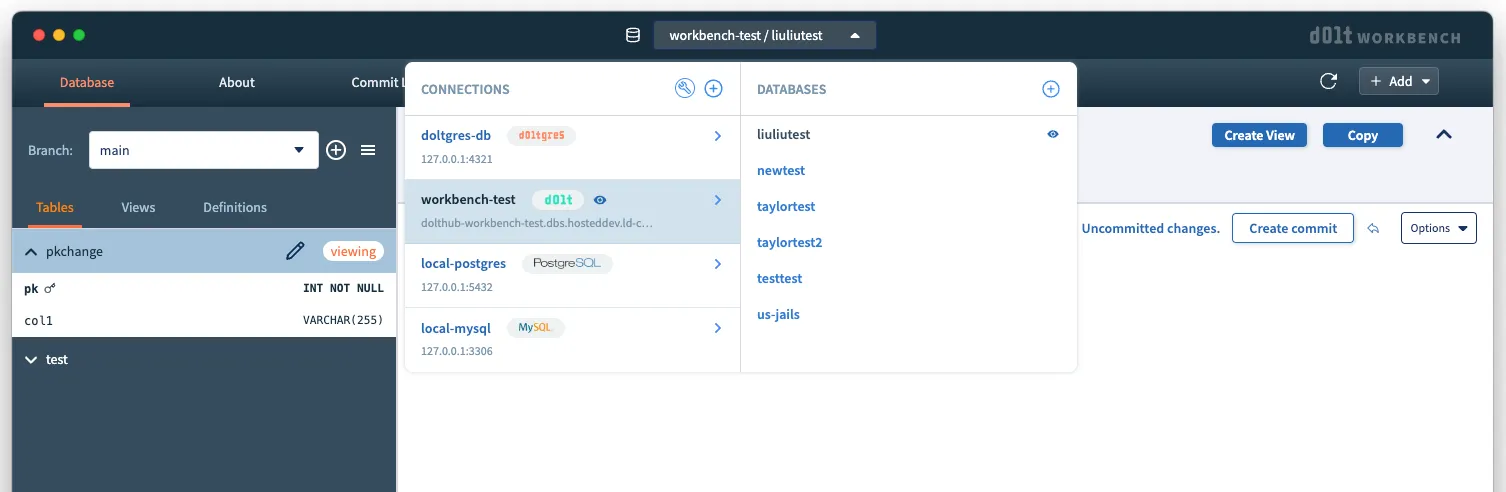
Our new title bar in Dolt Workbench features:
-
Switch Connections or Databases: Users can easily switch between different connections or databases directly from the title bar dropdown.
-
Manage and Add Connections: The title bar provides quick access to manage existing connections or add new ones, making it much easier for users to navigate and organize their connections.
This design improvement not only looks great but also enhances usability by putting essential features right where you need them.
Disable the Default Title bar#
To create a custom title bar, we first need to disable the default one, then the custom one can take its place. This is done by configuring the BrowserWindow in the main process with the titleBarStyle and titleBarOverlay options.
How do titleBarStyle and titleBarOverlay work?
By setting titleBarStyle to hiddenInset, it hides the default title bar while positioning the inset traffic lights (close, minimize, maximize buttons) appropriately. The titleBarOverlay option allows you to define a custom overlay for the title bar area. This overlay is essentially a transparent or semi-transparent region that sits on top of the window’s content but behaves like a native title bar, which still expects a draggable region at the top of the window for user interactions like moving, minimizing, or maximizing the window.
const HEADER_HEIGHT = 50;
const MACOS_TRAFFIC_LIGHTS_HEIGHT = 14;

const mainWindow = new BrowserWindow({
  width: 1400,
  height: 900,
  titleBarStyle: process.platform === "darwin" ? "hiddenInset" : undefined,
  titleBarOverlay:
    process.platform === "darwin" ? { height: HEADER_HEIGHT } : undefined,
  trafficLightPosition: {
    x: 20,
    y: HEADER_HEIGHT / 2 - MACOS_TRAFFIC_LIGHTS_HEIGHT / 2,
  },
  acceptFirstMouse: true,
  webPreferences: {
    preload: path.join(__dirname, "preload.js"),
  },
});
Create the Custom Title bar Component in React#
With the default title bar disabled, we can now create a custom title bar component in the renderer process. In our case, this component includes functionality for switching and managing connections and databases. Unlike a typical React component, we need to handle two specific events: double-click and drag.
Handling Double-Click Events#
One of the key features of a native macOS title bar is its response to double-click events. By default, double-clicking the title bar either minimizes or maximizes the window, depending on the user’s system preferences. To replicate this behavior in our custom title bar, we implemented a double-click handler that communicates between the renderer and main processes.
- Renderer Process: Detecting the Double-Clicks
In the React component for the custom title bar, we define a handleDoubleClick function that listens for double-click events:
const handleDoubleClick = (e: React.MouseEvent<HTMLDivElement>) => {
  if (e.currentTarget === e.target) {
    window.ipc.macTitlebarClicked();
  }
};

<div onDoubleClick={handleDoubleClick}>
  <Inner params={params} />
</div>-
e.currentTarget === e.targetensures the double-click event is only triggered when the user clicks directly on the title bar itself, not on any of its child elements. -
window.ipc.macTitlebarClicked()sends an IPC (Inter-Process Communication) message to the main process via the preload script.
- Preload Script: Exposing the IPC API
In the preload script (preload.ts), we expose a method called macTitlebarClicked to the renderer process:
contextBridge.exposeInMainWorld("ipc", {
  macTitlebarClicked() {
    ipcRenderer.send("mac-title-bar-clicked");
  },
});ipcRenderer.send("mac-title-bar-clicked")sends an IPC message to the main process with the channel name “mac-title-bar-clicked”.
- Main Process: Listening for the Message
In the main process (main.ts), we set up a listener for the “mac-title-bar-clicked” IPC message:
function setupTitleBarClickMac() {
  if (process.platform !== "darwin") {
    return;
  }

  ipcMain.on("mac-title-bar-clicked", (event: IpcMainEvent) => {
    const doubleClickAction = systemPreferences.getUserDefault(
      "AppleActionOnDoubleClick",
      "string"
    );
    const win = BrowserWindow.fromWebContents(event.sender);
    if (win) {
      if (doubleClickAction === "Minimize") {
        win.minimize();
      } else if (doubleClickAction === "Maximize") {
        if (!win.isMaximized()) {
          win.maximize();
        } else {
          win.unmaximize();
        }
      }
    }
  });
}-
systemPreferences.getUserDefault("AppleActionOnDoubleClick", "string"): Retrieves the user’s system preference for the double-click action on the title bar. This can be eitherMinimizeorMaximize. -
BrowserWindow.fromWebContents(event.sender): Gets theBrowserWindowinstance associated with the renderer process that sent the IPC message. -
win.maximize() / win.unmaximize(): Maximizes or restores the window if the user’s preference is set to “Maximize”.
Handling Drag Events#
We need to specify -webkit-app-region: drag in CSS to tell Electron which regions are draggable (like the standard title bar), and we can also use -webkit-app-region: no-drag to exclude the non-draggable area from the draggable region. The buttons and links shouldn’t be part of the window drag region, otherwise it would be impossible for users to click on them.
<div onDoubleClick={handleDoubleClick} className={css.drag}>
  <Inner params={params} />
</div>
.drag {
-webkit-app-region: drag;
a,
button {
-webkit-app-region: no-drag;
}
}By handling double-click and drag events, our custom title bar mimics native macOS behavior, enhancing usability while maintaining a consistent design.
Conclusion#
Building a custom title bar in Electron with TypeScript and React is a powerful way to enhance your app’s design and functionality. We hope this guide helps you create your own custom title bar. If you have questions or suggestions, join us on Discord, or file an issue on GitHub.