
We’re on a mission to show that Dolt works with all your favorite tools in all your favorite languages. Today we show you how to build a Dolt-backed desktop application with Flutter, an open source framework powered by Dart for building beautiful, natively compiled, multi-platform applications from a single codebase.

Getting started#
You can follow along with the code for our Dolt-backed example application here. Our desktop application will put Dolt behind the boilerplate Flutter counter app so that you can see firsthand how Dolt branches and pull requests can power collaboration and human review of data.
With Flutter#
Follow the installation guide to get up
and running with Flutter. You can choose to build any type of app, but this guide will use
a desktop application as an example. Once you verify the system
requirements,
install the Flutter
SDK,
and configure iOS
development,
running flutter docker in your terminal should give checks for your desired app type.
% flutter doctor

Running flutter doctor...
Doctor summary (to see all details, run flutter doctor -v):
[✓] Flutter (Channel stable, 3.24.3, on macOS 14.4.0 23E214 darwin-arm64, locale en)
[!] Android toolchain - develop for Android devices
[!] Chrome - develop for the web
[✓] Xcode - develop for iOS and macOS (Xcode 15)
[!] Android Studio (not installed)
[✓] VS Code (version 1.93)
[✓] Connected device (1 available)
[✓] Network resources


! Doctor found issues in 3 categories.
Next we use the VS Code Flutter extension to create a new project, but there are examples here for other IDEs.
We named ours dolt_flutter_example. When we run the
app, we select the
target device (macos - desktop) and get an app that looks like this:
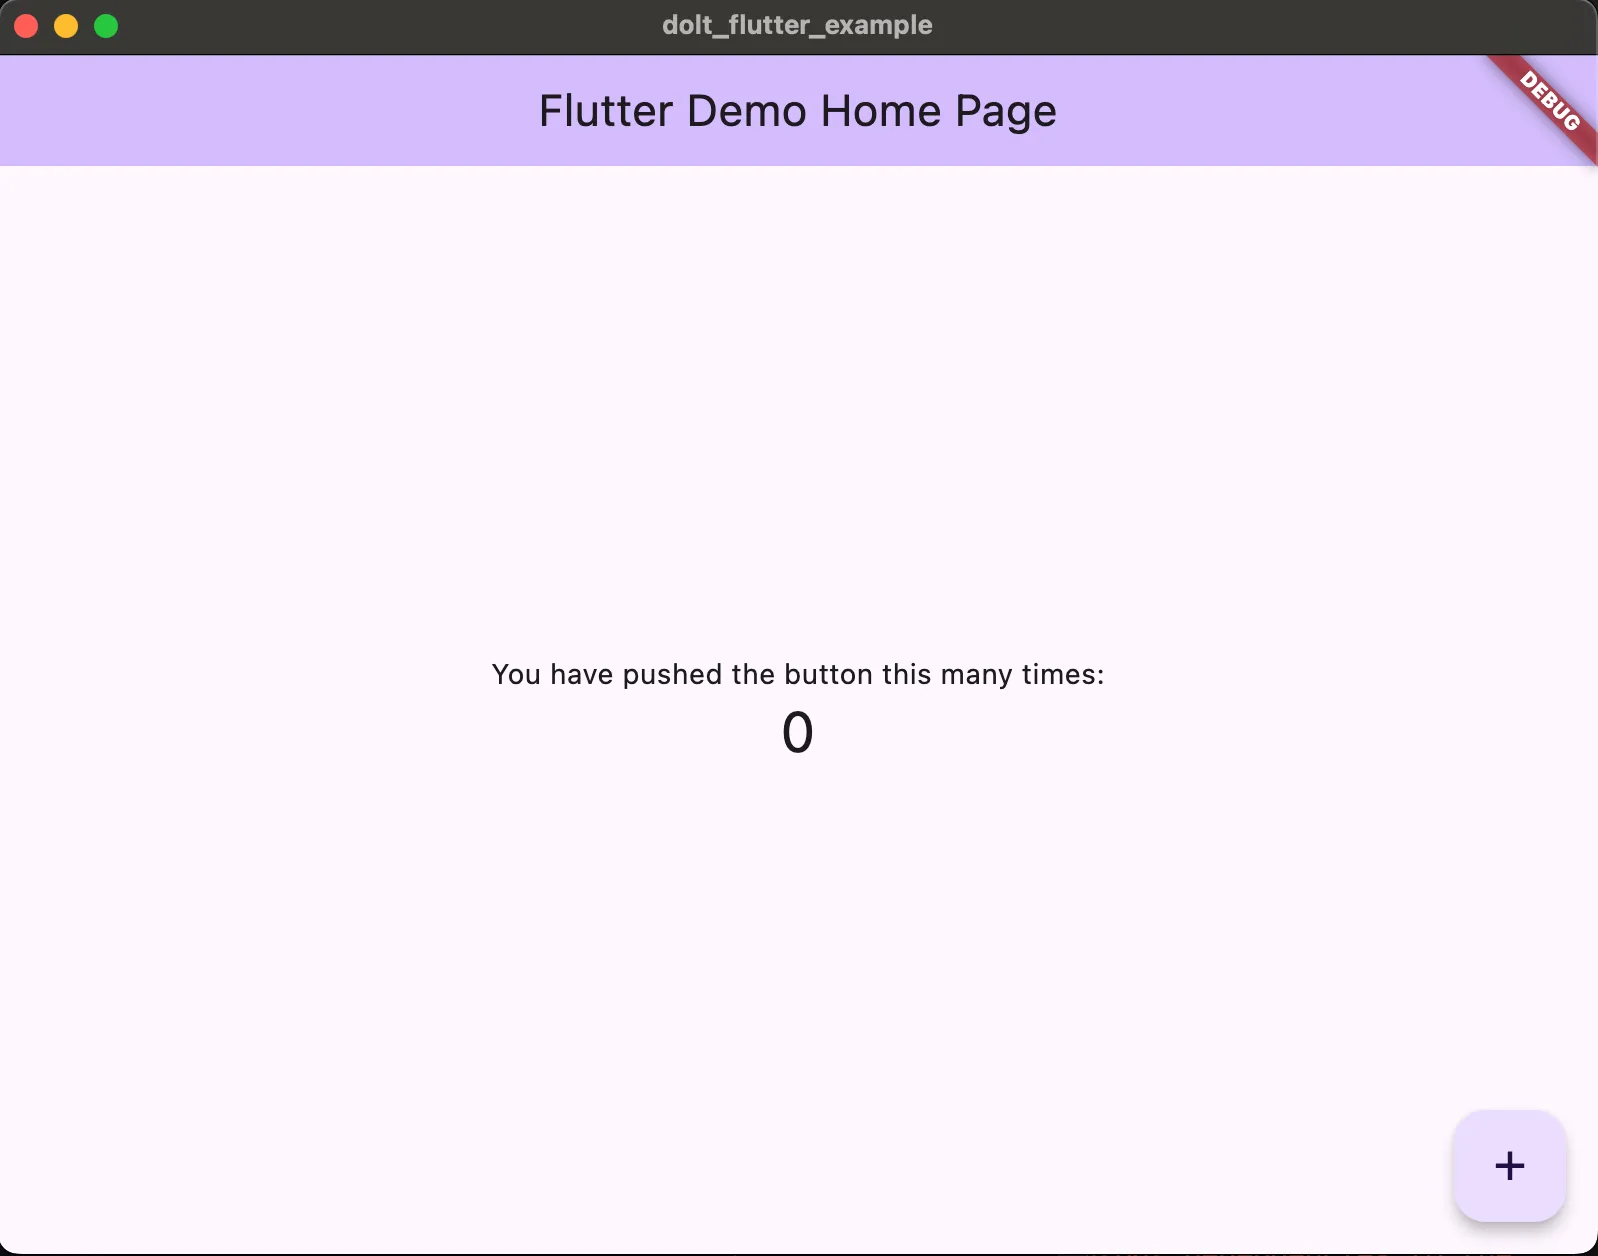
See that counter? We’re going to store that value in our Dolt database and make it branch-specific.
With Dolt#
We now need a Dolt SQL server that that Flutter app can connect to. There are two main ways to start a Dolt SQL server:
-
Create a cloud-deployed database on Hosted Dolt.
We’re going to use a Hosted Dolt database to connect our Flutter app to since this is likely what would be used in production use cases.
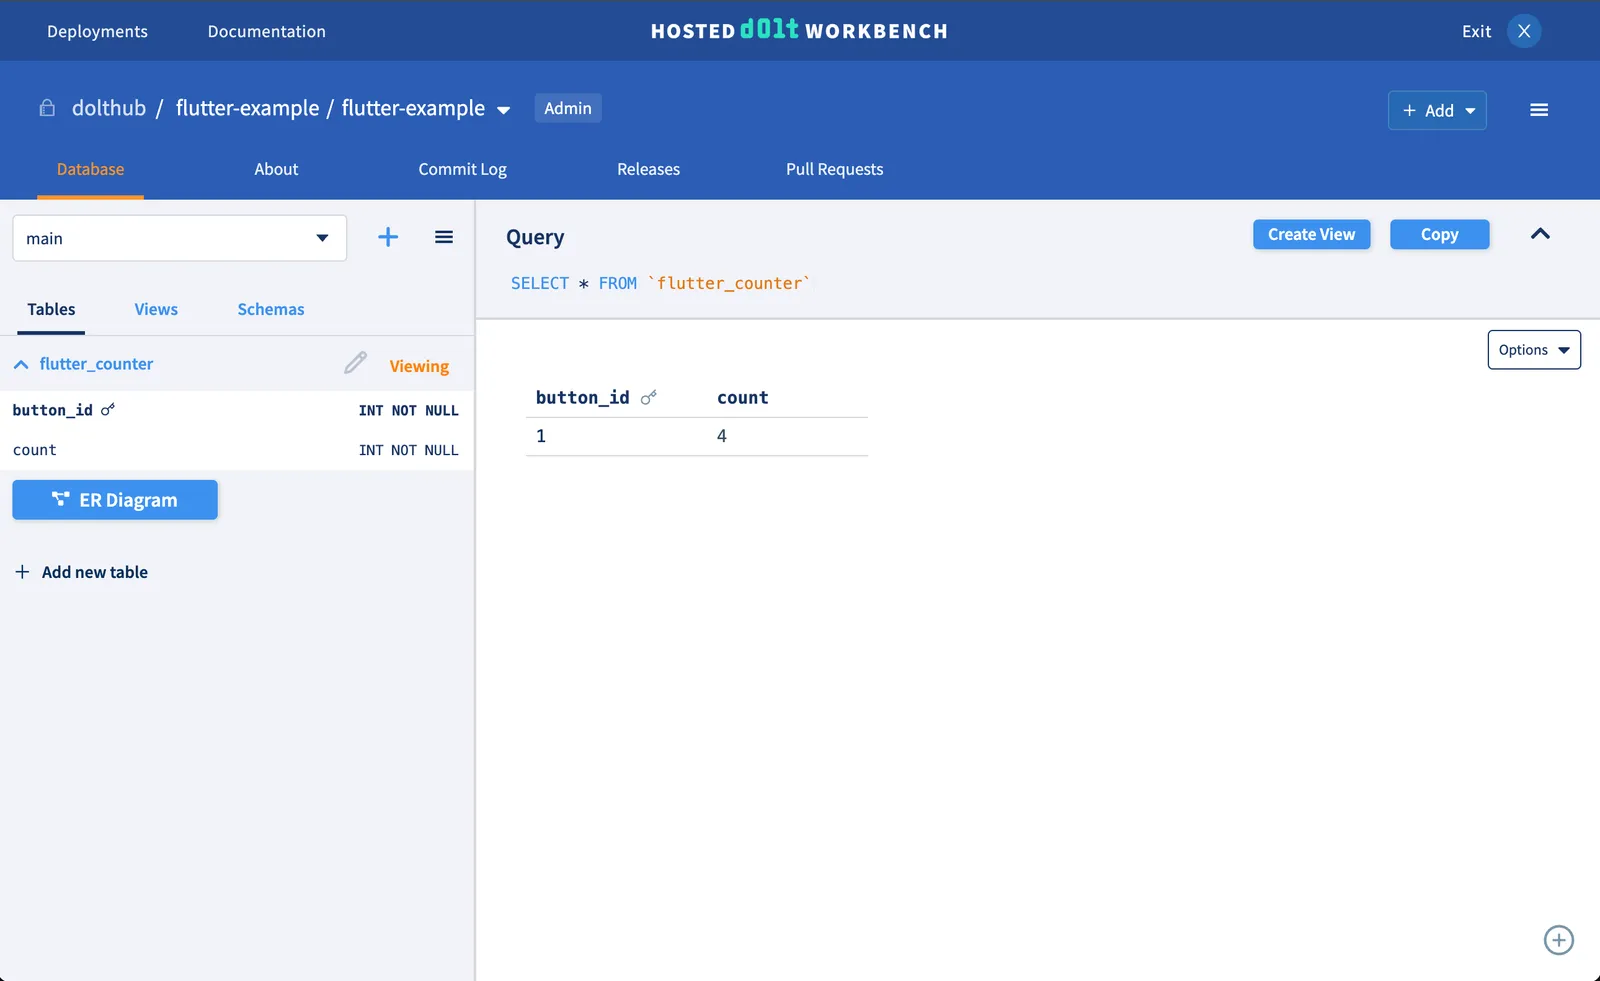
Follow this guide to create an account and deployment on hosted.doltdb.com. Once your deployment has started, you should see a page that looks like this:

We will use this connectivity information in our Flutter app.
Connecting the counter app to Dolt#
First, we need to connect our Flutter app to our database on Hosted Dolt using
mysql.dart. We’ll create a DatabaseHelper class
with some methods to interact with our database.
Since we don’t want our database information to be committed to the source code, we’ll use
flutter_dotenv to read our database
information from a source file.
First use the connectivity information in the Database tab of your deployment page to add
these environment variables to a .env file in root:
DB_HOST="dolthub-flutter-example.dbs.hosted.doltdb.com"
DB_PORT=3306
DB_USER="xxxxxxxxxxxxxxxxxxxxx"
DB_PASS="xxxxxxxxxxxxxxxxxxxxx"
DB_NAME="flutter-example"
Don’t forget to add the .env file to your assets bundle in pubspec.yaml and to your
.gitignore.
Then load the .env file in main.dart.
import 'package:flutter/material.dart';
import 'package:flutter_dotenv/flutter_dotenv.dart';

Future main() async {
  // To load the .env file contents into dotenv..
  await dotenv.load(fileName: ".env");

  runApp(const MyApp());
}
In a new database_helper.dart file we’ll start with methods that initialize a database
connection with the values from our .env and also close the connection.
// database_helper.dart
import 'package:mysql_client/mysql_client.dart';
import 'package:flutter_dotenv/flutter_dotenv.dart';

class DatabaseHelper {
  static final DatabaseHelper instance = DatabaseHelper._internal();
  static MySQLConnection? _conn;

  DatabaseHelper._internal();

  // Define a getter to access the database asynchronously.
  Future<MySQLConnection> get connection async {
    // If the database instance is already initialized, return it.
    if (_conn != null) {
      return _conn!;
    }

    // If the database instance is not initialized, call the initialization method.
    _conn = await _initConn();

    // Return the initialized database instance.
    return _conn!;
  }

  _initConn() async {
    final conn = await MySQLConnection.createConnection(
      host: dotenv.env['DB_HOST'],
      port: int.parse(dotenv.env['DB_PORT']!),
      userName: dotenv.env['DB_USER']!,
      password: dotenv.env['DB_PASS']!,
      databaseName: dotenv.env['DB_NAME']!,
    );

    await conn.connect();

    return conn;
  }

   Future close() async {
    final conn = await connection;
    conn.close();
  }
}
Next, we will need to add a table to store our count. We add methods to create our counter table on startup, and also to get and update our counter.
 // Run the CREATE TABLE statement on the database, executed after `conn.connect`
  _onCreate(MySQLConnection conn) async {
    await conn.execute("CREATE TABLE IF NOT EXISTS flutter_counter ("
        " button_id INTEGER PRIMARY KEY, "
        " count INTEGER NOT NULL"
        ")");
  }

  Future<int> getCounter(int buttonId) async {
    final conn = await connection;

    final result = await conn.execute(
        'SELECT count FROM flutter_counter WHERE button_id = $buttonId');

    if (result.rows.isNotEmpty) {
      final json = result.rows.first.assoc();
      return json["count"] as int;
    }

    return 0;
  }

  updateCounter(int buttonId) async {
   final conn = await connection;
    int oldCount = 0;

    final result = await conn.execute(
        'SELECT count FROM flutter_counter WHERE button_id = $buttonId');

    if (result.rows.isNotEmpty) {
      final json = result.rows.first.assoc();
      oldCount = json["count"] as int;
      await conn.execute(
          'UPDATE flutter_counter SET count = ${oldCount + 1} WHERE button_id = $buttonId');
    } else {
      await conn.execute(
          'INSERT INTO flutter_counter (button_id, count) VALUES ($buttonId, ${oldCount + 1})');
    }

    // We want to commit the counter update.
    await conn.execute(
        "CALL DOLT_COMMIT('-A', '-m', 'Increment counter to ${oldCount + 1}')");
  }
You’ll notice that we create a Dolt commit every time the counter is incremented.
Then we want to change our Flutter count widget to use our database methods to display and
update the count from the UI. We first need to update the _counter state in
_MyHomePageState with the value in our database when the page loads. We can do this
using initState.
class _MyHomePageState extends State<MyHomePage> {
  // Create an instance of the database helper
  DatabaseHelper db = DatabaseHelper.instance;
  int _counter = 0;
  final int _buttonId = 1;

  @override
  void initState() {
    _refreshCount();
    super.initState();
  }

  // Fetch and refresh the count from the database
  _refreshCount() {
    db.getCounter(_buttonId).then((value) {
      setState(() {
        _counter = value;
      });
    }).catchError((error) {
      handleError(context, error, 'fetch counter');
    });
  }

  @override
  Widget build(BuildContext context) {
    // rest of widget
  }
}
Next, we update _incrementCounter to use the update method we added to our database
helper.
  void _incrementCounter() {
    db.updateCounter(_buttonId).then((value) {
      _refreshCount();
    }).catchError((error) {
      handleError(context, error, 'increment counter');
    });
  }
When you run the app, you should see the counter increment as it was before. But you’ll
notice that the count column in your Dolt database has been updated after pressing the
button a few times.
And you have a commit for each counter update.

You now have a Flutter desktop application backed by a Dolt database!
Note: If you get a
Connection failed (OS Error: Operation not permitted, errno = 1)error after connecting to the database, you may need to set up entitlements. I was able to fix this by adding the following key-pair tomacos/Runner/DebugProfile.entitlementsand restarting the app.
<key>com.apple.security.network.client</key>
<true/>
Adding Dolt Branches#
We can now take this a step further by utilizing
branches to make isolated changes.
You’ll notice from the screenshot above that all our counter updates are being made on the
main branch.
I can use branches to test a data change without affecting the source data on the main
branch. Let’s say for example we want the counter to increment the count by 5 instead of 1.
I can create a new branch to isolate this data change. And then I can use a pull
request workflow to review the change and if satisfied merge into main.
First, we create a model and some methods to list and create Dolt
branches. We will base the model on
the dolt_branches system
table.
All the Git-like version control functionality available on the Dolt CLI is available in
the SQL server as well, exposed
as system tables, system variables, functions, and stored procedures.
// models/dolt_branch.dart
class BranchModel {
  String name;
  String hash;
  String latestCommitter;
  String latestCommitterEmail;
  String latestCommitMessage;
  String latestCommitDate;

  BranchModel({
    required this.name,
    required this.hash,
    required this.latestCommitter,
    required this.latestCommitterEmail,
    required this.latestCommitMessage,
    required this.latestCommitDate,
  });

  factory BranchModel.fromJson(Map<String, dynamic> json) {
    return BranchModel(
      name: json['name'],
      hash: json['hash'],
      latestCommitter: json['latest_committer'],
      latestCommitterEmail: json['latest_committer_email'],
      latestCommitMessage: json['latest_commit_message'],
      latestCommitDate: json['latest_commit_date'],
    );
  }
}
Then we’ll add methods to create and list branches, as well as a method to checkout the
selected branch, which we will call at the beginning of our getCounter and
updateCounter methods.
  Future<List<BranchModel>> getAllBranches() async {
    final conn = await connection;

    final result =
        await conn.execute('SELECT * FROM dolt_branches ORDER BY name ASC');

    return result.rows
        .map((json) => BranchModel.fromJson(json.assoc()))
        .toList();
  }

  Future<void> createBranch(String name, String fromName) async {
    final conn = await connection;
    await conn.execute('CALL DOLT_BRANCH("$name", "$fromName")');
  }

  Future<void> checkoutBranch(String branch) async {
    final conn = await connection;
    await conn.execute('CALL DOLT_CHECKOUT("$branch")');
  }
Notice that the dolt_branches system table is read-only and you must use the
dolt_branch()
procedure
to add branches.
Now back to the UI, which will show a dropdown menu with all the branches in the database
and a button to create a new branch. We want to load the branches when the page loads.
We’ll do this by creating state for _currentBranch and branches, which we populate in
the initState method.
  List<BranchModel> branches = [];
  String _currentBranch = "";

  @override
  void initState() {
    _refreshBranches(null);
    super.initState();
  }

  _refreshBranches(String? firstBranch) {
    db.getAllBranches().then((branchesRes) {
      if (branchesRes.isNotEmpty) {
        // targetBranch is either firstBranch, main if it exists, or first branch in list
        final targetBranch = branchesRes
            .firstWhere((b) => b.name == (firstBranch ?? "main"),
                orElse: () => branchesRes.first)
            .name;
        setState(() {
          branches = branchesRes;
          _currentBranch = targetBranch;
        });
        _refreshCount(targetBranch);
      }
    }).catchError((error) {
      handleError(context, error, 'fetch counter');
    });
  }
And then we add a row above our counter with a branch dropdown. This will set the
currentBranch and update the counter when a new branch is selected.
Row(
mainAxisAlignment: MainAxisAlignment.center,
children: [
const Padding(
padding: EdgeInsets.only(right: 20.0),
child: Text(
'Branch:',
),
),
DropdownMenu<String>(
textStyle: const TextStyle(fontSize: 14),
width: 250,
initialSelection: _currentBranch,
onSelected: (String? value) {
setState(() {
_currentBranch = value!;
});
_refreshCount(value!);
},
dropdownMenuEntries: branches
.map<DropdownMenuEntry<String>>((BranchModel value) {
return DropdownMenuEntry<String>(
value: value.name,
label: value.name,
);
}).toList(),
),
],
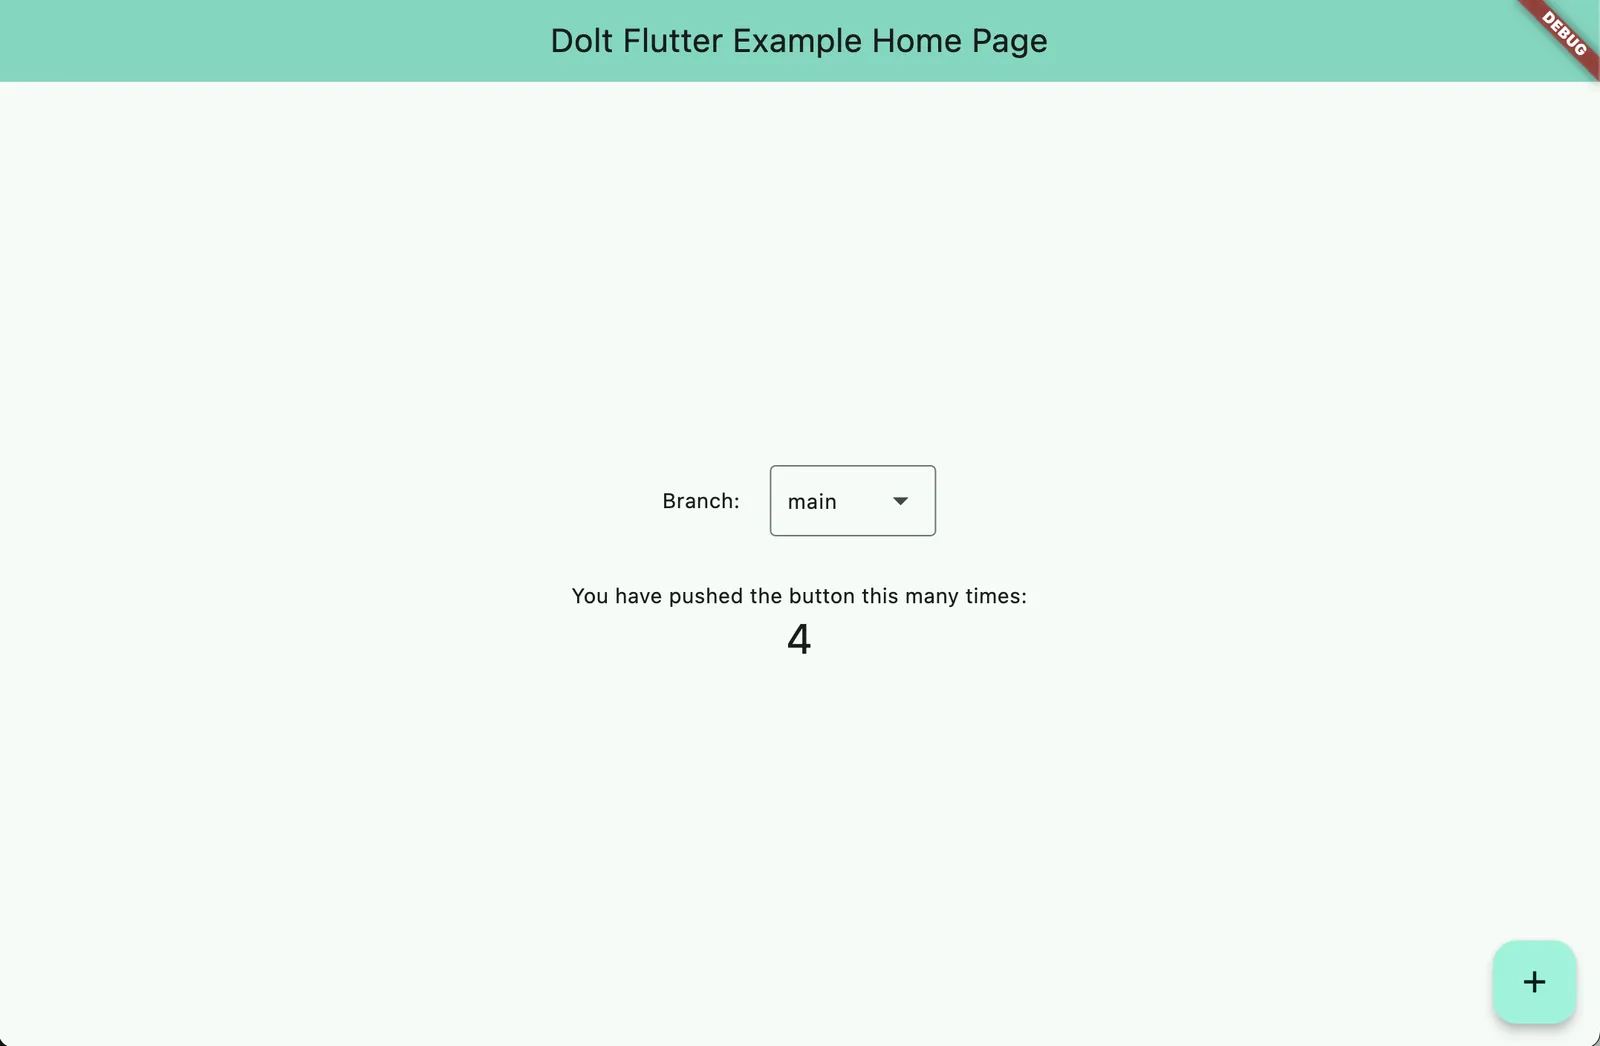
),We only have one branch (main) currently, and when you run the app it should look like
this:
Next, we want to add a button to create a new branch so we can test our counter increment change. This button will bring up a dialog with a form where you can provide the new branch name and from branch name.
First we add a button next to our branch dropdown.
IconButton(
  onPressed: _createBranchDialog,
  icon: const Icon(Icons.add),
  tooltip: "Create new branch",
),
Then we need to add some state to the top of our _MyHomePageState that will be used in
our create branch form.
  // State for create branch form
  final formKey = GlobalKey<FormState>();
  TextEditingController newBranchController = TextEditingController();
  TextEditingController fromBranchController = TextEditingController();
  bool isLoading = false;
And define our createBranchDialog method, which will show a dialog with the form.
  // Create a dialog with the new branch form
  _createBranchDialog({int? id}) async {
    showDialog(
        context: context,
        builder: (context) {
          return AlertDialog(
            title: const Text('Create a new branch'),
            content: SingleChildScrollView(
              child: ListBody(
                children: <Widget>[
                  const Text('Creates a new branch from an existing branch.'),
                  Form(
                      key: formKey,
                      child: Container(
                        padding: const EdgeInsets.all(30),
                        child: Column(
                          children: [
                            TextFormField(
                              controller: newBranchController,
                              decoration: const InputDecoration(
                                labelText: 'New Branch Name',
                              ),
                              validator: _validateBranch,
                            ),
                            const SizedBox(
                              height: 20,
                            ),
                            TextFormField(
                              controller: fromBranchController,
                              decoration: const InputDecoration(
                                labelText: 'From Branch Name',
                              ),
                              validator: _validateBranch,
                            ),
                          ],
                        ),
                      ))
                ],
              ),
            ),
            actions: [
              ElevatedButton(
                style: ButtonStyle(
                    backgroundColor: WidgetStateProperty.all(
                        const Color.fromARGB(255, 193, 223, 255))),
                onPressed: _createBranch,
                child: const Text('Create Branch'),
              ),
              ElevatedButton(
                onPressed: () => Navigator.pop(context),
                child: const Text('Cancel'),
              ),
            ],
          );
        });
  }
Now when you click on the create branch button in the lower right hand corner, you should see a dialog pop up that looks like this.

Lastly, we need to define a createBranch method, which will use our database helper to
create a branch in our Dolt database and handle any errors that occur.
// Create a new branch in the database
_createBranch() async {
setState(() {
isLoading = true;
});
if (formKey.currentState != null && formKey.currentState!.validate()) {
formKey.currentState?.save();
db
.createBranch(newBranchController.text, fromBranchController.text)
.then((respond) async {
handleSuccess("Branch added");
Navigator.pop(context, {
'reload': true,
});
_refreshBranches();
}).catchError((error) {
handleError(error, "create branch");
});
}
setState(() {
isLoading = false;
});
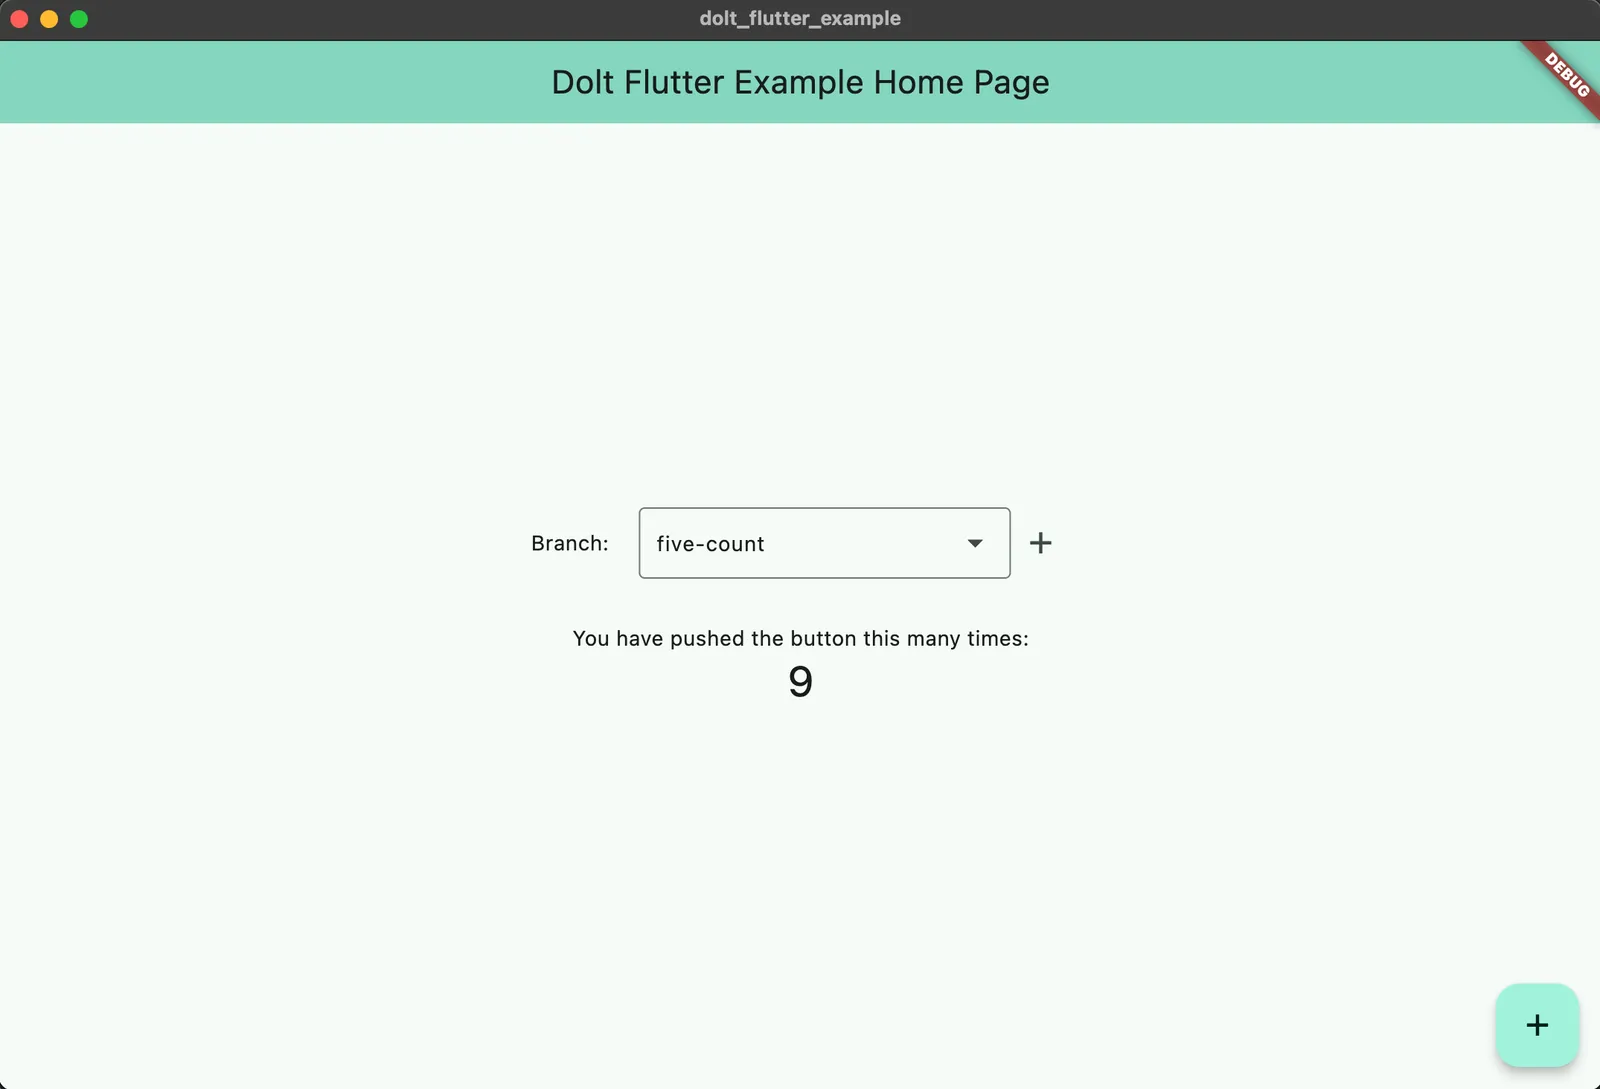
}Now we will add a new branch named five-count and update our updateCounter method in
database helper to add 5 to the counter instead of 1. When you click to increment the
counter you should now see 9.
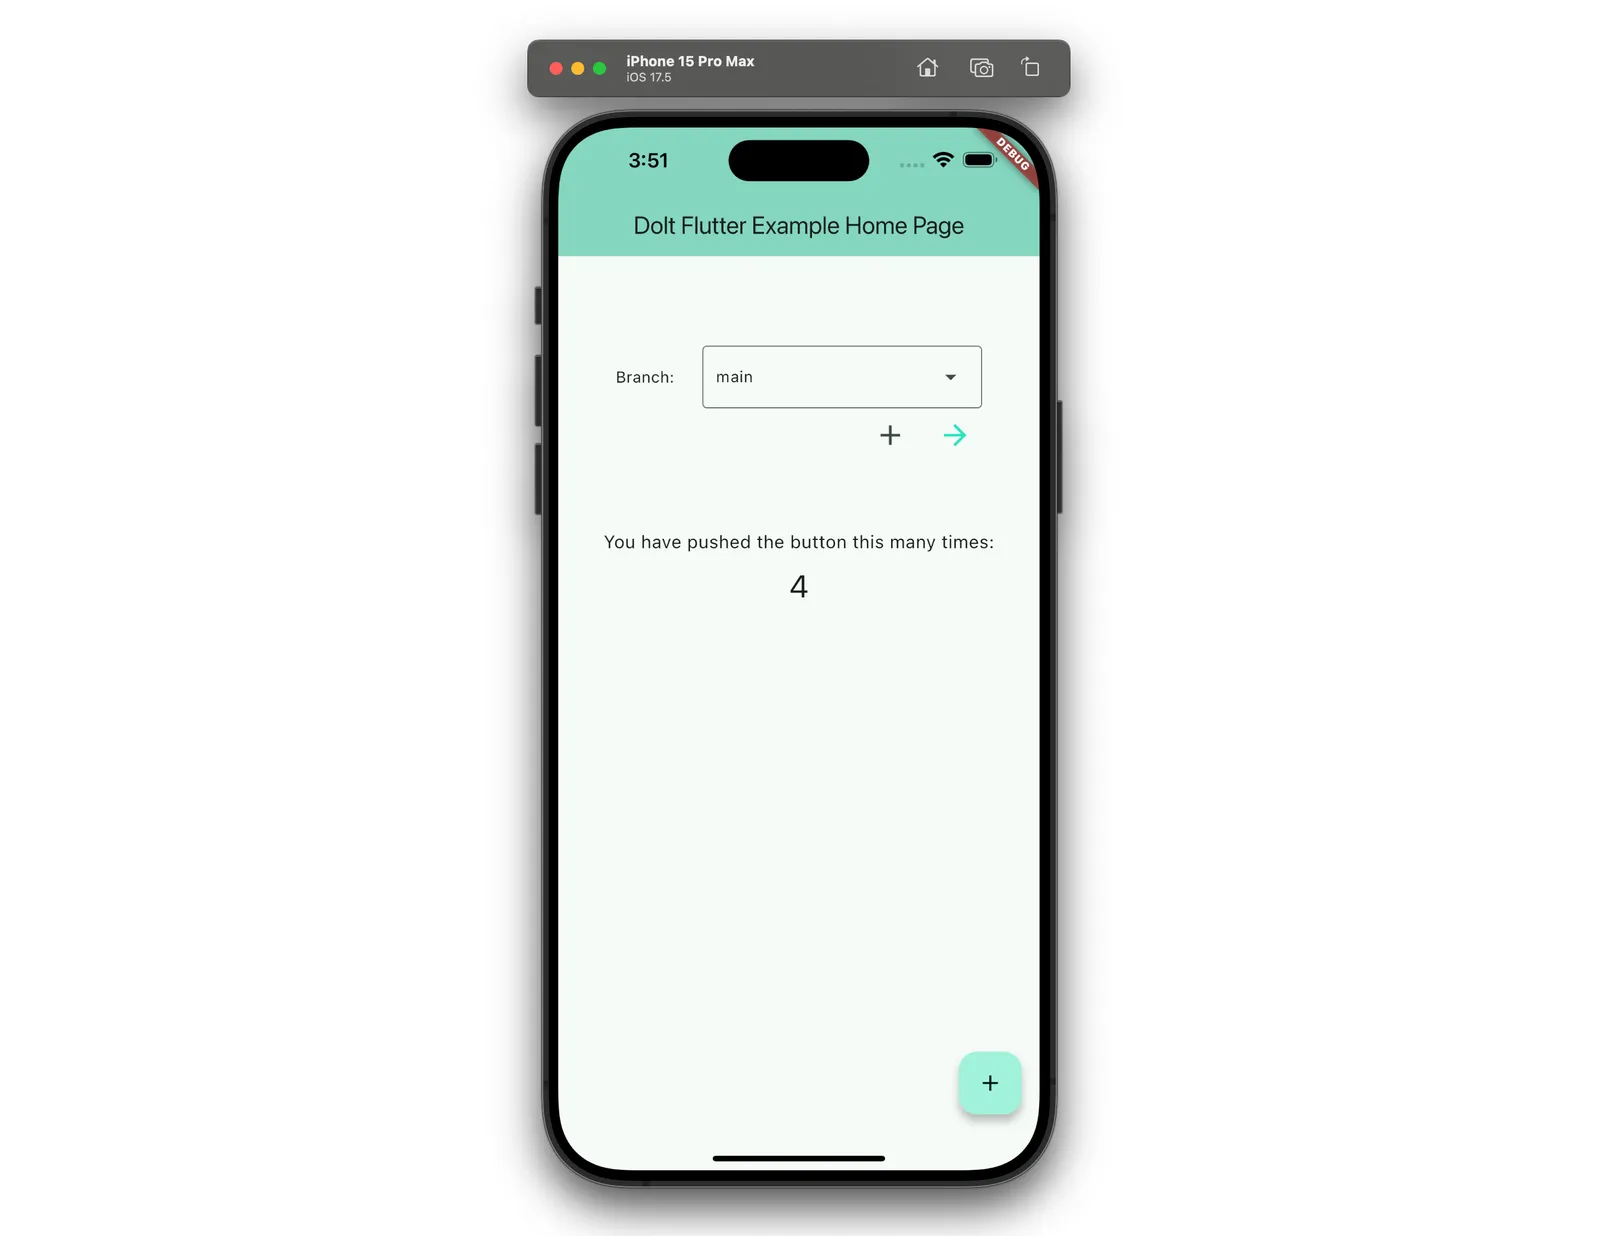
If I change the branch back to main, the counter will change back to 4.
Simulating a simple pull request workflow#
Now that you have successfully created a data change on a new branch, we will go through what a very simplified pull request workflow could look like. Pull requests are a a way to propose changes to a database that enable greater collaboration and improved human review of data. They are part of what make Dolt a popular choice for version controlled database use cases.
Our simplified pull request will show commits between two selected branches using two dot log, as well as a merge button that will merge the “pull request”.
First, add methods to your database helper that will get the pull request logs and merge
the branches (note that we also created a LogModel based on the dolt_log table
function).
// database_helper.dart
  Future<List<LogModel>> getPullLogs(String fromBranch, String toBranch) async {
    final conn = await connection;
    final result =
        await conn.execute('SELECT * FROM DOLT_LOG("$toBranch..$fromBranch")');
    return result.rows.map((json) => LogModel.fromJson(json.assoc())).toList();
  }

  Future<void> mergeBranches(String fromBranch, String toBranch) async {
    final conn = await connection;
    await conn.execute('CALL DOLT_CHECKOUT("$toBranch")');
    await conn.execute('CALL DOLT_MERGE("$fromBranch")');
  }
We will create a new view for our pull request UI instead of showing it on the same home page. To do so, we’ll add a button next to the branch dropdown that will navigate to the new view and set the current branch as the “from branch”.
  IconButton(
    onPressed: () => _goToPullView(_currentBranch),
    icon: const Icon(Icons.arrow_forward,
        color: Color.fromARGB(255, 41, 227, 193)),
    tooltip: "View pull request",
  ),
Implement a goToPullView method that navigates to a PullView (which we will build
next), passing down the current branch and list of branches.
  // Navigate to the PullView screen and refresh branches afterward
  _goToPullView(String fromBranch) async {
    await Navigator.push(
      context,
      MaterialPageRoute(
          builder: (context) =>
              PullView(fromBranch: fromBranch, branches: branches)),
    );
    _refreshBranches(fromBranch);
  }
Next, we will create a new file pull.dart for our PullView. We’ll initialize some
state we will need for our branch dropdown, which will let us change the base branch for
our pull request.
// pull.dart
import 'package:dolt_flutter_example/models/dolt_log.dart';
import 'package:flutter/material.dart';
import 'package:dolt_flutter_example/database_helper.dart';
import 'package:dolt_flutter_example/models/dolt_branch.dart';

class PullView extends StatefulWidget {
  const PullView({super.key, required this.fromBranch, required this.branches});

  final List<BranchModel> branches;
  final String fromBranch;

  @override
  State<PullView> createState() => _PullViewState();
}

class _PullViewState extends State<PullView> {
  // Create an instance of the database helper
  DatabaseHelper db = DatabaseHelper.instance;
  String dropdownValue = "";
  List<LogModel> logs = [];

  @override
  void initState() {
    if (widget.branches.isNotEmpty) {
      setState(() {
        // dropdownValue is either main if it exists or first branch in list
        dropdownValue = widget.branches
            .firstWhere((branch) => branch.name == "main",
                orElse: () => widget.branches.first)
            .name;
      });
      super.initState();
    }
  }

  @override
  Widget build(BuildContext context) {
    return Scaffold(
        appBar: AppBar(
          backgroundColor: Theme.of(context).colorScheme.inversePrimary,
          title: const Text("Dolt Pull Request Page"),
        ),
        body: Padding(
          padding: const EdgeInsets.all(20.0),
          child: Column(
            mainAxisAlignment: MainAxisAlignment.start,
            children: <Widget>[
              const Text(
                'Choose branches to view the pull request',
              ),
            ],
          ),
       ),
    ),
  }
}
Next we want to use the branches list to populate our base branch dropdown, similar to
the home page. We already set our dropdownValue to either “main” if it exists or the
first branch. Now we will add a Row with the from branch name and base branch dropdown
to the children array above.
Row(
  mainAxisAlignment: MainAxisAlignment.center,
  children: [
    const Padding(
      padding: EdgeInsets.only(right: 20.0),
      child: Text(
        'Base branch:',
      ),
    ),
    DropdownMenu<String>(
      textStyle: const TextStyle(fontSize: 14),
      initialSelection: dropdownValue,
      onSelected: (String? value) {
        setState(() {
          dropdownValue = value!;
        });
        _getLogs(value);
      },
      dropdownMenuEntries: widget.branches
          .map<DropdownMenuEntry<String>>((BranchModel value) {
        return DropdownMenuEntry<String>(
          value: value.name,
          label: value.name,
        );
      }).toList(),
    ),
    const Padding(
      padding: EdgeInsets.only(right: 40.0, left: 40.0),
      child: Icon(
        Icons.arrow_back,
      ),
    ),
    const Padding(
      padding: EdgeInsets.only(right: 20.0),
      child: Text(
        'From branch:',
      ),
    ),
    Text(widget.fromBranch),
  ],
),
When the view loads or when the base branch changes, we want to get the pull request logs
and display them. Implement the getLogs method and add it to initState (it’s already
used in the dropdown above).
  _getLogs(String? toBranch) {
    if (toBranch == null) {
      return;
    }
    db.getPullLogs(widget.fromBranch, toBranch).then((value) {
      setState(() {
        logs = value;
      });
    }).catchError((error) {
      handleError(error, "get logs");
    });
  }
We create a card to display information about each commit in the pull request logs.
  // Helper method to build a log card
  Widget buildLogCard(LogModel log) {
    return Card(
      child: GestureDetector(
        onTap: () => {},
        child: ListTile(
          leading: const Icon(
            Icons.commit,
            color: Color.fromARGB(255, 28, 3, 15),
          ),
          title: Text(log.hash),
          subtitle: Container(
            child: Column(
              crossAxisAlignment: CrossAxisAlignment.start,
              children: [
                Text(log.message),
                Text("Committed at ${log.date} by ${log.committer}"),
              ],
            ),
          ),
        ),
      ),
    );
  }
And then we again add to the children array in our PullView.
Container(
child: logs.isEmpty
? const Text(
"No differences found between branches",
style: TextStyle(
fontWeight: FontWeight.normal,
fontSize: 14,
),
)
: Column(
crossAxisAlignment: CrossAxisAlignment.start,
children: [
const Text("Pull request logs:",
style: TextStyle(fontSize: 16)),
const SizedBox(
height: 10,
),
...logs.map((log) {
return buildLogCard(log);
}),
],
),
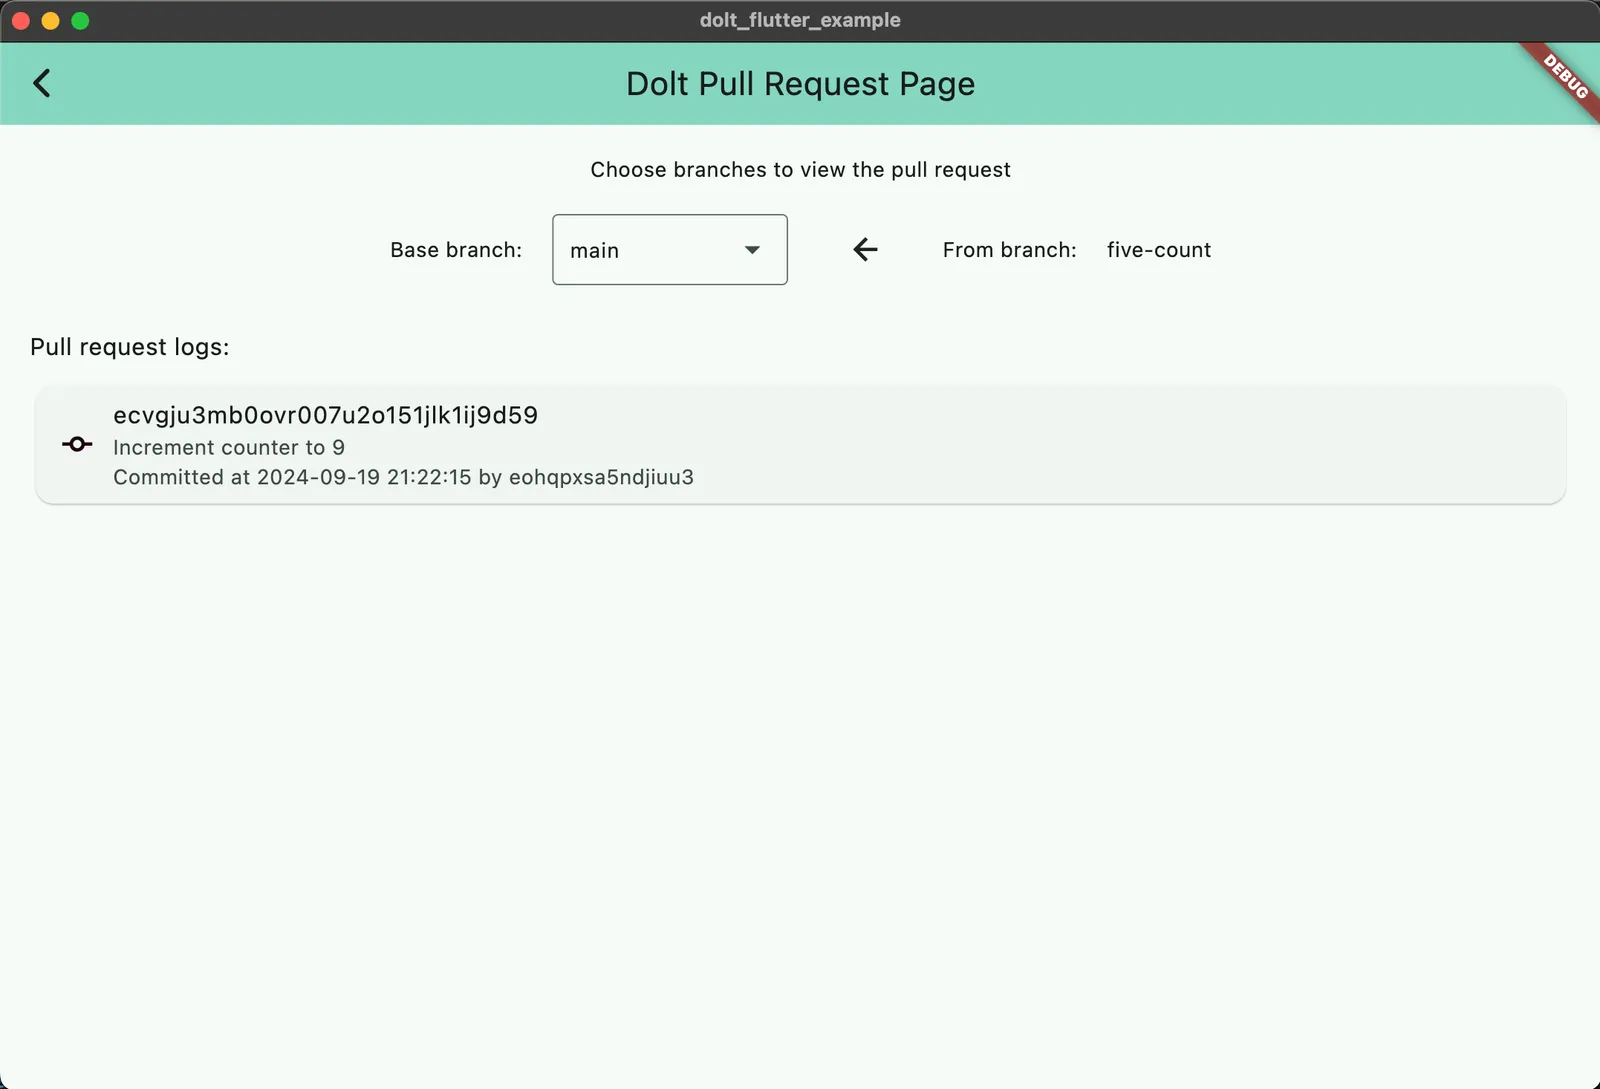
),Now when you click on the arrow with the five-count branch selected, you should see the
pull request view with the commit that updated our counter to 9.
Merge is one of Dolt’s most powerful version control features and no pull request workflow is complete without it. In fact, we think Dolt is the only database with true branch and merge.
We add a merge branch button above the pull request logs.
   ElevatedButton(
      style: ButtonStyle(
          backgroundColor: WidgetStateProperty.all(
              const Color.fromARGB(255, 193, 223, 255))),
      onPressed: _mergePull,
      child: const Text('Merge branch'),
    ),
And implement a mergePull method that merges the branches in the database.
  _mergePull() {
    db.mergeBranches(widget.fromBranch, dropdownValue).then((value) {
      handleSuccess("Pull request merged");
      // Route back to home page
      Navigator.pop(context);
    }).catchError((error) {
      handleError(error, "merge branches");
    });
  }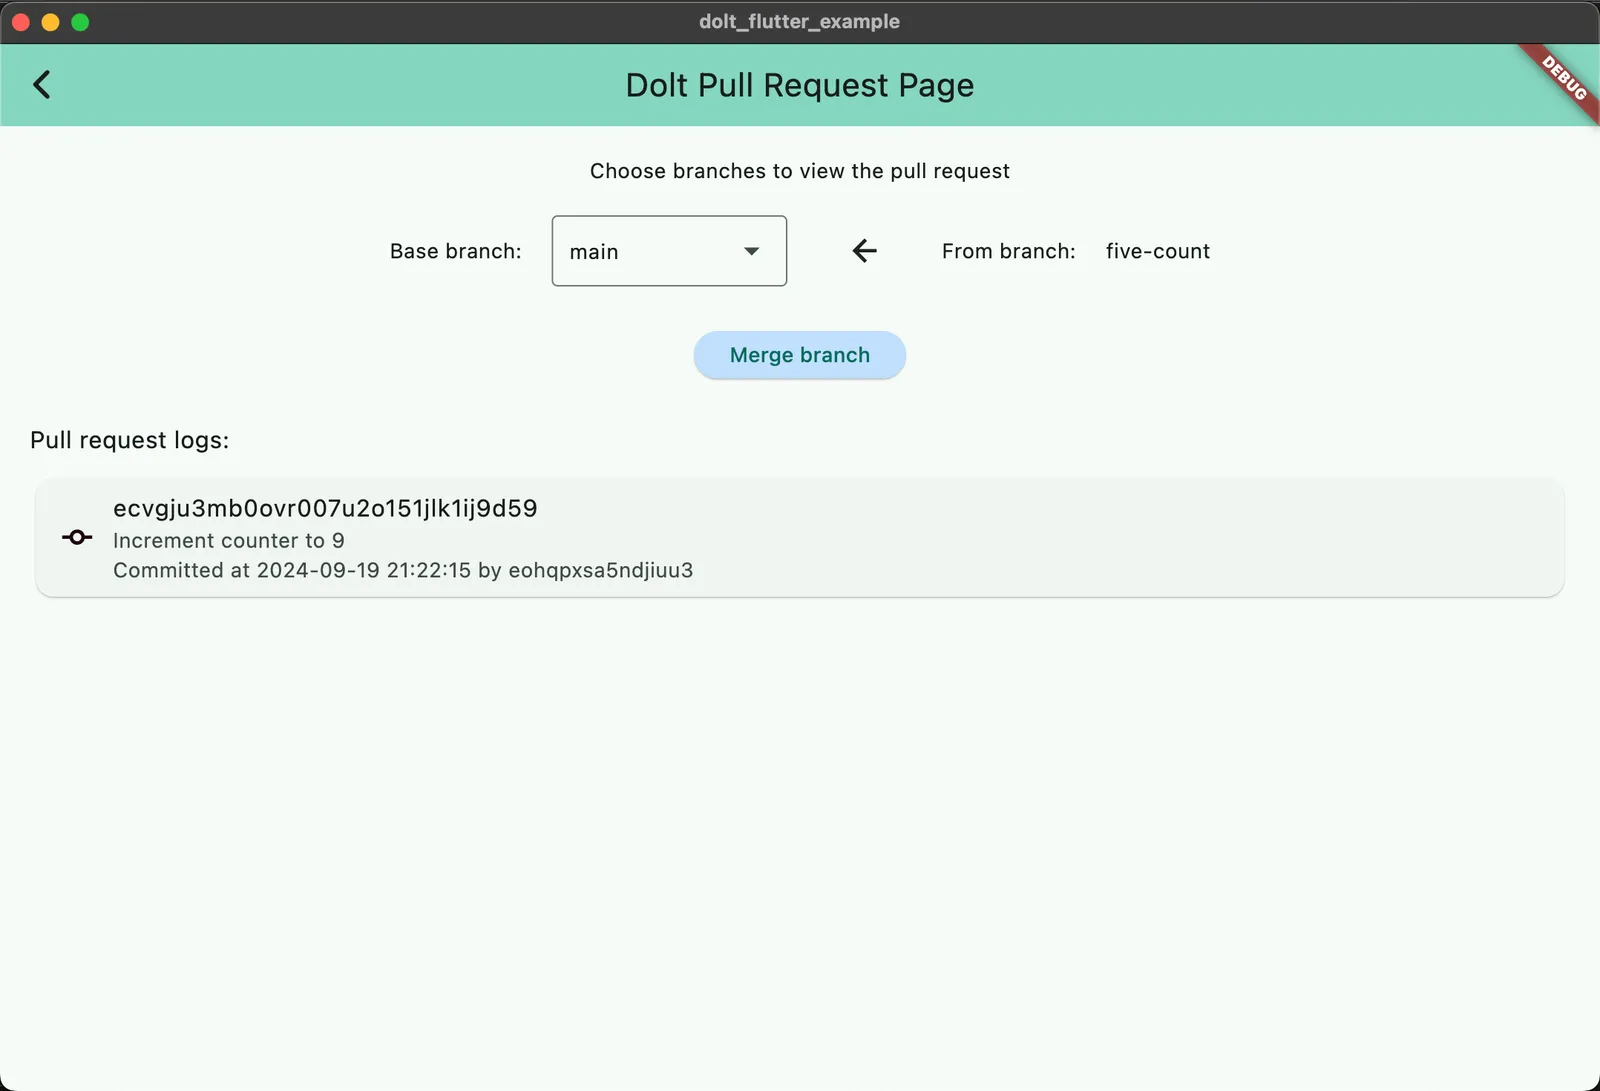
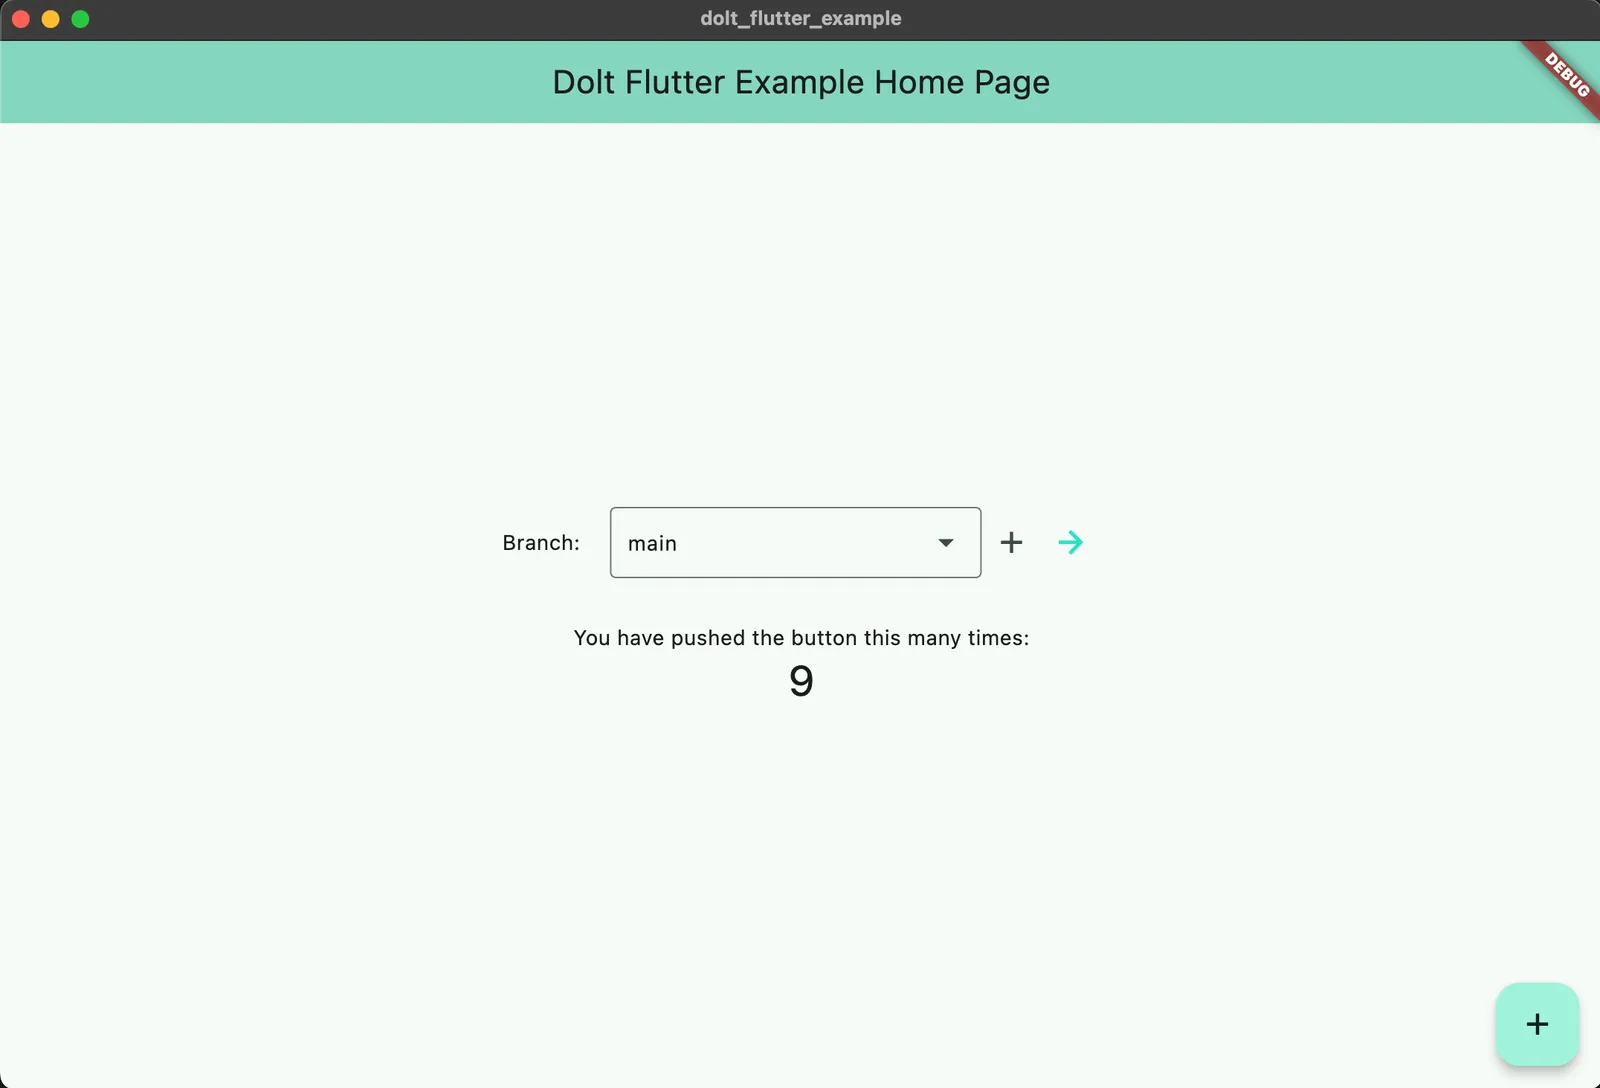
Now when you merge your changes to your new branch, you will see the counter on main
updated to 9.
This is a very simplified version of a pull request. You can implement data and/or schema diffs to see granular changes of data and schema before you merge. If you want a more concrete example for how to implement pull requests with diffs, check out this blog or our open-source Dolt Workbench.
Viewing our Dolt app on iOS#
Flutter is multi-platform, so we can also run our Dolt desktop application on iOS, Android, or the web. We decided that we also want to make an iOS app.
First, follow these installation
instructions. Make sure
when you run flutter doctor the Xcode - develop for iOS and macOS (Xcode 15) line is
checked.
Next, install and start the iOS Simulator.
% xcodebuild -downloadPlatform iOS
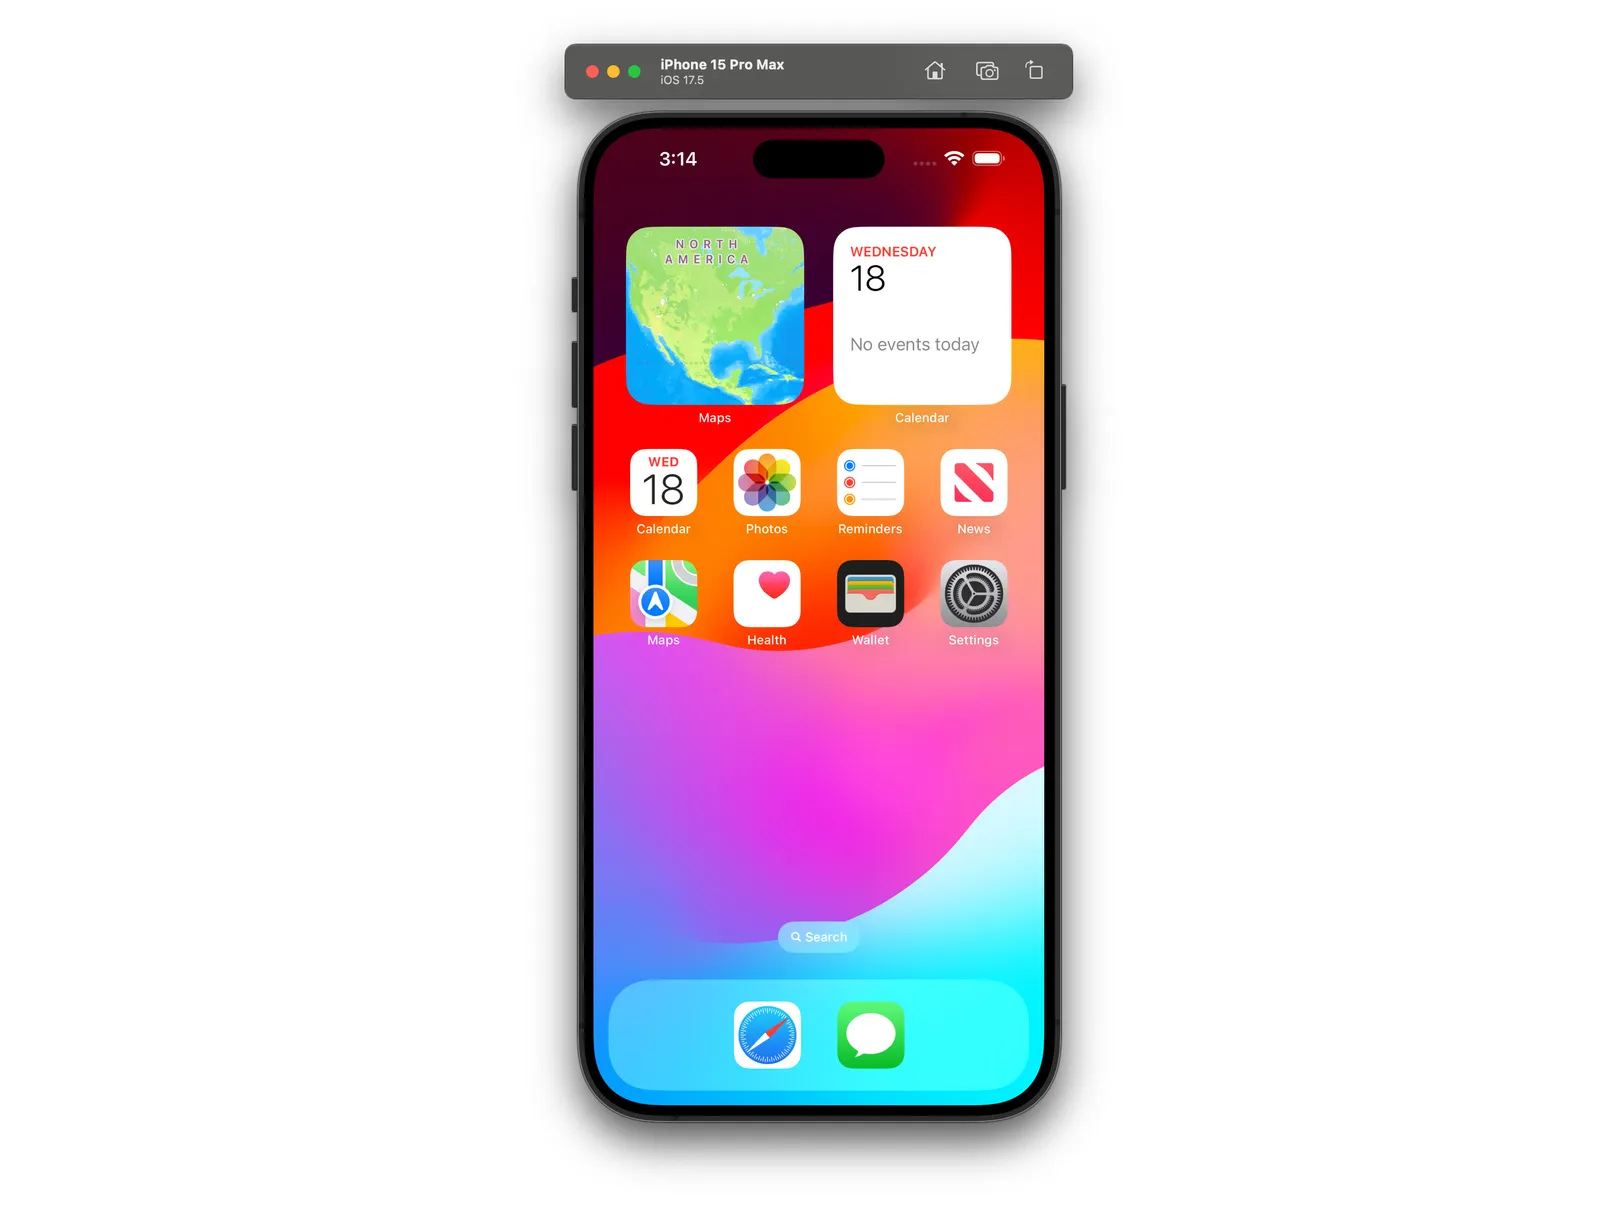
% open -a SimulatorYou should see an iPhone that looks something like this. If not, follow these instructions.
Next, go back to VS Code (or whatever IDE you were using) and select iPhone from Command Palette > Flutter: Select Device. You should see the Flutter app appear on your iPhone simulator homescreen. When it opens, you should see our Dolt app!
Conclusion#
Dolt works with all your favorite tools and adds a greater level of collaboration and auditability to your database through version control features like branches and pull requests. While our web products have built-in pull requests, you can also build branch and pull request workflows into your web applications using whatever language and framework works for you. Have questions or need help getting started with Flutter and Dolt? Stop by our Discord.