
We recently released DoltLab v2.1.6 which allows DoltLab Enterprise to use cloud storage, instead of disk storage on the DoltLab host. At the time of this writing, only AWS cloud resources are supported.
This blog will walk you through setting up a DoltLab Enterprise instance that uses cloud storage on AWS.
As you scale your DoltLab instance, you’ll discover there are big advantages to persisting DoltLab’s data to the cloud, instead of using only the disk on your DoltLab host.
Backing your instance with cloud resources means you no longer need to monitor disk usage and, potentially, provision more if you start running low.
Object stores, like S3, are infinitely scalable, extremely performant, and guarantee extreme availability/up-time. DoltHub uses S3 for its storage for this exact reason.
Similarly, using a hosted message queue service like AWS SQS with your DoltLab instance helps with performance and scalability as well.
By default, DoltLab uses an internal, in-memory queue to schedule and process its asynchronous tasks. While functional, this internal queue is coupled to the lifecycle of the doltlabapi process and consumes resources on your DoltLab host. It is also far less robust than SQS queues, which themselves come with performance and availability guarantees.
Backing your DoltLab instance with an SQS queue, instead, means you’ll be using fewer host resources for scheduling task, such as loading a pull request diffs or running an import Job, but these tasks can also be picked up by your DoltLab instance at anytime, even if the DoltLab process was temporarily offline, since they’ll be stored externally in SQS and not in host memory.
Let’s see how to configure a DoltLab Enterprise instance to use these cloud storage options.
Prerequisites#
To run a DoltLab Enterprise instance that uses AWS resources for cloud storage, an EC2 host is required.
DoltLab’s services must be able to authenticate AWS SDK clients using credentials on the host itself, so the host will need an IAM role and Instance Profile with the appropriate permissions.
Later on in this guide, we will create an IAM role and Instance Profile for the EC2 instance we provision, however please note that configuring DoltLab Enterprise to use AWS resources on non-EC2 hosts is currently untested and not guaranteed to work out-of-the-box.
Before provisioning AWS resources used for DoltLab Enterprise, you will first need to provision the EC2 instance itself. To do so, please follow the Getting Started on AWS guide with the following exceptions:
- You will not need 300 GBs of disk, since you’re creating a cloud-backed DoltLab Enterprise instance. Instead, 40 GBs should suffice.
- You will not need to create an ingress security group rule for port
4321. This port is not needed for cloud-backed DoltLab Enterprise.
Once you’ve launched your EC2 instance and your instance is ready and in the running state, you are ready to modify the metadata PUT hop limit of the instance.
By default, EC2 instances have a hop limit of 1, however, in order for DoltLab’s Docker containers to use the AWS credentials on the host, the hop limit must be at least 2.
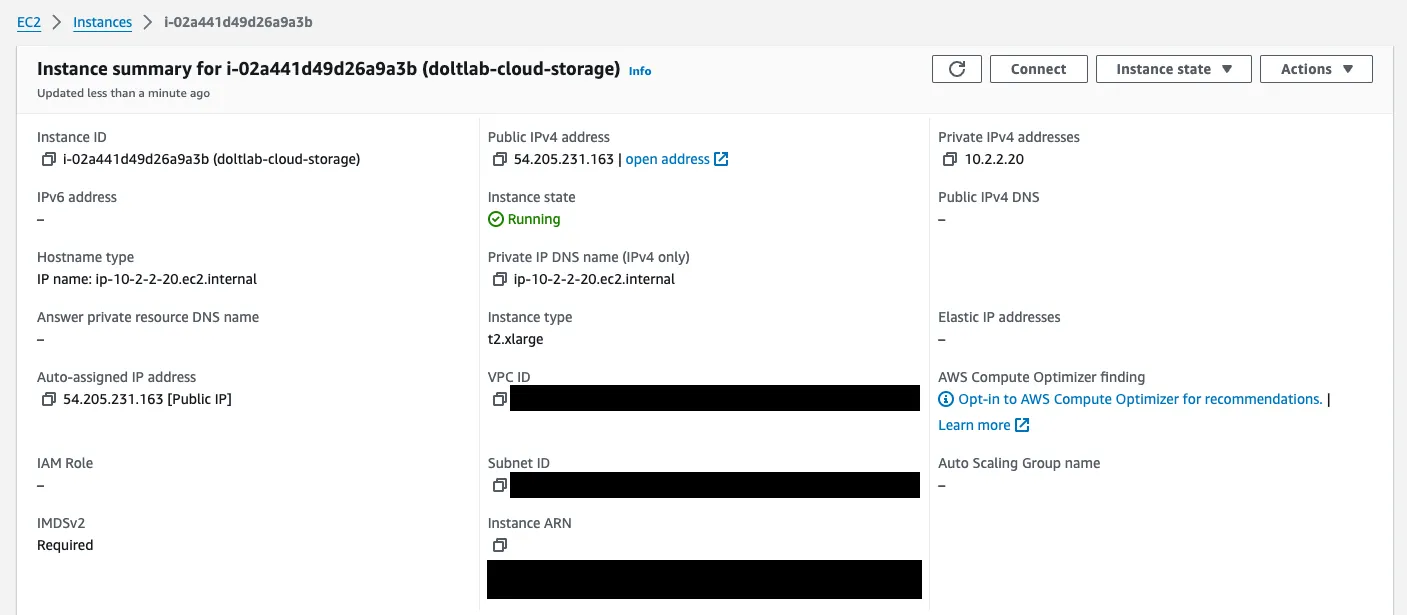
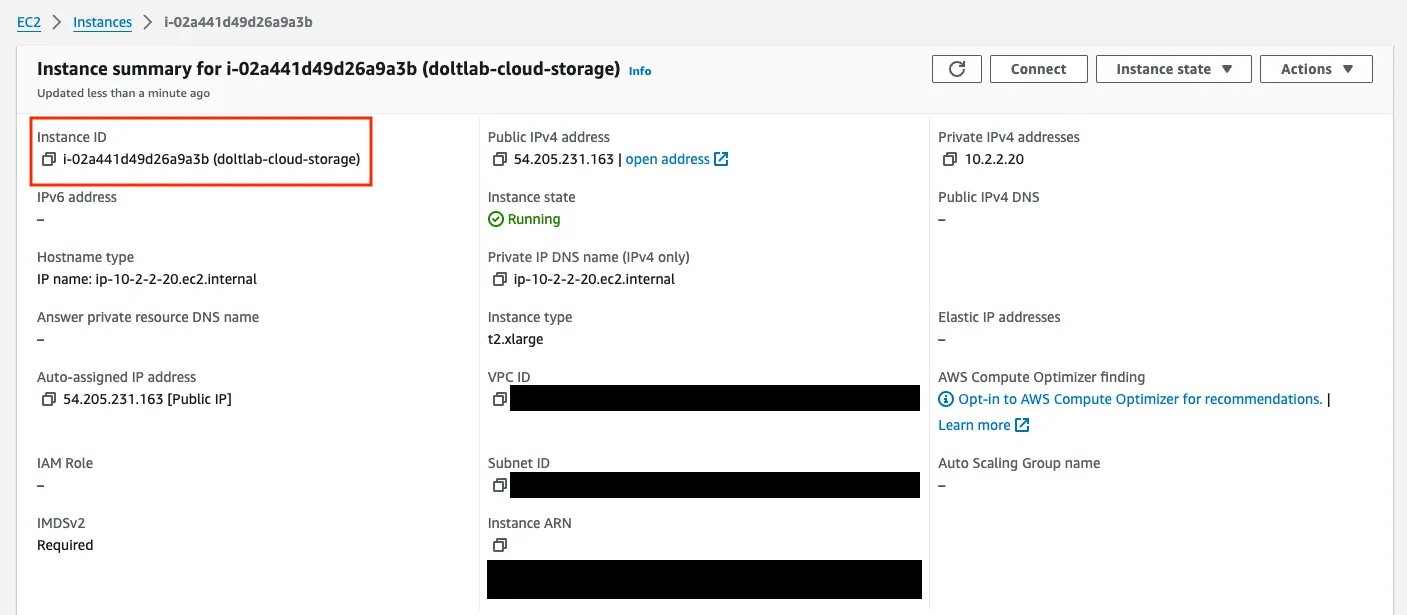
To modify the hop limit, first get the instance id of your EC2 host which can be found here:
Then, run the following command using the aws command line tool. If you do not have this tool installed locally, install it now.
% AWS_REGION=us-east-1 aws ec2 modify-instance-metadata-options \
    --instance-id i-02a441d49d26a9a3b \
    --http-put-response-hop-limit 2 \
    --http-endpoint enabled
You may need to provide the AWS_REGION environment variable where your EC2 instance is running as well. This will produce output like the following:
{
    "InstanceId": "i-02a441d49d26a9a3b",
    "InstanceMetadataOptions": {
        "State": "pending",
        "HttpTokens": "required",
        "HttpPutResponseHopLimit": 2,
        "HttpEndpoint": "enabled",
        "HttpProtocolIpv6": "disabled",
        "InstanceMetadataTags": "disabled"
    }
}
You are now ready to provision the remaining AWS resources which are defined in the next section.
Provisioning AWS resources#
The following list are required AWS resources you will need in order to use any cloud storage options for your DoltLab Enterprise instance.
- An IAM role for your EC2 host.
- An Instance Profile associated with your IAM role for your EC2 host.
- An IAM policy attached to your IAM role with permission
ecr:GetAuthorizationToken.
To persist DoltLab’s remote database data to the cloud, the following additional resources are also needed:
- A DynamoDB table, configured for Dolt AWS remotes, with the hash key
dband and attribute withname=db,type=S. - An IAM Policy attached to your IAM role with permissions
dynamodb:DescribeTable,dynamodb:GetItem, anddynamodb:PutItemon your DynamoDB table. - An S3 bucket for remote storage.
- An IAM Policy attached to your IAM role with permissions
s3:GetBucketAcl,s3:ListBucket,s3:GetObject,s3:GetObjectAcl,s3:PutObject, ands3:PutObjectAclon your S3 bucket for remote storage.
To persist files that users upload to your DoltLab instance, you will need the following resources too:
- An S3 bucket for user uploads with a lifecycle configuration to abort multipart uploads after 7 days and with the CORS configuration:
AllowedHeaders: ["*"],AllowedMethods: ["PUT"],AllowedOrigins: ["http://${INSTANCE_IP}"]whereINSTANCE_IPis the IP address of your EC2 host, andExposeHeaders: ["ETag"]. - An IAM Policy attached to your IAM role with permissions
s3:ListBucket,s3:GetObject, ands3:PutObjecton your S3 bucket for user uploads. - An S3 bucket for long running query Jobs with a lifecycle configuration to abort multipart uploads after 7 days.
- An IAM Policy attached to your IAM role with permissions
s3:ListBucket,s3:GetObject, ands3:PutObjecton your S3 bucket for long running query Jobs.
To use a message queue for processing asynchronous DoltLab tasks, you will also need:
- An SQS queue for asynchronous tasks with a receive wait time of 20 seconds and message retention seconds of 1209600.
- An SQS queue for dead letters with a receive wait time of 20 seconds and a redrive policy with a max receive count of 500 and a dead letter target pointing to the other SQS queue.
- An IAM Policy attached to your IAM role with permissions
sqs:SendMessage,sqs:DeleteMessage,sqs:ReceiveMessage, andsqs:GetQueueUrlon both SQS queues.
We will go over provisioning each of these resources below, but will do so in terraform for brevity. Any of these resources can also be provisioned in the AWS console.
Below is the entire terraform file that can be applied to provision all resources outlined above, but let’s go over the file in more bite-sized sections.
Click to see code
resource "aws_iam_role" "doltlab-cloud" {
  name = "DoltLabCloud"
  assume_role_policy = <<EOF
{
  "Version": "2012-10-17",
  "Statement": [
    {
      "Sid": "AllowDoltLabCloud",
      "Action": "sts:AssumeRole",
      "Principal": {
        "Service": "ec2.amazonaws.com"
      },
      "Effect": "Allow"
    }
  ]
}
EOF

}

resource "aws_iam_instance_profile" "doltlab-cloud" {
  name = "DoltLabCloudInstanceProfile"
  role = aws_iam_role.doltlab-cloud.name
}

resource "aws_iam_policy" "doltlab-cloud-ecr" {
  name        = "DoltLabCloudEcrPolicy"
  description = "Allows ecr read access for DoltLabCloud."
  policy      = <<EOF
{
    "Version": "2012-10-17",
    "Statement": [
      {
            "Sid": "AllowDoltLabEcrReadAccess",
            "Effect": "Allow",
            "Action": [
                "ecr:GetAuthorizationToken"
            ],
            "Resource": "*"
        }
    ]
}
EOF

}

resource "aws_iam_role_policy_attachment" "doltlab-cloud-ecr-attachment" {
  role       = aws_iam_role.doltlab-cloud.name
  policy_arn = aws_iam_policy.doltlab-cloud-ecr.arn
}

resource "aws_dynamodb_table" "doltlabremoteapi-db-manifest" {
  name           = "doltlabremoteapi-db-manifest"
  billing_mode   = "PROVISIONED"
  read_capacity  = 25
  write_capacity = 5
  hash_key       = "db"

  stream_enabled   = true
  stream_view_type = "NEW_AND_OLD_IMAGES"

  point_in_time_recovery {
    enabled = true
  }

  attribute {
    name = "db"
    type = "S"
  }
}

resource "aws_iam_policy" "doltlabremoteapi-db-manifest" {
  name        = "DoltLabRemoteApiDbManifestPolicy"
  description = "Allows access to doltlabremoteapi-db-manifest"
  policy = <<EOF
{
    "Version": "2012-10-17",
    "Statement": [
        {
            "Action": [
                "dynamodb:DescribeTable",
                "dynamodb:GetItem",
                "dynamodb:PutItem"
            ],
            "Effect": "Allow",
            "Resource": [
                "${aws_dynamodb_table.doltlabremoteapi-db-manifest.arn}"
            ]
        }
    ]
}
EOF
}

resource "aws_s3_bucket" "doltlabremoteapi-storage" {
  bucket = "doltlabremoteapi-storage"
}

resource "aws_iam_policy" "doltlabremoteapi-cloud-policy" {
  name        = "DoltLabRemoteApiCloudPolicy"
  description = "Policy for DoltLabRemoteApi cloud resources."
  policy      = <<EOF
{
    "Version": "2012-10-17",
    "Statement": [
        {
            "Effect": "Allow",
            "Action": [
              "s3:GetBucketAcl",
              "s3:ListBucket",
              "s3:GetObject",
              "s3:GetObjectAcl",
              "s3:PutObject",
              "s3:PutObjectAcl"
            ],
            "Resource": [
                "${aws_s3_bucket.doltlabremoteapi-storage.arn}/*",
                "${aws_s3_bucket.doltlabremoteapi-storage.arn}"
            ]
        }
    ]
}
EOF

}

resource "aws_iam_role_policy_attachment" "doltlab-cloud-doltlabremoteapi-storage-attachment" {
  role       = aws_iam_role.doltlab-cloud.name
  policy_arn = aws_iam_policy.doltlabremoteapi-cloud-policy.arn
}

resource "aws_iam_role_policy_attachment" "doltlab-cloud-doltlabremoteapi-db-manifest-attachment" {
  role       = aws_iam_role.doltlab-cloud.name
  policy_arn = aws_iam_policy.doltlabremoteapi-db-manifest.arn
}

resource "aws_s3_bucket" "doltlabapi-user-uploads" {
  bucket = "doltlabapi-user-uploads"
}

resource "aws_s3_bucket_cors_configuration" "doltlabapi-user-uploads-cors" {
  bucket = aws_s3_bucket.doltlabapi-user-uploads.id

  cors_rule {
    allowed_headers = ["*"]
    allowed_methods = ["PUT"]
    allowed_origins = ["http://54.205.231.163"]
    expose_headers = ["ETag"]
  }
}

resource "aws_s3_bucket_lifecycle_configuration" "doltlabapi-user-uploads-lifecycle" {
  bucket = aws_s3_bucket.doltlabapi-user-uploads.id

  rule {
    id = "AbortIncompleteMultipartUploads"
    status = "Enabled"
    abort_incomplete_multipart_upload {
      days_after_initiation = 7
    }
  }
}

resource "aws_s3_bucket" "doltlabapi-query-job-uploads" {
  bucket = "doltlabapi-query-job-uploads"
}

resource "aws_s3_bucket_lifecycle_configuration" "doltlabapi-query-job-uploads-lifecycle" {
  bucket = aws_s3_bucket.doltlabapi-query-job-uploads.id

  rule {
    id = "AbortIncompleteMultipartUploads"
    status = "Enabled"
    abort_incomplete_multipart_upload {
      days_after_initiation = 7
    }
  }
}

resource "aws_sqs_queue" "doltlabapi-asyncwork-dead-letter-queue" {
  name                      = "doltlabapi-asyncwork-queue-dlq"
  receive_wait_time_seconds = 20
  message_retention_seconds = 1209600
}

resource "aws_sqs_queue" "doltlabapi-asyncwork-queue" {
  name                      = "doltlabapi-asyncwork-queue"
  receive_wait_time_seconds = 20
  redrive_policy            = <<EOF
{
  "maxReceiveCount": 500,
  "deadLetterTargetArn": "${aws_sqs_queue.doltlabapi-asyncwork-dead-letter-queue.arn}"
}
EOF

}

resource "aws_iam_policy" "doltlabapi-cloud-policy" {
  name        = "DoltLabApiCloudPolicy"
  description = "Policy for DoltLabAPI cloud resources."
  policy      = <<EOF
{
    "Version": "2012-10-17",
    "Statement": [
        {
            "Effect": "Allow",
            "Action": [
                "s3:GetObject",
                "s3:ListBucket",
                "s3:PutObject"
            ],
            "Resource": [
                "${aws_s3_bucket.doltlabapi-user-uploads.arn}",
                "${aws_s3_bucket.doltlabapi-user-uploads.arn}/*"
            ]
        },
        {
            "Effect": "Allow",
            "Action": [
                "s3:GetObject",
                "s3:ListBucket",
                "s3:PutObject"
            ],
            "Resource": [
                "${aws_s3_bucket.doltlabapi-query-job-uploads.arn}",
                "${aws_s3_bucket.doltlabapi-query-job-uploads.arn}/*"
            ]
        },
        {
            "Effect": "Allow",
            "Action": [
                "sqs:SendMessage",
                "sqs:DeleteMessage",
                "sqs:ReceiveMessage",
                "sqs:GetQueueUrl"
            ],
            "Resource": [
                "${aws_sqs_queue.doltlabapi-asyncwork-dead-letter-queue.arn}",
                "${aws_sqs_queue.doltlabapi-asyncwork-queue.arn}"
            ]
        }
    ]
}
EOF

}

resource "aws_iam_role_policy_attachment" "doltlab-cloud-doltlabapi-policy" {
  role       = aws_iam_role.doltlab-cloud.name
  policy_arn = aws_iam_policy.doltlabapi-cloud-policy.arn
}
The first section to inspect will be the definition for the IAM role we’ll create for our host, as well as the Instance Profile and ECR policy.
resource "aws_iam_role" "doltlab-cloud" {
  name = "DoltLabCloud"
  assume_role_policy = <<EOF
{
  "Version": "2012-10-17",
  "Statement": [
    {
      "Sid": "AllowDoltLabCloud",
      "Action": "sts:AssumeRole",
      "Principal": {
        "Service": "ec2.amazonaws.com"
      },
      "Effect": "Allow"
    }
  ]
}
EOF

}

resource "aws_iam_instance_profile" "doltlab-cloud" {
  name = "DoltLabCloudInstanceProfile"
  role = aws_iam_role.doltlab-cloud.name
}

resource "aws_iam_policy" "doltlab-cloud-ecr" {
  name        = "DoltLabCloudEcrPolicy"
  description = "Allows ecr read access for DoltLabCloud."
  policy      = <<EOF
{
    "Version": "2012-10-17",
    "Statement": [
      {
            "Sid": "AllowDoltLabEcrReadAccess",
            "Effect": "Allow",
            "Action": [
                "ecr:GetAuthorizationToken"
            ],
            "Resource": "*"
        }
    ]
}
EOF

}

resource "aws_iam_role_policy_attachment" "doltlab-cloud-ecr-attachment" {
  role       = aws_iam_role.doltlab-cloud.name
  policy_arn = aws_iam_policy.doltlab-cloud-ecr.arn
}
You’ll see we’ll be creating an IAM role named DoltLabCloud to be used by our EC2 instance, and to this role we’ll be attaching an Instance Profile called DoltLabCloudInstanceProfile. This role and profile combination will enable our DoltLab instance to use AWS credentials from the host, so we won’t need to plumb credentials to individual DoltLab services.
We’ve also defined the policy DoltLabCloudEcrPolicy which will allow the host to pull DoltLab’s images when it starts up.
Finally, we attach DoltLabCloudEcrPolicy to DoltLabCloud.
Next, let’s go over the AWS resources we need for storing DoltLab’s remote data in AWS. This requires a DynamoDB table, an S3 bucket, and the IAM policies with required permissions on these resources.
resource "aws_dynamodb_table" "doltlabremoteapi-db-manifest" {
  name           = "doltlabremoteapi-db-manifest"
  billing_mode   = "PROVISIONED"
  read_capacity  = 25
  write_capacity = 5
  hash_key       = "db"

  stream_enabled   = true
  stream_view_type = "NEW_AND_OLD_IMAGES"

  point_in_time_recovery {
    enabled = true
  }

  attribute {
    name = "db"
    type = "S"
  }
}

resource "aws_iam_policy" "doltlabremoteapi-db-manifest" {
  name        = "DoltLabRemoteApiDbManifestPolicy"
  description = "Allows access to doltlabremoteapi-db-manifest"
  policy = <<EOF
{
    "Version": "2012-10-17",
    "Statement": [
        {
            "Action": [
                "dynamodb:DescribeTable",
                "dynamodb:GetItem",
                "dynamodb:PutItem"
            ],
            "Effect": "Allow",
            "Resource": [
                "${aws_dynamodb_table.doltlabremoteapi-db-manifest.arn}"
            ]
        }
    ]
}
EOF
}

resource "aws_s3_bucket" "doltlabremoteapi-storage" {
  bucket = "doltlabremoteapi-storage"
}

resource "aws_iam_policy" "doltlabremoteapi-cloud-policy" {
  name        = "DoltLabRemoteApiCloudPolicy"
  description = "Policy for DoltLabRemoteApi cloud resources."
  policy      = <<EOF
{
    "Version": "2012-10-17",
    "Statement": [
        {
            "Effect": "Allow",
            "Action": [
              "s3:GetBucketAcl",
              "s3:ListBucket",
              "s3:GetObject",
              "s3:GetObjectAcl",
              "s3:PutObject",
              "s3:PutObjectAcl"
            ],
            "Resource": [
                "${aws_s3_bucket.doltlabremoteapi-storage.arn}/*",
                "${aws_s3_bucket.doltlabremoteapi-storage.arn}"
            ]
        }
    ]
}
EOF

}

resource "aws_iam_role_policy_attachment" "doltlab-cloud-doltlabremoteapi-storage-attachment" {
  role       = aws_iam_role.doltlab-cloud.name
  policy_arn = aws_iam_policy.doltlabremoteapi-cloud-policy.arn
}

resource "aws_iam_role_policy_attachment" "doltlab-cloud-doltlabremoteapi-db-manifest-attachment" {
  role       = aws_iam_role.doltlab-cloud.name
  policy_arn = aws_iam_policy.doltlabremoteapi-db-manifest.arn
}
From the above snippet you can see we’ll be provisioning a DynamoDB table named doltlabremoteapi-db-manifest, and we’ve defined a policy called DoltLabRemoteApiDbManifestPolicy with the appropriate permissions on this table.
We’ll also be creating the S3 bucket named doltlabremoteapi-storage, and similarly, have defined the policy DoltLabRemoteApiCloudPolicy with the proper permissions on this bucket.
At the end of the snippet we attach the policies to the DoltLabCloud IAM role. Once applied, we’ll be able to store database data hosted on our DoltLab Enterprise instance, in AWS.
Lastly, let’s look at the definitions for the resources to be used by doltlabapi, which enable unlimited user uploads and scalable processing of asynchronous tasks.
resource "aws_s3_bucket" "doltlabapi-user-uploads" {
  bucket = "doltlabapi-user-uploads"
}

resource "aws_s3_bucket_cors_configuration" "doltlabapi-user-uploads-cors" {
  bucket = aws_s3_bucket.doltlabapi-user-uploads.id

  cors_rule {
    allowed_headers = ["*"]
    allowed_methods = ["PUT"]
    allowed_origins = ["http://54.205.231.163"]
    expose_headers = ["ETag"]
  }
}

resource "aws_s3_bucket_lifecycle_configuration" "doltlabapi-user-uploads-lifecycle" {
  bucket = aws_s3_bucket.doltlabapi-user-uploads.id

  rule {
    id = "AbortIncompleteMultipartUploads"
    status = "Enabled"
    abort_incomplete_multipart_upload {
      days_after_initiation = 7
    }
  }
}

resource "aws_s3_bucket" "doltlabapi-query-job-uploads" {
  bucket = "doltlabapi-query-job-uploads"
}

resource "aws_s3_bucket_lifecycle_configuration" "doltlabapi-query-job-uploads-lifecycle" {
  bucket = aws_s3_bucket.doltlabapi-query-job-uploads.id

  rule {
    id = "AbortIncompleteMultipartUploads"
    status = "Enabled"
    abort_incomplete_multipart_upload {
      days_after_initiation = 7
    }
  }
}

resource "aws_sqs_queue" "doltlabapi-asyncwork-dead-letter-queue" {
  name                      = "doltlabapi-asyncwork-queue-dlq"
  receive_wait_time_seconds = 20
  message_retention_seconds = 1209600
}

resource "aws_sqs_queue" "doltlabapi-asyncwork-queue" {
  name                      = "doltlabapi-asyncwork-queue"
  receive_wait_time_seconds = 20
  redrive_policy            = <<EOF
{
  "maxReceiveCount": 500,
  "deadLetterTargetArn": "${aws_sqs_queue.doltlabapi-asyncwork-dead-letter-queue.arn}"
}
EOF

}

resource "aws_iam_policy" "doltlabapi-cloud-policy" {
  name        = "DoltLabApiCloudPolicy"
  description = "Policy for DoltLabAPI cloud resources."
  policy      = <<EOF
{
    "Version": "2012-10-17",
    "Statement": [
        {
            "Effect": "Allow",
            "Action": [
                "s3:GetObject",
                "s3:ListBucket",
                "s3:PutObject"
            ],
            "Resource": [
                "${aws_s3_bucket.doltlabapi-user-uploads.arn}",
                "${aws_s3_bucket.doltlabapi-user-uploads.arn}/*"
            ]
        },
        {
            "Effect": "Allow",
            "Action": [
                "s3:GetObject",
                "s3:ListBucket",
                "s3:PutObject"
            ],
            "Resource": [
                "${aws_s3_bucket.doltlabapi-query-job-uploads.arn}",
                "${aws_s3_bucket.doltlabapi-query-job-uploads.arn}/*"
            ]
        },
        {
            "Effect": "Allow",
            "Action": [
                "sqs:SendMessage",
                "sqs:DeleteMessage",
                "sqs:ReceiveMessage",
                "sqs:GetQueueUrl"
            ],
            "Resource": [
                "${aws_sqs_queue.doltlabapi-asyncwork-dead-letter-queue.arn}",
                "${aws_sqs_queue.doltlabapi-asyncwork-queue.arn}"
            ]
        }
    ]
}
EOF

}

resource "aws_iam_role_policy_attachment" "doltlab-cloud-doltlabapi-policy" {
  role       = aws_iam_role.doltlab-cloud.name
  policy_arn = aws_iam_policy.doltlabapi-cloud-policy.arn
}
In the above section we first create an S3 bucket named doltlabapi-user-uploads to store files the users will upload to our DoltLab instance. To this bucket we also attach a CORS configuration that permits writes originating from our EC2 host, and a lifecycle policy that automatically deletes multipart uploads that have not been completed after 7 days.
In the same way, we also define another S3 bucket named doltlabapi-query-job-uploads, which also gets a lifecycle policy to delete old, incomplete multipart uploads.
Then, we create two SQS queues, one called doltlabapi-asyncwork-queue-dlq to act as our dead letter queue, and one called doltlabapi-asyncwork-queue to act as the primary queue for processing asynchronous task messages originating from doltlabapi.
Then, we create an IAM policy called DoltLabApiCloudPolicy to house all the permissions we need for all of the aforementioned resources, and at the bottom of the snippet, attach the policy to our DoltLabCloud role.
With these terraform definitions in place, we can apply them to create everything in AWS, or alternatively, these resources can be provisioned manually from the AWS console.
Once the above resources have been successfully created/provisioned, we have one final step to take before our cloud-backed DoltLab Enterprise instance is ready to go.
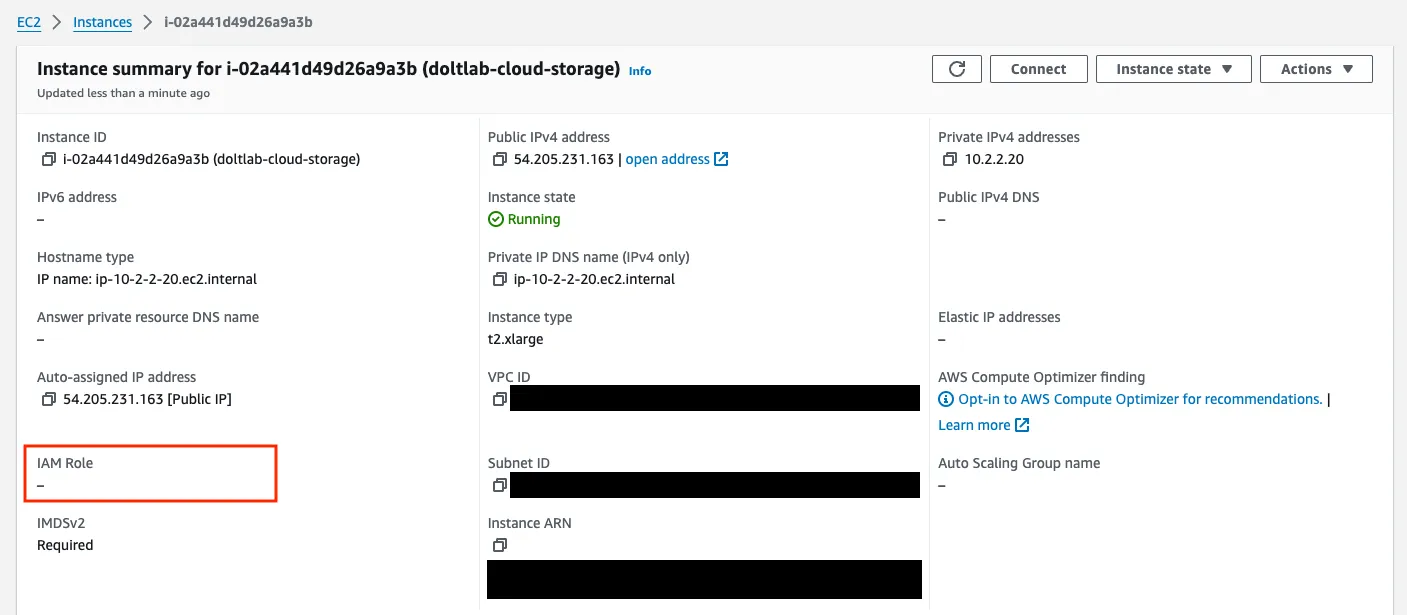
Notice that even though we’ve created the IAM role DoltLabCloud, it has not yet been associated with our EC2 host. To do this, we run the following with our local aws tool:
% AWS_REGION=us-east-1 aws ec2 associate-iam-instance-profile --instance-id i-02a441d49d26a9a3b --iam-instance-profile Name=DoltLabCloudInstanceProfileThis produces output like the following:
{
"IamInstanceProfileAssociation": {
"AssociationId": "iip-assoc-09eddd4424a79f21e",
"InstanceId": "i-02a441d49d26a9a3b",
"IamInstanceProfile": {
"Arn": "arn:aws:iam::**********:instance-profile/DoltLabCloudInstanceProfile",
"Id": "AIPA2QYQQGN4MVYCJRZ7V"
},
"State": "associating"
}
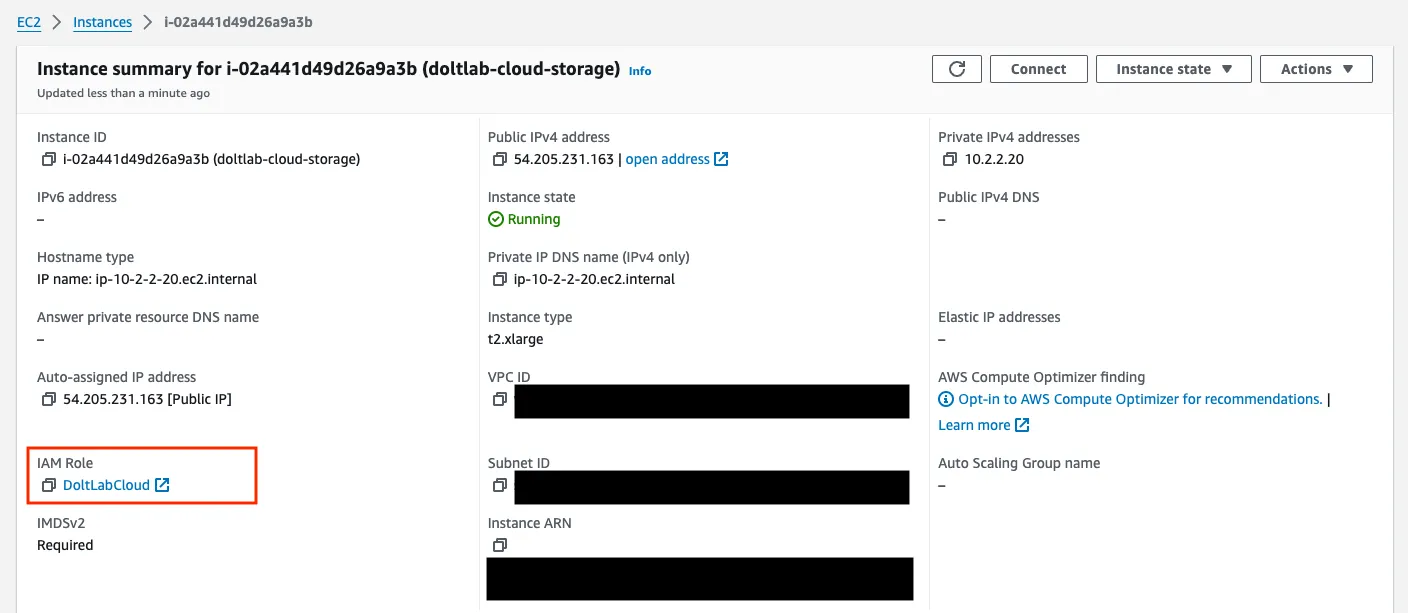
}After a few seconds, we’ll be able to see our host with the DoltLabCloud role.
We are now ready to download, configure, and run DoltLab!
Install and run DoltLab Enterprise#
You can now ssh into the EC2 host, and follow the Getting Started guide to download DoltLab v2.1.6 and install its dependencies.
You should have a doltlab directory with the following contents:
root@ip-10-2-2-20:/home/ubuntu/doltlab# ls
installer  installer_config.yaml  smtp_connection_helper ubuntu_install.sh
Next, edit the installer_config.yaml file so that in contains the following (note: the following example does not contain the comments you’ll see in the default installer_config.yaml):
# installer_config.yaml
version: "v2.1.6"

host: "54.205.231.163"

services:
  doltlabdb:
    admin_password: "DoltLab1234"
    dolthubapi_password: "DoltLab1234"

  doltlabapi:
    cloud_storage:
      aws_region: "us-east-1"
      user_import_uploads_aws_bucket: "doltlabapi-user-uploads"
      query_job_aws_bucket: "doltlabapi-query-job-uploads"
      asyncworker_aws_sqs_queue: "doltlabapi-asyncwork-queue"

  doltlabremoteapi:
    nbs_memory_cache_limit: 17179869184
    cloud_storage:
      aws_region: "us-east-1"
      aws_bucket: "doltlabremoteapi-storage"
      aws_dynamodb_table: "doltlabremoteapi-db-manifest"

default_user:
  name: "admin"
  password: "DoltLab1234"
  email: "admin@localhost"

enterprise:
  online_product_code: "************"
  online_shared_key: "**************"
  online_api_key: "**************"
  online_license_key: "**************"
In installer_config.yaml, supply the IP address of the EC2 host in the host field, and define the cloud_storage blocks for both services.doltlabapi and services.doltlabremoteapi.
services.doltlabapi.cloud_storage is where we provide the buckets for user uploads and query job uploads, as well as the queue we created for asynchronous tasks.
services.doltlabremoteapi.cloud_storage is where we provide the bucket for remote data storage and the table name for our DynamoDB table.
Additionally, the enterprise block contains our required DoltLab Enterprise keys.
Save these changes, then run the installer to generate DoltLab’s assets.
root@ip-10-2-2-20:/home/ubuntu/doltlab# ./installer
2024-06-13T17:30:20.778Z	INFO	metrics/emitter.go:111	Successfully sent DoltLab usage metrics

2024-06-13T17:30:20.778Z	INFO	cmd/main.go:545	Successfully configured DoltLab	{"version": "v2.1.6"}

2024-06-13T17:30:20.778Z	INFO	cmd/main.go:551	To start DoltLab, use:	{"script": "/home/ubuntu/doltlab/start.sh"}
2024-06-13T17:30:20.778Z	INFO	cmd/main.go:556	To stop DoltLab, use:	{"script": "/home/ubuntu/doltlab/stop.sh"}
This produces the script you can use to start DoltLab, ./start.sh. Run this script and your Enterprise instance will go live, fully backed by the AWS cloud!
root@ip-10-2-2-20:/home/ubuntu/doltlab# ./start.sh
[+] Running 6/6
 ✔ Container doltlab-doltlabenvoy-1      Started                                                                                                                      0.4s
 ✔ Container doltlab-doltlabdb-1         Started                                                                                                                      0.3s
 ✔ Container doltlab-doltlabremoteapi-1  Started                                                                                                                      0.6s
 ✔ Container doltlab-doltlabapi-1        Started                                                                                                                      0.9s
 ✔ Container doltlab-doltlabgraphql-1    Started                                                                                                                      1.1s
 ✔ Container doltlab-doltlabui-1         Started
You can see the running process using the docker ps command.
root@ip-10-2-2-20:/home/ubuntu/doltlab# docker ps
CONTAINER ID   IMAGE                                                             COMMAND                  CREATED        STATUS          PORTS                                                                                                                                                                       NAMES
bb34d8d399ed   public.ecr.aws/dolthub/doltlab/dolthub-server:v2.1.6              "docker-entrypoint.s…"   22 hours ago   Up 54 seconds   3000/tcp                                                                                                                                                                    doltlab-doltlabui-1
37ebac5ff385   public.ecr.aws/dolthub/doltlab/dolthubapi-graphql-server:v2.1.6   "docker-entrypoint.s…"   22 hours ago   Up 54 seconds   9000/tcp                                                                                                                                                                    doltlab-doltlabgraphql-1
5716d571011e   public.ecr.aws/dolthub/doltlab/dolthubapi-server:v2.1.6           "/app/server -doltla…"   22 hours ago   Up 54 seconds                                                                                                                                                                               doltlab-doltlabapi-1
84e7e8979276   public.ecr.aws/dolthub/doltlab/doltremoteapi-server:v2.1.6        "/app/server -http-p…"   22 hours ago   Up 54 seconds   0.0.0.0:50051->50051/tcp, :::50051->50051/tcp                                                                                                                               doltlab-doltlabremoteapi-1
d15971450676   public.ecr.aws/dolthub/doltlab/dolt-sql-server:v2.1.6             "tini -- docker-entr…"   22 hours ago   Up 55 seconds   3306/tcp, 33060/tcp                                                                                                                                                         doltlab-doltlabdb-1
5e341b1de113   envoyproxy/envoy:v1.28-latest                                     "/docker-entrypoint.…"   22 hours ago   Up 55 seconds   0.0.0.0:80->80/tcp, :::80->80/tcp, 0.0.0.0:100->100/tcp, :::100->100/tcp, 0.0.0.0:2001->2001/tcp, :::2001->2001/tcp, 0.0.0.0:7770->7770/tcp, :::7770->7770/tcp, 10000/tcp   doltlab-doltlabenvoy-1
You will see the DoltLab Enterprise UI at the public IP address of your EC2 host. For this example that would be http://54.205.231.163.
Conclusion#
I hope this blog helps you get your cloud-backed DoltLab Enterprise instance up and running. If you want a free trial of DoltLab Enterprise, just ask. As always, we’d love to chat with you, so please come join our Discord server and let us know how you are using DoltLab.
Thanks for reading and don’t forget to check out each of our cool products below:
- Dolt—it’s Git for data.
- DoltHub—it’s GitHub for data.
- DoltLab—it’s GitLab for data.
- Hosted Dolt—it’s RDS for Dolt databases.