
In a recent blog post, Tim provided new DoltLab users a helpful “getting started” guide that explained how to start running a DoltLab instance on AWS.
Admittedly, we are an AWS shop here at DoltHub, so providing tutorials about using their cloud resources to setup DoltLab came pretty naturally to us.
This week, though, we’ve had a new customer ask about setting up DoltLab on Microsoft Azure, so we jumped at the chance to show off how quickly you can get DoltLab running using a different cloud provider.
Without further ado, here’s how to get started running DoltLab on Microsoft Azure!
Provision a virtual machine#
The first step for setting up DoltLab in Microsoft Azure Cloud is provisioning a virtual machine. A virtual machine in Azure is Microsoft’s equivalent to EC2 in AWS.
Referencing the recommended minimum hardware for DoltLab, we’ll provision a virtual machine with at least 4 CPU and 16 GB of RAM. We’ll also need to ensure our host has at least 300 GB of disk.
From the Azure Cloud console, we’ll select “Virtual machines” from the list of services.

This will take you to the Virtual Machines Dashboard.
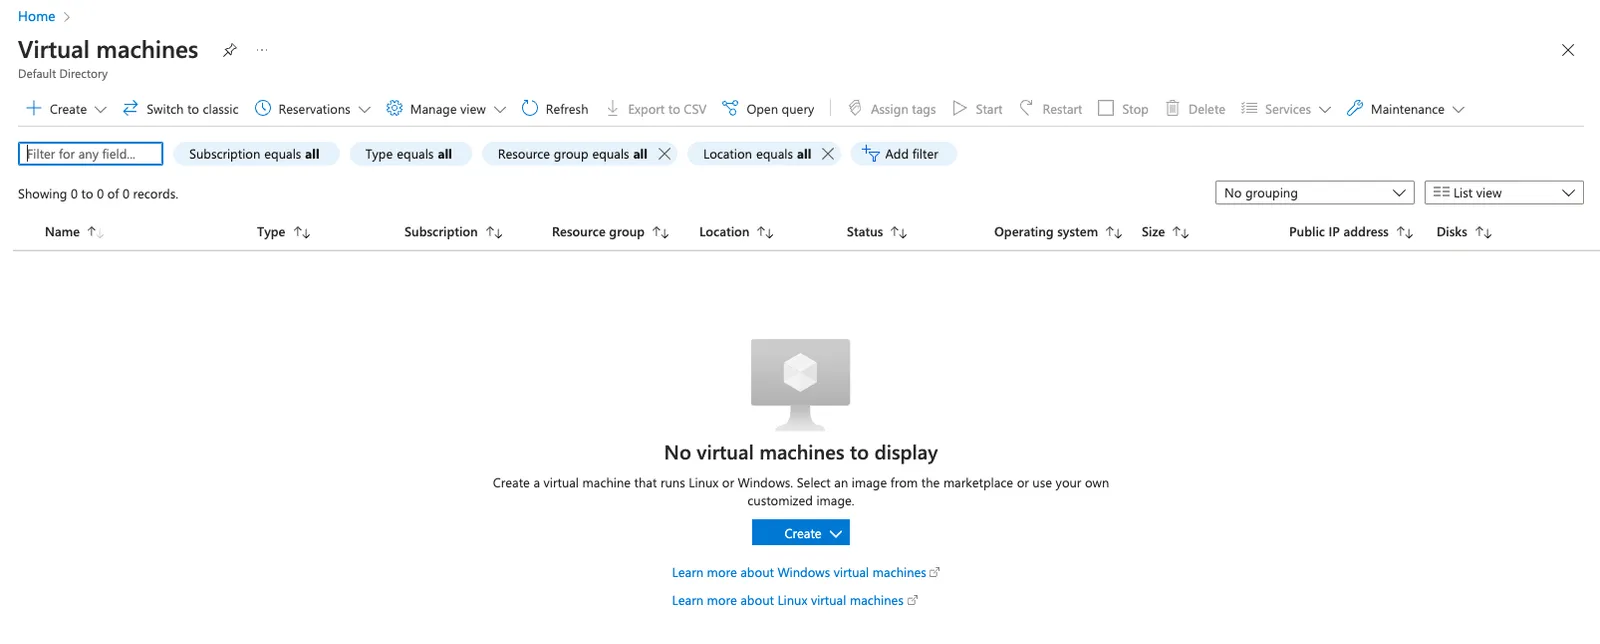
Next, click “Create”. This will take you to the following form with the “Basics” tab open.
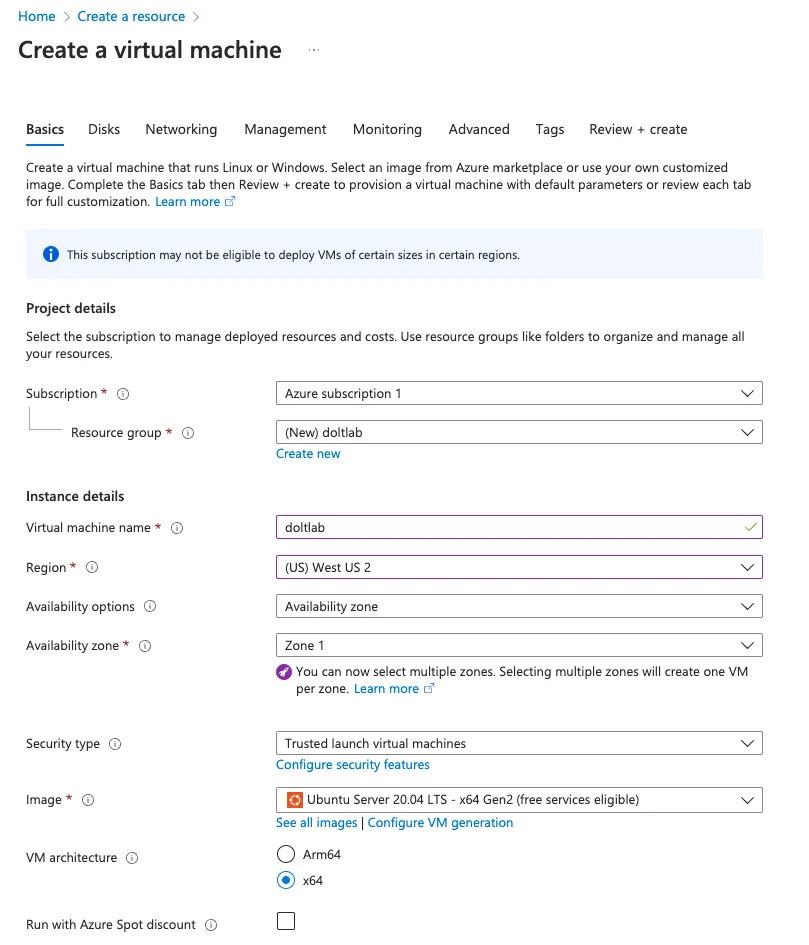
The “Subscription” field of the “Project details” section should have your Azure subscription selected. Mine is called “Azure subscription 1”. I’ve also chosen to create a new “Resource group” called “doltlab”.
In “Instance details”, I’ve named our DoltLab instance “doltlab”, and chosen the appropriate region and availability where I want my virtual machine deployed.
“Security type” defaults to “Trusted launch virtual machines”, and does not need to be changed.
For “Image”, DoltLab requires Ubuntu, so I went with 20.04 LTS, though 22.04 LTS is also fine. DoltLab also requires x86 for “VM architecture” so the choice is selected as well.
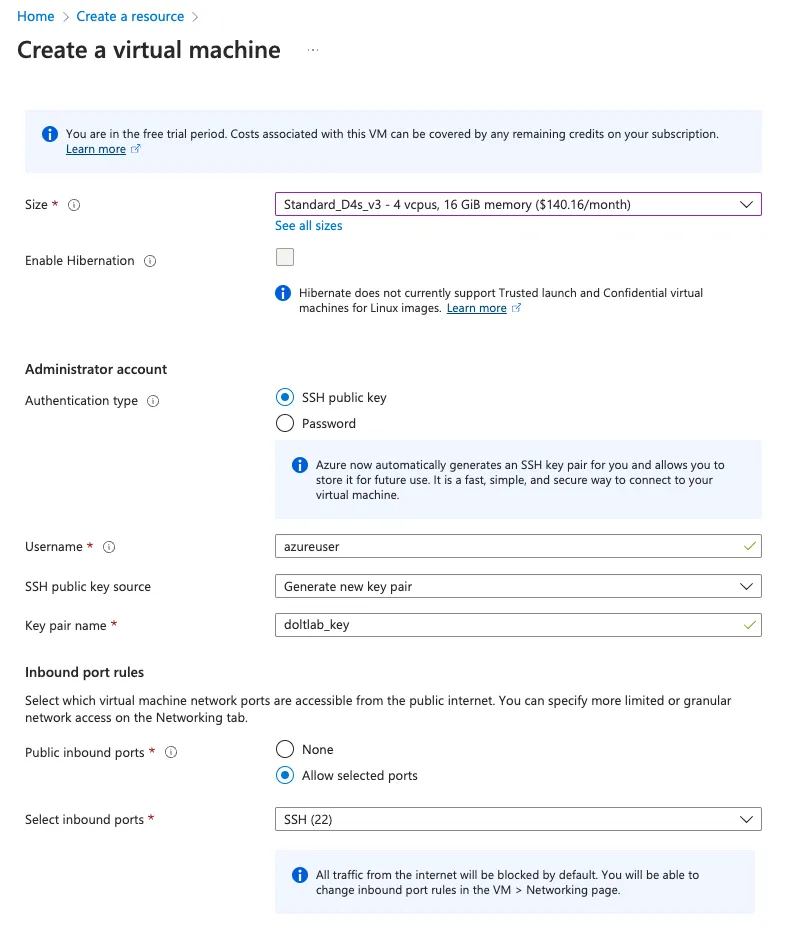
Scrolling further down the page, for “Size”, we select Standard_D4s_v3 which meets the minimum hardware requirements, and we choose “SSH public key” for connecting to our virtual machine.
We use the default value for “Username”, azureuser, choose “Generate a new key pair” under “SSH public key source”, since we don’t have an existing one to use on this host.
Now click over to the “Disks” tab.
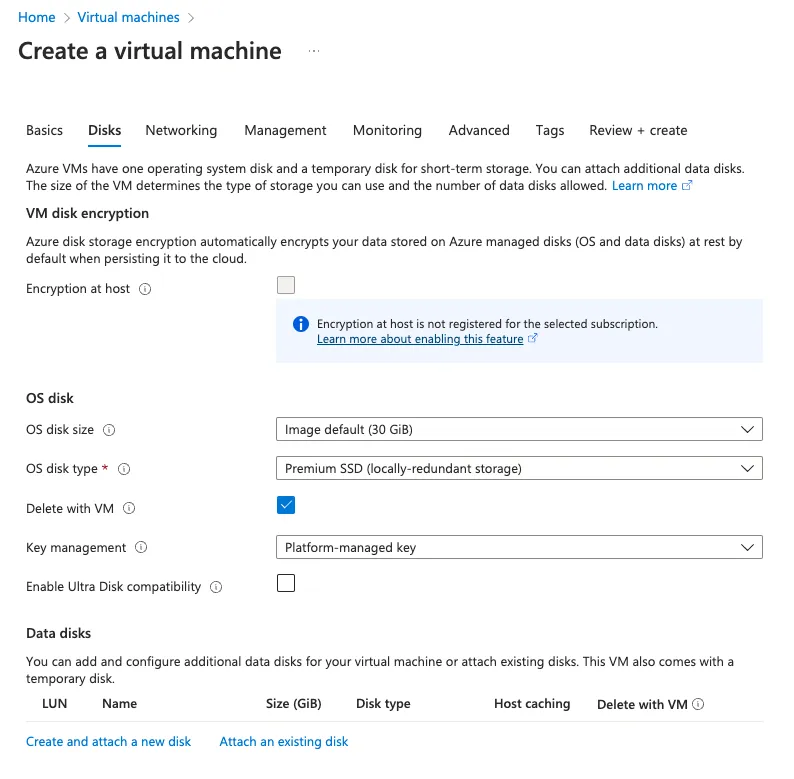
Here we can choose the size of the OS disk, which defaults to 30 GB. This is sufficient for the OS, but we do need at least 300 GBs for DoltLab.
For that, under the “Data disks” section at the bottom, we can click “Create and attach a new disk”.
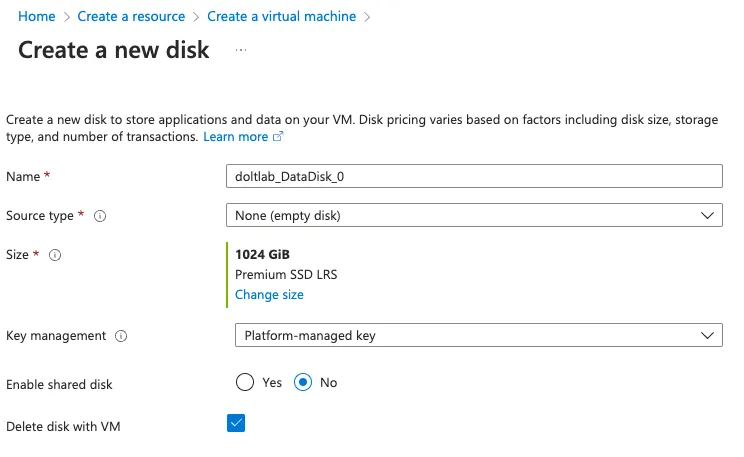
We can make our data disk for DoltLab using this form. Since the default size for this new disk is 1TB, we go ahead and leave the default values for all fields here. The one exception is whether you want to have this disk automatically deleted when the virtual machine is deleted. I chose this option.
Click “Ok”, then move on to the “Networking” tab.
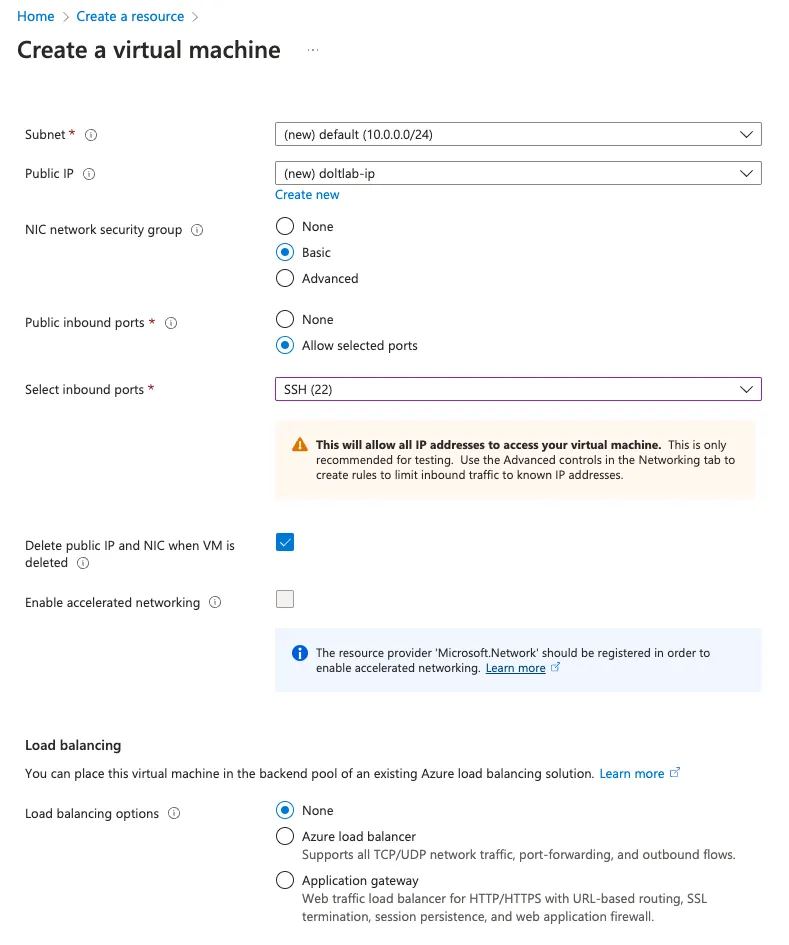
By default, new “Subnet” and new “Public IP” are selected for us. And, since we don’t have existing ones we want to use, this is fine for us.
We also want to delete the public IP if we delete the virtual machine, so we check “Delete public IP and NIC when VM is deleted”.
Finally, we can click “Review + create”.
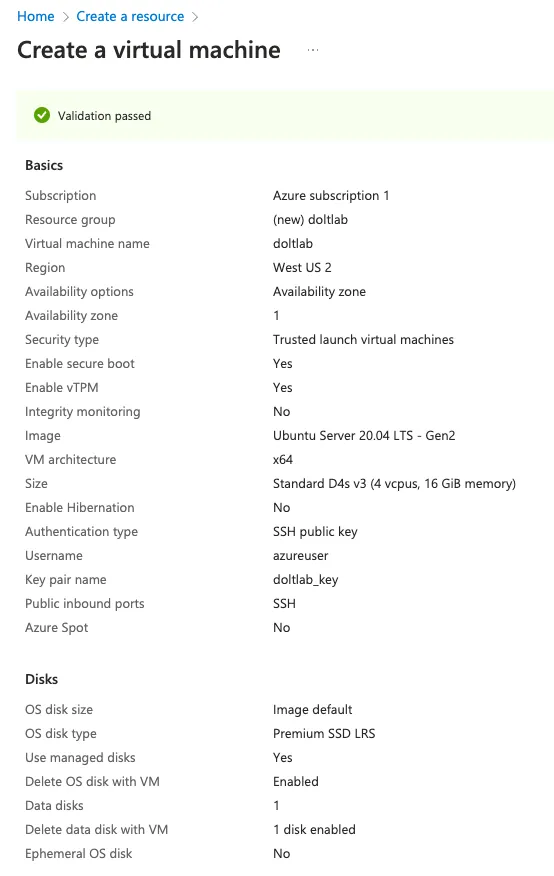
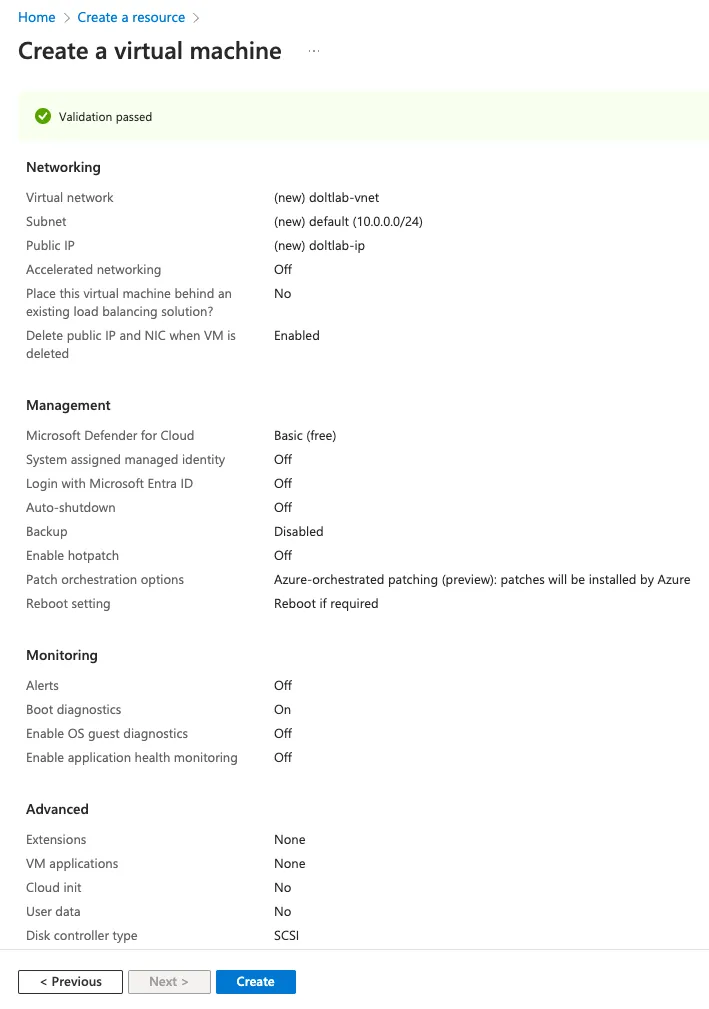
You’ll see a summary of all the configuration options on this page. Click “create” to deploy your virtual machine. Azure will then prompt you to download the generated private key file you’ll need to ssh into the host.
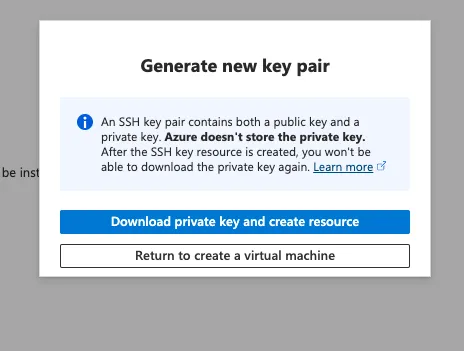
Click “Download private key and create resource”.
Azure will begin the deployment of your host, and it will take a minute or two to come up. In the meantime, change the permissions of the private key you downloaded by running:
chmod 400 doltlab_key.pemNow let’s open the required ports on our virtual machine.
Open the required ports#
When the virtual machine is up and running, Azure will redirect you to the dashboard for your running virtual machine.
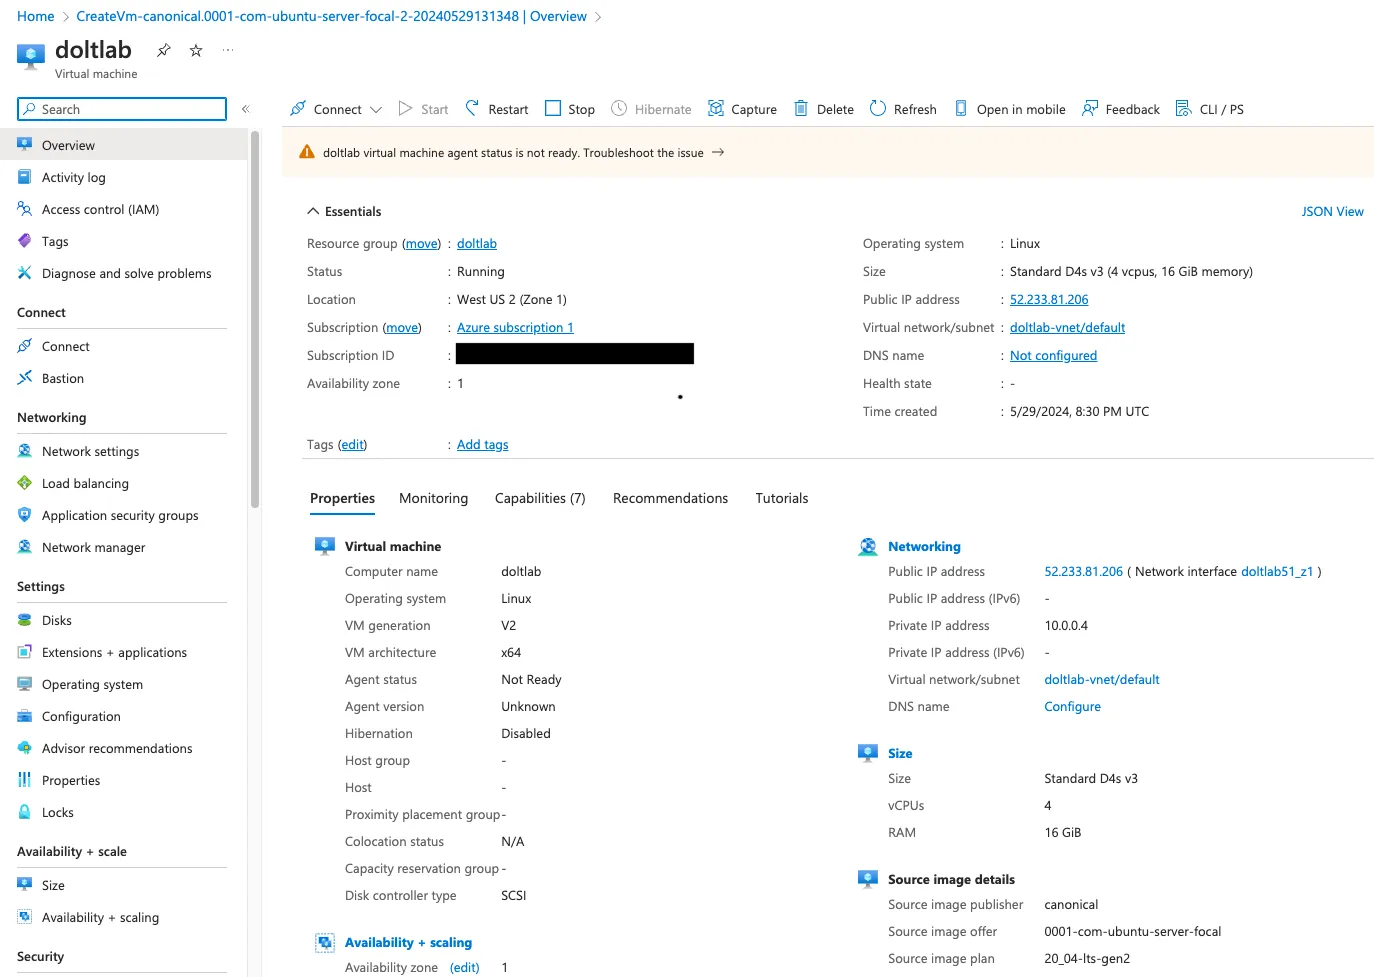
From the menu on the left, under the “Networking” section, choose “Network settings”. This is where we will create inbound rules for the ports DoltLab requires to be open.
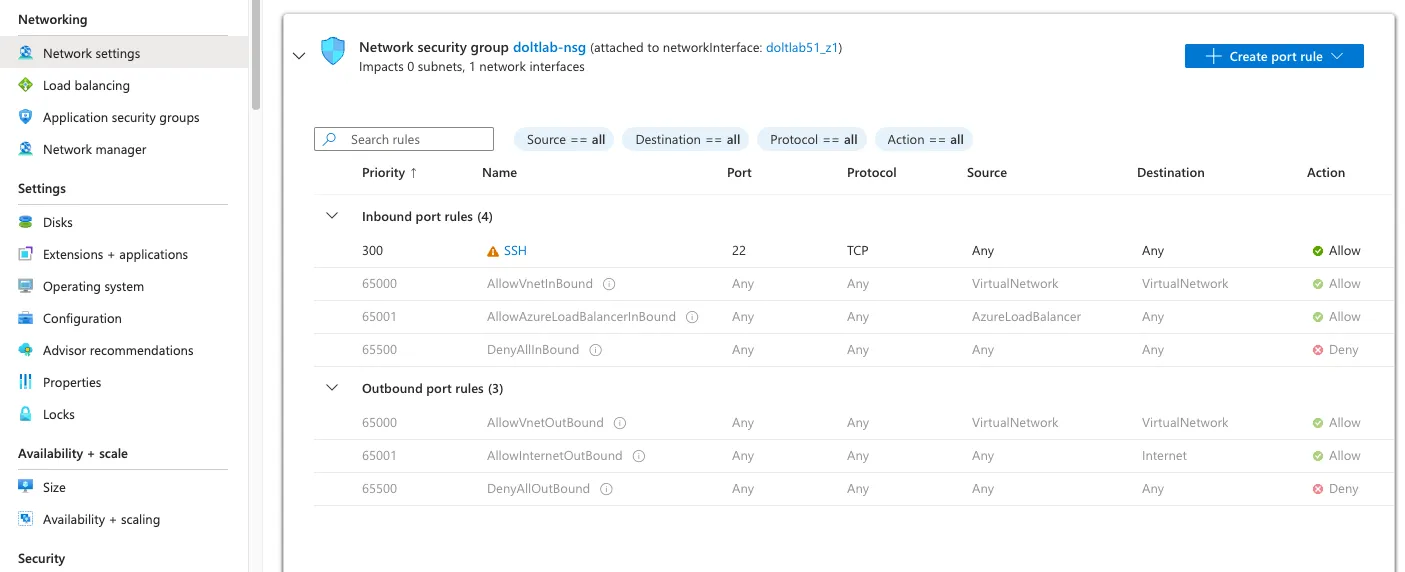
We can see that our ssh inbound rule is already configured. Now we need open ports 80, 100, 4321, and 50051 which are required for DoltLab.
Click “Create port rule”.
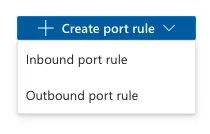
Be sure to select “Inbound port rule”. Following this you’ll see the form you use to create each port rule.
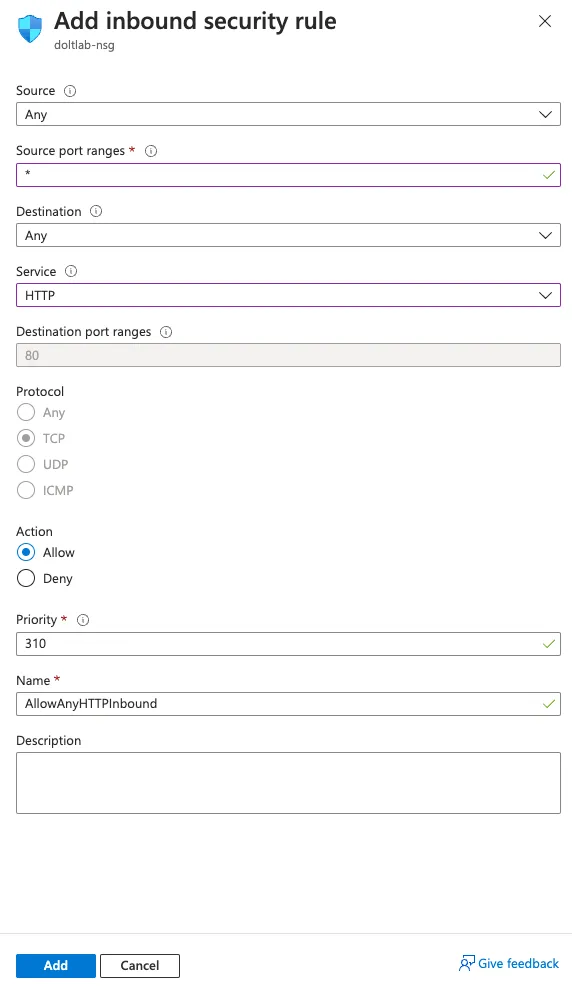
Creating a rule for port 80 can be done by selecting “HTTP” from the “Service” dropdown menu. Make sure “Action” is “Allow” and click “Add”.
For the remaining ports, click “Create port rule” for each one, then fill in the form to create the new port rules. Each port rule should have a “Source” of “Any”, an ”*” for “Source port ranges”, “Any” for “Destination”, nothing for “Service”, and the port number you’re adding in “Destination port ranges”, one of 100, 4321, and 50051.
All port-rule “Protocols” should be “TCP”, with “Action” “Allow”. None of the other settings need to be modified from their default values here. Click “Add” to create each new port rule.
When you’re finished, your ports should look like this:
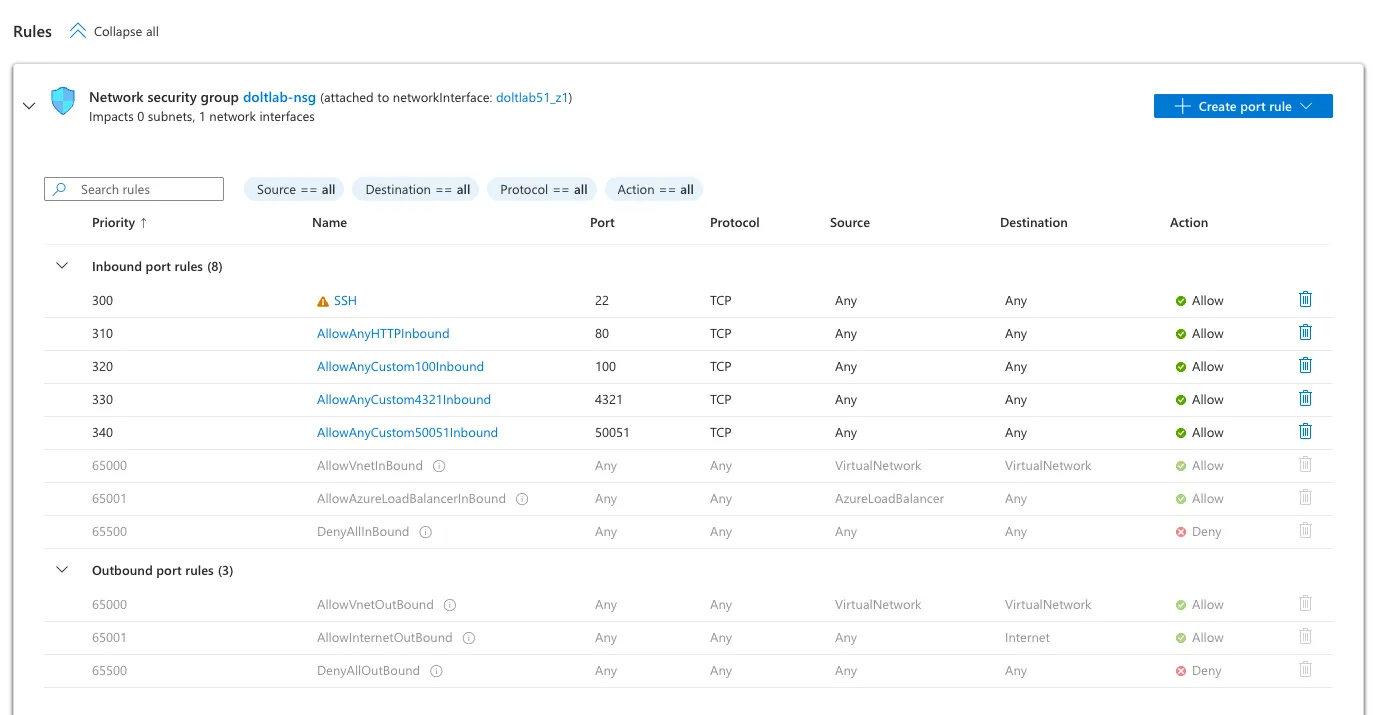
If they do, you’ve successfully provisioned your virtual machine for DoltLab and it’s time to connect to it and set up the attached disk.
Configure the disk#
To connect to your virtual machine, ssh into it with a command like the following:
ssh -i ~/.ssh/doltlab_key.pem azureuser@52.233.81.206Once connected, if you look for the 1TB disk we attached while creating the virtual machine, you won’t see it listed.
azureuser@doltlab:~$ df -h
Filesystem      Size  Used Avail Use% Mounted on
/dev/root        29G  1.5G   28G   5% /
devtmpfs        7.8G     0  7.8G   0% /dev
tmpfs           7.8G     0  7.8G   0% /dev/shm
tmpfs           1.6G  996K  1.6G   1% /run
tmpfs           5.0M     0  5.0M   0% /run/lock
tmpfs           7.8G     0  7.8G   0% /sys/fs/cgroup
/dev/loop0       64M   64M     0 100% /snap/core20/2264
/dev/loop1       39M   39M     0 100% /snap/snapd/21465
/dev/loop2       92M   92M     0 100% /snap/lxd/24061
/dev/sda15      105M  6.1M   99M   6% /boot/efi
/dev/sdb1        32G   28K   30G   1% /mnt
tmpfs           1.6G     0  1.6G   0% /run/user/1000
This is because we need to format and partition the disk before we can use it. To do this, I followed this documentation, but I’ll show each step I performed on my host here as well.
First, I used lsblk to search for the 1TB attached disk.
azureuser@doltlab:~$ lsblk -o NAME,HCTL,SIZE,MOUNTPOINT | grep -i "sd"
sda     0:0:0:0      30G
├─sda1             29.9G /
├─sda14               4M
└─sda15             106M /boot/efi
sdb     0:0:0:1      32G
└─sdb1               32G /mnt
sdc     1:0:0:0       1T
The disk we attached is sdc.
Next we use the parted and partprobe utilities to format and partition the disk.
azureuser@doltlab:~$ sudo parted /dev/sdc --script mklabel gpt mkpart xfspart xfs 0% 100%
azureuser@doltlab:~$ sudo mkfs.xfs /dev/sdc1
meta-data=/dev/sdc1              isize=512    agcount=4, agsize=67108736 blks
         =                       sectsz=4096  attr=2, projid32bit=1
         =                       crc=1        finobt=1, sparse=1, rmapbt=0
         =                       reflink=1
data     =                       bsize=4096   blocks=268434944, imaxpct=25
         =                       sunit=0      swidth=0 blks
naming   =version 2              bsize=4096   ascii-ci=0, ftype=1
log      =internal log           bsize=4096   blocks=131071, version=2
         =                       sectsz=4096  sunit=1 blks, lazy-count=1
realtime =none                   extsz=4096   blocks=0, rtextents=0
azureuser@doltlab:~$ sudo partprobe /dev/sdc1
Then we need to mount the disk and get the block id using blkid. We’ll mount the disk to /datadrive.
azureuser@doltlab:~$ sudo mkdir /datadrive
azureuser@doltlab:~$ sudo mount /dev/sdc1 /datadrive
azureuser@doltlab:~$ sudo blkid
/dev/sdb1: UUID="37f8c837-59f6-4e39-aac4-9c885a8c36fa" TYPE="ext4" PARTUUID="04c7e087-01"
/dev/sda1: LABEL="cloudimg-rootfs" UUID="32c589b5-7835-4684-9994-62e8fb26cd85" TYPE="ext4" PARTUUID="543198b3-f3a1-4b8c-af24-13528d57bedf"
/dev/sda15: LABEL_FATBOOT="UEFI" LABEL="UEFI" UUID="9915-EF3D" TYPE="vfat" PARTUUID="74635b66-5240-4255-aa0c-8c5ba19b7933"
/dev/loop0: TYPE="squashfs"
/dev/loop1: TYPE="squashfs"
/dev/loop2: TYPE="squashfs"
/dev/sda14: PARTUUID="293179ee-1e44-4436-a325-a8dd7eb21c8e"
/dev/sdc1: UUID="0dee6a06-1d62-4e14-a437-ea2ad1e82d09" TYPE="xfs" PARTLABEL="xfspart" PARTUUID="f9c4f28d-a3cb-4618-a115-5cc88a292d99"
Next, we edit /etc/fstab and add our device’s UUID to the file.
azureuser@doltlab:~$ sudo cat /etc/fstab
# CLOUD_IMG: This file was created/modified by the Cloud Image build process
UUID=32c589b5-7835-4684-9994-62e8fb26cd85	/	 ext4	defaults,discard	0 1
UUID=9915-EF3D	/boot/efi	vfat	umask=0077	0 1
/dev/disk/cloud/azure_resource-part1	/mnt	auto	defaults,nofail,x-systemd.requires=cloud-init.service,_netdev,comment=cloudconfig	0	2
UUID=0dee6a06-1d62-4e14-a437-ea2ad1e82d09 /datadrive   xfs   defaults,nofail   1   2
Once those edits are saved, we can see our new device successfully mounted using lsblk and df:
azureuser@doltlab:~$ lsblk -o NAME,HCTL,SIZE,MOUNTPOINT | grep -i "sd"
sda     0:0:0:0      30G
├─sda1             29.9G /
├─sda14               4M
└─sda15             106M /boot/efi
sdb     0:0:0:1      32G
└─sdb1               32G /mnt
sdc     1:0:0:0       1T
└─sdc1             1024G /datadrive
azureuser@doltlab:~$ df -h
Filesystem      Size  Used Avail Use% Mounted on
/dev/root        29G  1.5G   28G   5% /
devtmpfs        7.8G     0  7.8G   0% /dev
tmpfs           7.8G     0  7.8G   0% /dev/shm
tmpfs           1.6G 1000K  1.6G   1% /run
tmpfs           5.0M     0  5.0M   0% /run/lock
tmpfs           7.8G     0  7.8G   0% /sys/fs/cgroup
/dev/loop0       64M   64M     0 100% /snap/core20/2264
/dev/loop1       39M   39M     0 100% /snap/snapd/21465
/dev/loop2       92M   92M     0 100% /snap/lxd/24061
/dev/sda15      105M  6.1M   99M   6% /boot/efi
/dev/sdb1        32G   28K   30G   1% /mnt
tmpfs           1.6G     0  1.6G   0% /run/user/1000
/dev/sdc1       1.0T  7.2G 1017G   1% /datadrive
Finally, we need to change the permissions of /datadrive so we can write to it. Initially, only root can do so.
azureuser@doltlab:~$ ls -la /datadrive
total 4
drwxr-xr-x  2 root root    6 May 29 21:07 .
drwxr-xr-x 20 root root 4096 May 29 21:07 ..
This can be done using chown:
azureuser@doltlab:~$ sudo chown azureuser: /datadrive
azureuser@doltlab:~$ ls -la /datadrive
total 4
drwxr-xr-x  2 azureuser azureuser    6 May 29 21:07 .
drwxr-xr-x 20 root      root      4096 May 29 21:07 ..
Our disk is now ready, and we can move on to installing and running DoltLab.
Download and start DoltLab#
To download, configure, and start DoltLab, we can follow the steps described in Tim’s Getting Started blog.
First we install unzip, then we download and unzip the latest DoltLab release.
azureuser@doltlab:~$ sudo apt install -y unzip
Reading package lists... Done
Building dependency tree
Reading state information... Done
Suggested packages:
  zip
The following NEW packages will be installed:
  unzip
0 upgraded, 1 newly installed, 0 to remove and 8 not upgraded.
Need to get 168 kB of archives.
After this operation, 593 kB of additional disk space will be used.
Get:1 http://azure.archive.ubuntu.com/ubuntu focal-security/main amd64 unzip amd64 6.0-25ubuntu1.1 [168 kB]
Fetched 168 kB in 0s (6159 kB/s)
Selecting previously unselected package unzip.
(Reading database ... 58942 files and directories currently installed.)
Preparing to unpack .../unzip_6.0-25ubuntu1.1_amd64.deb ...
Unpacking unzip (6.0-25ubuntu1.1) ...
Setting up unzip (6.0-25ubuntu1.1) ...
Processing triggers for mime-support (3.64ubuntu1) ...
Processing triggers for man-db (2.9.1-1) ...
azureuser@doltlab:~$ curl -LO https://doltlab-releases.s3.amazonaws.com/linux/amd64/doltlab-latest.zip
% Total % Received % Xferd Average Speed Time Time Time Current
Dload Upload Total Spent Left Speed
100 19.1M 100 19.1M 0 0 13.8M 0 0:00:01 0:00:01 --:--:-- 13.8Mazureuser@doltlab:~$ unzip doltlab-latest.zip -d doltlab
Archive: doltlab-latest.zip
inflating: doltlab/smtp_connection_helper
inflating: doltlab/installer
inflating: doltlab/installer_config.yamlNow we can cd into the doltlab directory and install DoltLab’s dependencies by using the installer to produce a script for us.
azureuser@doltlab:~$ cd doltlab/
azureuser@doltlab:/doltlab$ ./installer --ubuntu
2024-05-29T21:26:03.239Z	INFO	metrics/emitter.go:111	Successfully sent DoltLab usage metrics

2024-05-29T21:26:03.239Z	INFO	cmd/main.go:489	To install DoltLab's dependencies, use this script	{"script": "/home/ubuntu/doltlab/ubuntu_install.sh"}
And we run ubuntu_install.sh. This will take a minute or two to finish. When it finishes, we can run sudo newgrp docker so that we can run Docker without using the sudo command, which DoltLab requires.
azureuser@doltlab:/doltlab$ sudo newgrp docker
root@doltlab:/datadrive/doltlab#
Next, we make changes the installer_config.yaml, providing our host ip in the host field.
# installer_config.yaml
version: v2.1.5

# `host` is the hostname or IP address of the host running DoltLab. Required.
host: "52.233.81.206"
We save these changes, and run the installer.
root@doltlab:/doltlab# ./installer
2024-05-29T21:36:49.899Z	INFO	metrics/emitter.go:111	Successfully sent DoltLab usage metrics

2024-05-29T21:36:49.899Z	INFO	cmd/main.go:496	Successfully configured DoltLab	{"version": "v2.1.5"}

2024-05-29T21:36:49.899Z	INFO	cmd/main.go:502	To start DoltLab, use:	{"script": "/home/ubuntu/doltlab/start.sh"}
2024-05-29T21:36:49.899Z	INFO	cmd/main.go:507	To stop DoltLab, use:	{"script": "/home/ubuntu/doltlab/stop.sh"}
The installer generates the assets DoltLab needs to run, including a script for starting and stopping the DoltLab instance. Before starting DoltLab, though, we need to edit the generated docker-compose.yaml file so that Docker creates persistent volumes at /datadrive, where we want all of DoltLab’s data written. Please note, newer releases of the installer will support this directly so you won’t need to manually edit the generated files.
For now though, at the bottom of the docker-compose.yaml file, there are volumes defined.
# docker-compose.yaml
---
volumes:
  doltlab-remote-storage: {}
  doltlab-user-uploads: {}
  doltlabdb-dolt-backups: {}
  doltlabdb-dolt-configs: {}
  doltlabdb-dolt-data: {}
  doltlabdb-dolt-root: {}
We change these to be this instead:
# docker-compose.yaml

...
volumes:
    doltlab-remote-storage:
            driver: local
            driver_opts:
                    o: bind
                    type: none
                    device: /datadrive/doltlabremoteapi-data
    doltlab-user-uploads:
            driver: local
            driver_opts:
                    o: bind
                    type: none
                    device: /datadrive/doltlabfileserviceapi-data
    doltlabdb-dolt-backups:
            driver: local
            driver_opts:
                    o: bind
                    type: none
                    device: /datadrive/doltlabdb-backups
                        doltlabdb-dolt-configs:
            driver: local
            driver_opts:
                    o: bind
                    type: none
                    device: /datadrive/doltlabdb-configs
    doltlabdb-dolt-data:
            driver: local
            driver_opts:
                    o: bind
                    type: none
                    device: /datadrive/doltlabdb-data
    doltlabdb-dolt-root:
            driver: local
            driver_opts:
                    o: bind
                    type: none
                    device: /datadrive/doltlabdb-roots
And before running start.sh to start DoltLab, we need to create each of these directories:
root@doltlab:/doltlab# mkdir /datadrive/doltlabdb-data
root@doltlab:/doltlab# mkdir /datadrive/doltlabdb-roots
root@doltlab:/doltlab# mkdir /datadrive/doltlabdb-configs
root@doltlab:/doltlab# mkdir /datadrive/doltlabdb-backups
root@doltlab:/doltlab# mkdir /datadrive/doltlabfileserviceapi-data
root@doltlab:/doltlab# mkdir /datadrive/doltlabremoteapi-data
And now we can start DoltLab.
root@doltlab:/doltlab# ./start.shOnce this script completes, we’ll be able to see our running DoltLab services with docker ps:
root@doltlab:/doltlab# docker ps
CONTAINER ID   IMAGE                                                             COMMAND                  CREATED         STATUS         PORTS                                                                                                                                                                                                                  NAMES
30aa97734ea1   public.ecr.aws/dolthub/doltlab/dolthub-server:v2.1.5              "docker-entrypoint.s…"   6 seconds ago   Up 3 seconds   3000/tcp                                                                                                                                                                                                               doltlab-doltlabui-1
807c2ef17794   public.ecr.aws/dolthub/doltlab/dolthubapi-graphql-server:v2.1.5   "docker-entrypoint.s…"   7 seconds ago   Up 3 seconds   9000/tcp                                                                                                                                                                                                               doltlab-doltlabgraphql-1
6dd90ef32ca1   public.ecr.aws/dolthub/doltlab/dolthubapi-server:v2.1.5           "/app/server -doltla…"   7 seconds ago   Up 4 seconds                                                                                                                                                                                                                          doltlab-doltlabapi-1
dd0de03e4cf2   public.ecr.aws/dolthub/doltlab/doltremoteapi-server:v2.1.5        "/app/server -http-p…"   7 seconds ago   Up 4 seconds   0.0.0.0:50051->50051/tcp, :::50051->50051/tcp                                                                                                                                                                          doltlab-doltlabremoteapi-1
6e63ae663aae   public.ecr.aws/dolthub/doltlab/dolt-sql-server:v2.1.5             "tini -- docker-entr…"   7 seconds ago   Up 5 seconds   3306/tcp, 33060/tcp                                                                                                                                                                                                    doltlab-doltlabdb-1
f2cd2d881181   public.ecr.aws/dolthub/doltlab/fileserviceapi-server:v2.1.5       "/app/server -outbou…"   3 minutes ago   Up 4 seconds                                                                                                                                                                                                                          doltlab-doltlabfileserviceapi-1
3bd20158d184   envoyproxy/envoy:v1.28-latest                                     "/docker-entrypoint.…"   3 minutes ago   Up 5 seconds   0.0.0.0:80->80/tcp, :::80->80/tcp, 0.0.0.0:100->100/tcp, :::100->100/tcp, 0.0.0.0:2001->2001/tcp, :::2001->2001/tcp, 0.0.0.0:4321->4321/tcp, :::4321->4321/tcp, 0.0.0.0:7770->7770/tcp, :::7770->7770/tcp, 10000/tcp   doltlab-doltlabenvoy-1
And, we can navigate to http://52.233.81.206/ to see our live DoltLab!
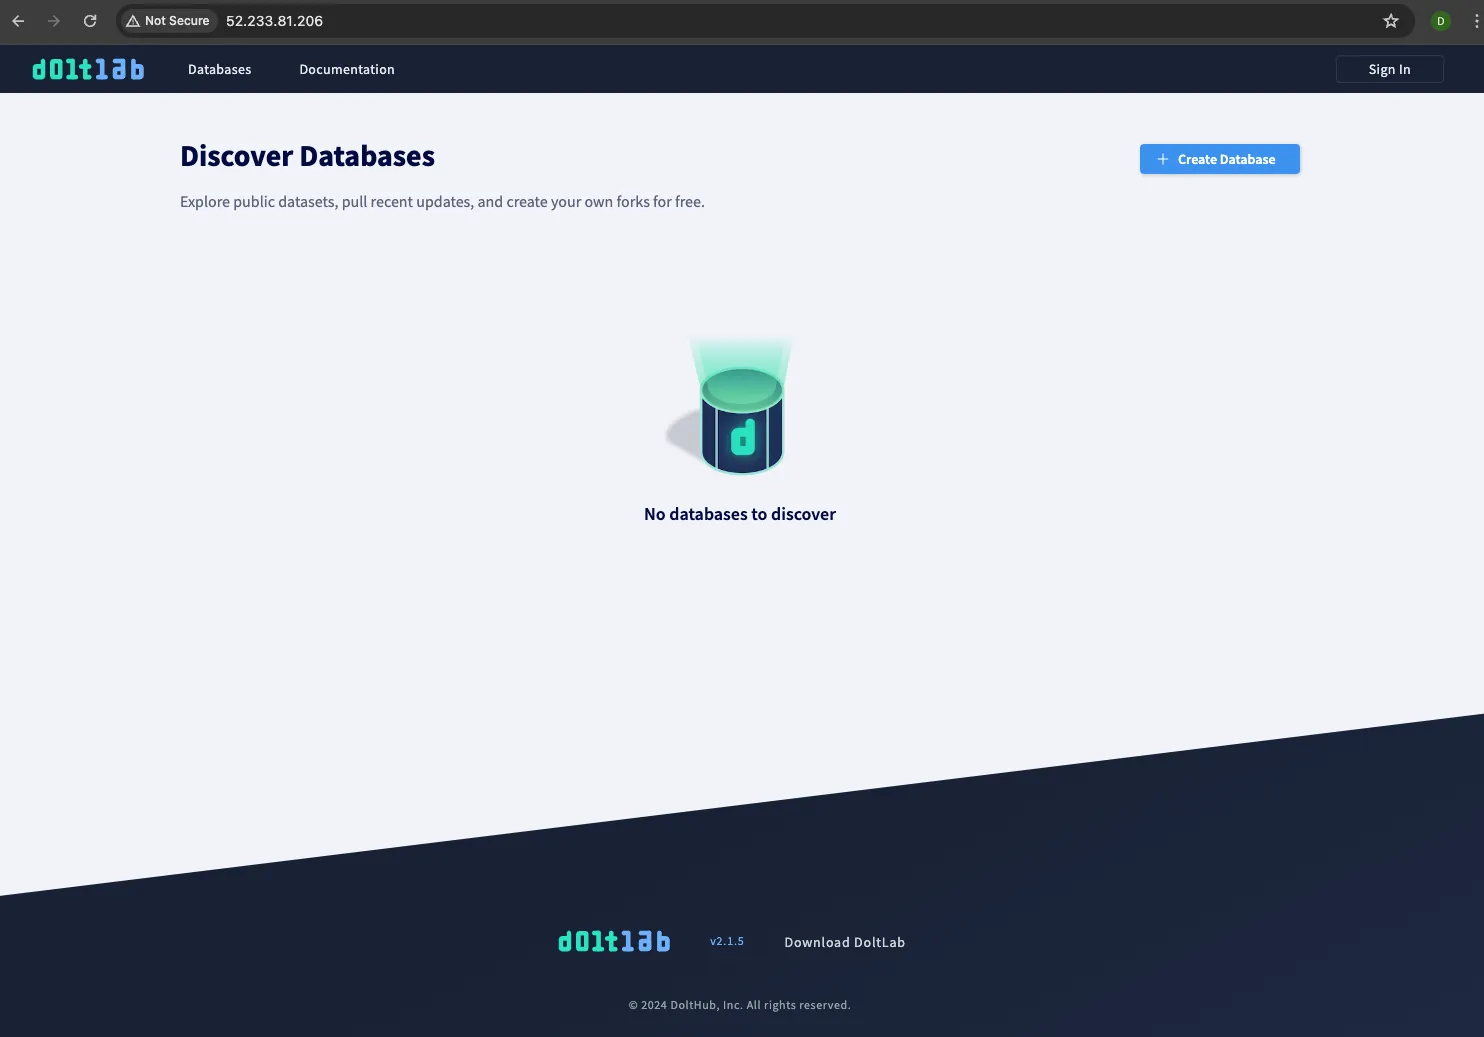
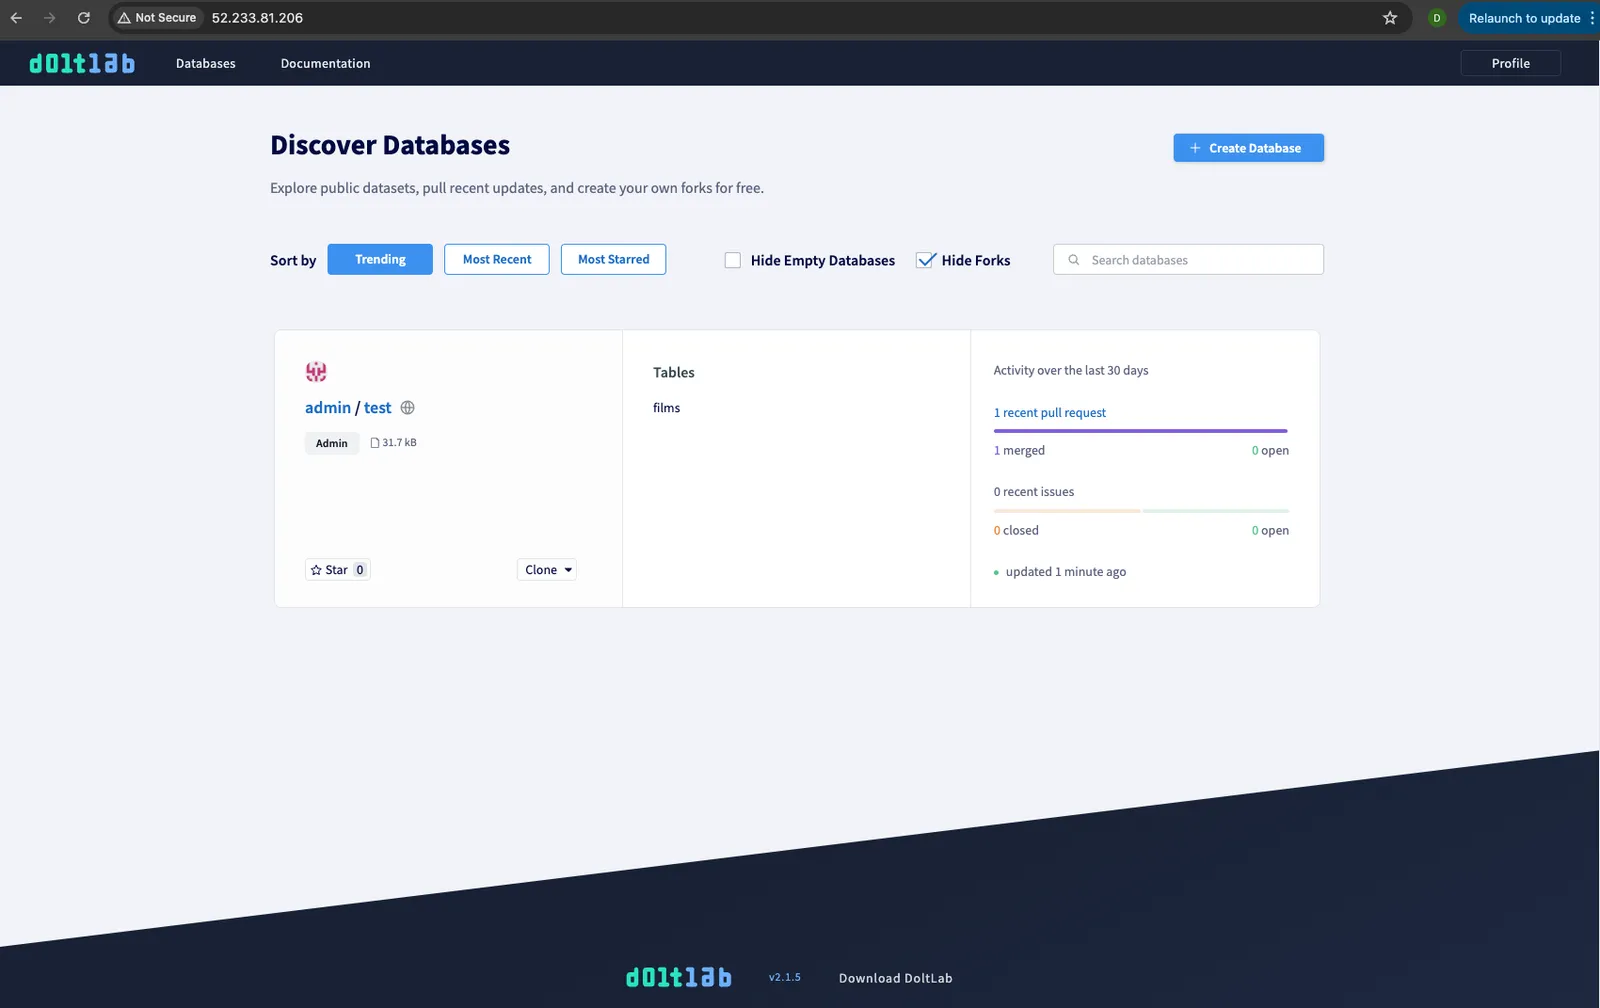
From here, we can sign-in as the default user admin, and create our first database called test.
Conclusion#
I hope this blog helps demystify how to run DoltLab on Azure for you, and encourages you to give it a try. If you use a different cloud provider at your company and would like us to write up a guide on deploying DoltLab for you, swing by our Discord.
Thanks for reading and don’t forget to check out each of our cool products below:
- Dolt—it’s Git for data.
- DoltHub—it’s GitHub for data.
- DoltLab—it’s GitLab for data.
- Hosted Dolt—it’s RDS for Dolt databases.