Getting Started with Dolt and Prisma
Dolt is the world's first version controlled SQL database, offering full MySQL compatibility. This means that all tools you typically use with MySQL, including Prisma, work seamlessly with Dolt. Prisma ORM is an open-source toolkit designed to enhance database interactions in Node.js and TypeScript applications. It features three key components: Prisma Client, an auto-generated, type-safe query builder; Prisma Migrate, for managing database schema changes; and Prisma Studio, a GUI for database management.
Due to a few Prisma-related issues reported by our users on GitHub, we have compiled this guide to demonstrate how to effectively use Prisma with Dolt.
Quick Start
If you prefer to skip the tutorial and directly access the code, it is available in this GitHub repository. Simply connect to any Dolt SQL server by specifying the connection details in a .env file and place it at the root of the repository. You can find directions for running the code in the repository README.
To execute the code, ensure that Git and Node.js are installed on your system. While this example connects to a Hosted Dolt database, the code is compatible with both hosted and local Dolt SQL servers. If you want to use a local Dolt SQL server, you'll need to install Dolt.
Project Initialization
Start by creating a new directory for your project and initialize it:
mkdir my-prisma-dolt-project
cd my-prisma-dolt-project
yarn init -y  # Initialize a new package.json file
Install TypeScript and ts-node:
yarn add typescript ts-node @types/node --devCreate a tsconfig.json file for TypeScript configuration:
{
  "compilerOptions": {
    "target": "ES2018",
    "module": "commonjs",
    "esModuleInterop": true,
    "strict": true,
    "outDir": "./dist",
    "rootDir": "./src"
  },
  "include": ["src/**/*"],
  "ts-node": {
    "compilerOptions": {
      "module": "CommonJS"
    }
  }
}
Install Prisma CLI and Client:
yarn add @prisma/client
yarn add prisma --dev
You can now use the Prisma CLI to create a basic Prisma setup by running:
npx prisma initConnect to Hosted Database
After running the command npx prisma init, your project will include a new /prisma directory. Inside this directory, you'll find a schema.prisma file, which serves as the main configuration file for your Prisma setup and contains definitions for your database schema. Additionally, a .env file will be created at the root of your project where you can set environment variables, such as the database connection URL and SSL information.
Create a Hosted Dolt deployment
This guide demonstrates how to connect to a Dolt database that is cloud-hosted using our Hosted Dolt product.
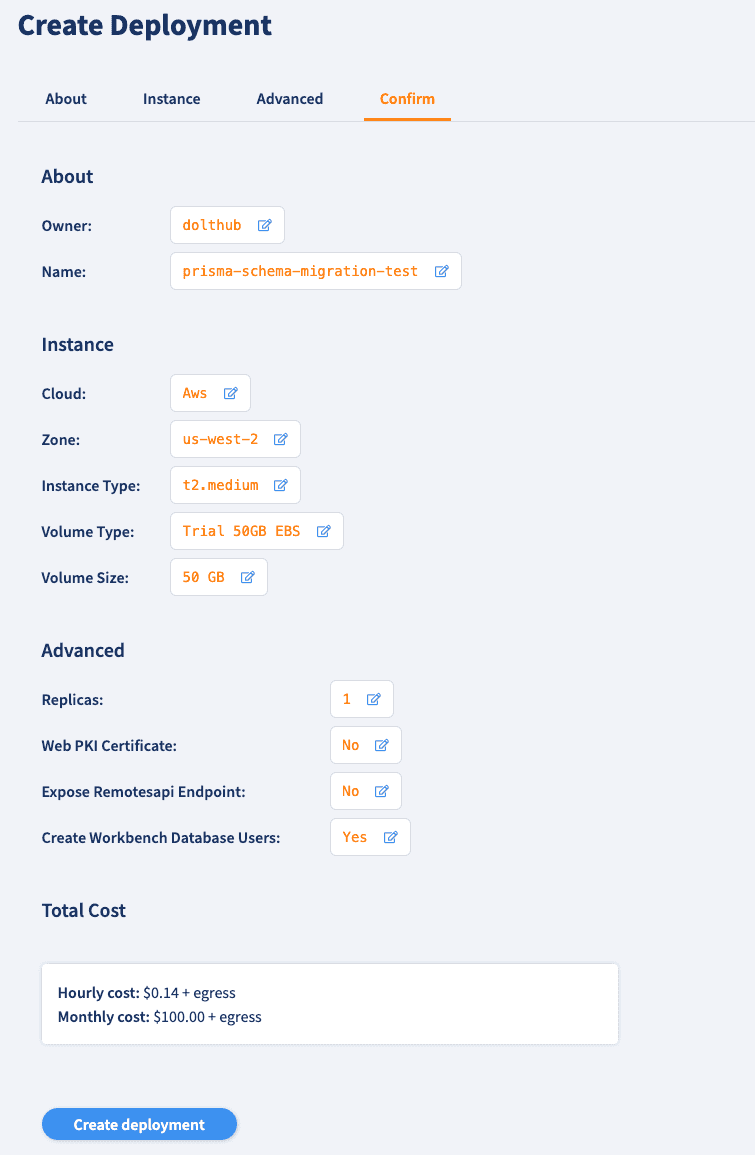
First, sign in or create an account and go to the Create Deployment page. Select the desired instance type. For this example, we'll use the $50 trial instance. Then, click Create Deployment.
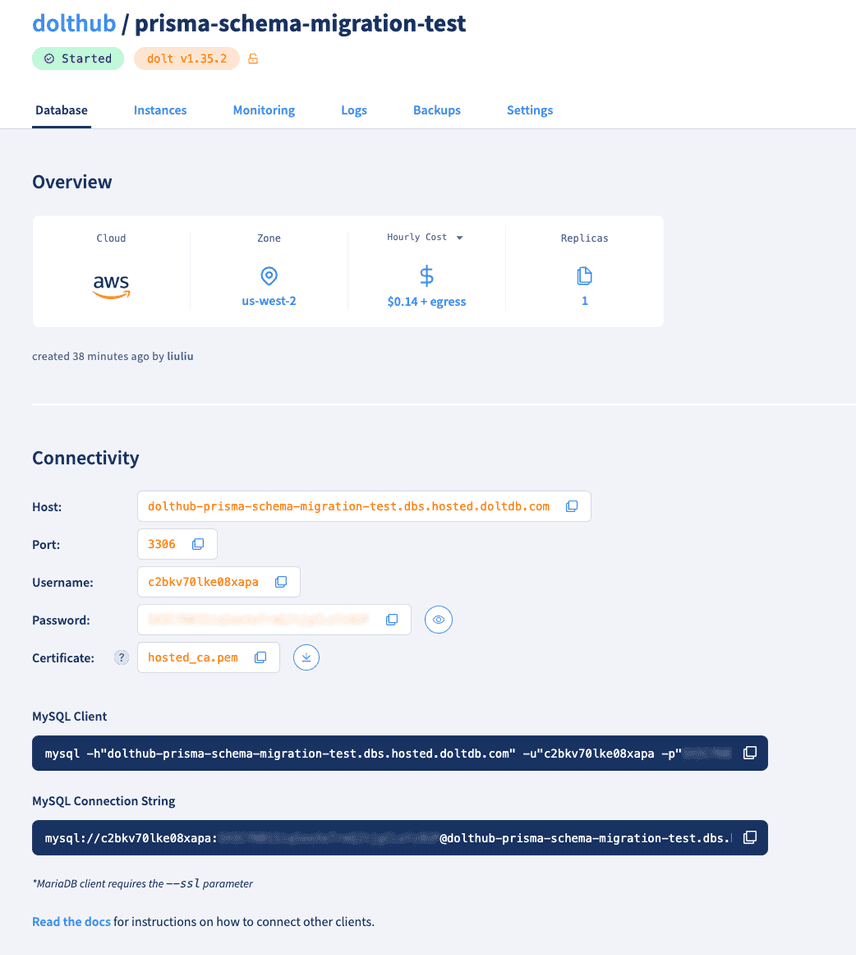
Once the deployment has started, you'll find the connectivity information in the Database tab.
Create a Database
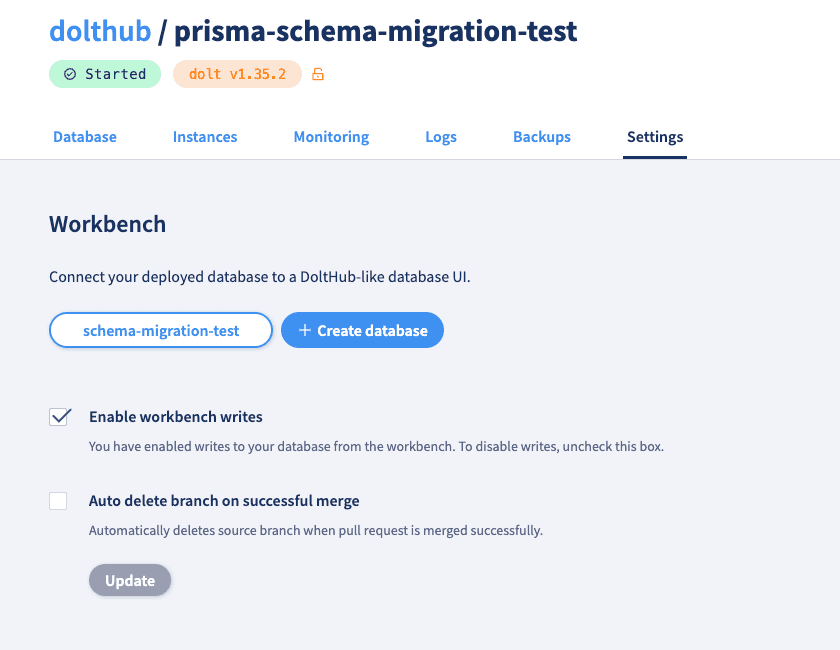
In the Hosted Dolt UI, navigate to the Settings tab. Enable workbench writes by checking the Enable workbench writes option. Then click Create database.
Set Up Environment Variables
Open the .env file, add the database connectivity information and the database name.
DB_HOST="dolthub-prisma-schema-migration-test.dbs.hosted.doltdb.com"
DB_NAME="schema-migration-test"
DB_SSL_PATH="../hosted_ca.pem"
DB_USER="c2bkv70lke08xapa"
DB_PASSWORD="xxxxxxxxxxxxxxxxxxx"
DB_URL="mysql://${DB_USER}:${DB_PASSWORD}@${DB_HOST}/${DB_NAME}?sslmode=require&sslcert=${DB_SSL_PATH}"
You will also need to download the Certificate and add it to the root of the repository. The file name should match the DB_SSL_PATH env. Note that certificate paths are resolved relative to the ./prisma folder.
Create your database schema with Prisma
Open the /prisma/schema.prisma file and add "mysql" to the datasource field since Dolt is MySQL-compatible and load the database url from the env. In the generator block, we're specifying that we want to generate Prisma Client based on our data models.
// prisma/schema.prisma

datasource db {
  provider = "mysql"
  url      = env("DB_URL")
}

generator client {
  provider = "prisma-client-js"
}
Defining the models
Our database will have the following entities, where each entity will map to a table in the database.
employees, a person with an employee number, last name and first name, birth date, gender and hire date.departments, a department has a department number and name.dept_emp, represents the relationship between employees and departments, stores the employee number, department number, from date, and to date.
Let's create the employees, departments and dept_emp models in schema.prisma file. For more details on defining models, refer to the Prisma documentation.
model Employee {
  emp_no     Int       @id
  birth_date DateTime
  first_name String    @db.VarChar(14)
  last_name  String    @db.VarChar(16)
  hire_date  DateTime
  dept_emps  DeptEmp[]

  @@map("employees")
}

model Department {
  dept_no   String   @id @db.Char(4)
  dept_name String   @db.VarChar(40) @unique
  dept_emps DeptEmp[]

  @@map("departments")
}

model DeptEmp {
  emp_no     Int
  dept_no    String     @db.Char(4)
  from_date  DateTime
  to_date    DateTime
  employee   Employee   @relation(fields: [emp_no], references: [emp_no], onDelete: Cascade)
  department Department @relation(fields: [dept_no], references: [dept_no], onDelete: Cascade)

  @@id([emp_no, dept_no])
  @@map("dept_emp")
}
Migrating and pushing changes to the database
To create these tables in the database, you will use the prisma migrate dev command:
npx prisma migrate dev --name initThen, inside the /prisma directory, you will notice a new folder called migrations. It should also contain another folder that ends with init and contains a file called migration.sql. The migration.sql file contains the generated SQL.
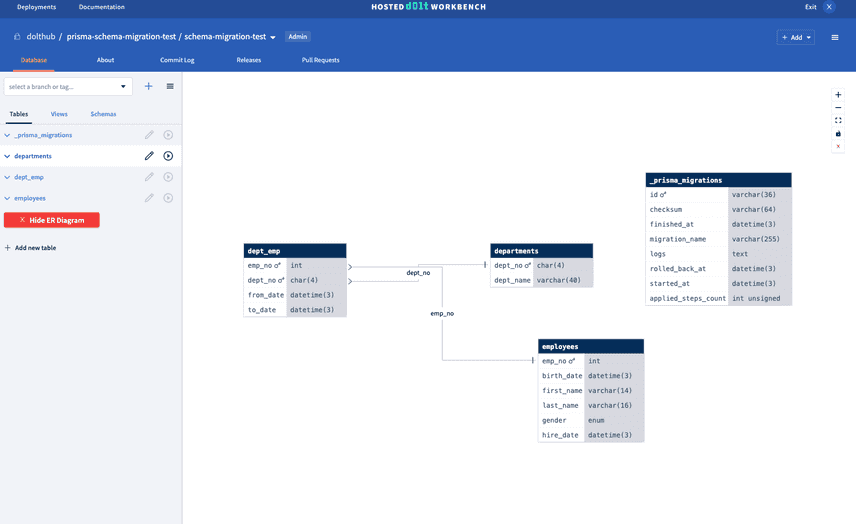
Now the employees, departments, and dept_emp tables have been created. One of the many benefits of using Hosted Dolt is that it comes with a SQL Workbench where you can view your data and changes across revisions. When you click on Launch SQL Workbench from the top right of your deployment page, you'll see the tables we just created, as well as an ER diagram that illustrates table relations.
You'll notice an additional table _prisma_migrations is created. This _prisma_migrations table has a record for each applied migration, which includes information of migration history. This information is used by Prisma to determine which migrations have already been applied to the database, and which ones still need to be applied.
Seeding the database
Since the database is currently empty, we want to populate it with data. You'll use Prisma Client, a type-safe query builder to interact with your database and populate it with sample data.
Create a new file called seed.ts in the /prisma folder. Inside this file, import Prisma Client, instantiate it, and we will import data from CSV files:
import { PrismaClient } from "@prisma/client";
import csv from "csv-parser";
import fs from "fs";

const prisma = new PrismaClient();

async function processCSV(
  filePath: string,
  processData: (data: any[]) => Promise<void>
): Promise<void> {
  return new Promise<void>((resolve, reject) => {
    const results: any[] = [];
    fs.createReadStream(filePath)
      .pipe(csv())
      .on("data", (data) => results.push(data))
      .on("end", async () => {
        try {
          await processData(results);
          resolve();
        } catch (error) {
          reject(error);
        }
      });
  });
}

async function main() {
  try {
    await processCSV("./employees.csv", async (data) => {
      for (const emp of data) {
        await prisma.employee.create({
          data: {
            emp_no: parseInt(emp.emp_no),
            last_name: emp.last_name,
            first_name: emp.first_name,
            birth_date: new Date(emp.birth_date),
            hire_date: new Date(emp.hire_date),
          },
        });
      }
      console.log("Employees have been inserted");
    });

    await processCSV("./departments.csv", async (data) => {
      for (const dept of data) {
        await prisma.department.create({
          data: {
            dept_no: dept.dept_no,
            dept_name: dept.dept_name,
          },
        });
      }
      console.log("Departments have been inserted");
    });

    await processCSV("./dept_emp.csv", async (data) => {
      for (const deptEmp of data) {
        await prisma.deptEmp.create({
          data: {
            emp_no: parseInt(deptEmp.emp_no),
            dept_no: deptEmp.dept_no,
            from_date: new Date(deptEmp.from_date),
            to_date: new Date(deptEmp.to_date),
          },
        });
      }
      console.log("Department_Employee have been inserted");
    });
  } catch (e) {
    console.error("Error during database operation", e);
  } finally {
    await prisma.$disconnect();
  }
}

main().catch((e) => {
  console.error(e);
  process.exit(1);
});
Update your package.json with a "seed" script for seeding the database, which includes an added prisma key:
...
"prisma": {
    "seed": "ts-node --transpile-only ./prisma/seed.ts"
  }
...
You can now seed your database by running the following command:
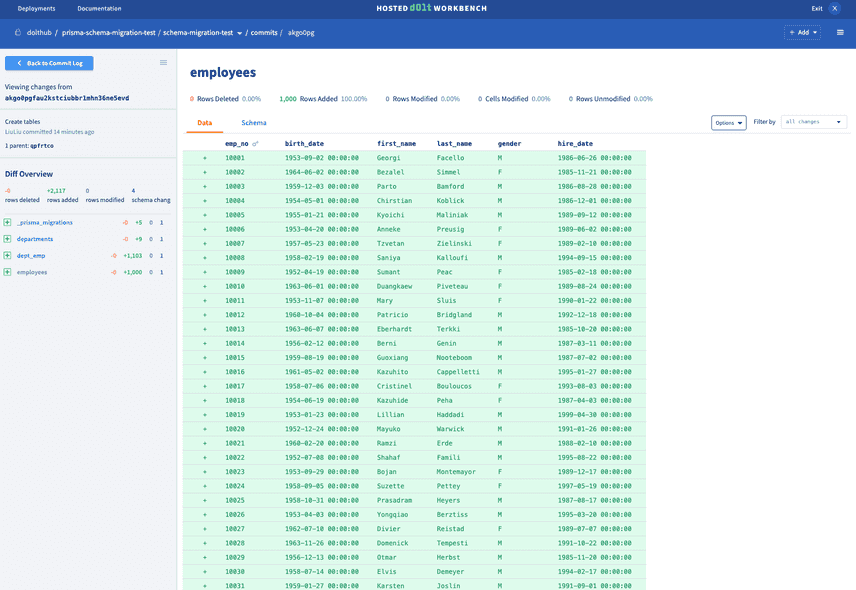
npx prisma db seedWe can check the imported data in the Hosted Workbench:
We can also use the dolt_status system table to see what tables changed. In our examples, we use Prisma's queryRaw and executeRaw methods for executing Dolt-specific queries to system tables, such as dolt_status. We're passing a PrismaTransaction object to our functions, which we'll discuss in more detail in a later section.
// in src/doltUtils.ts
// Define an interface for dolt status
interface DoltStatus {
  table_name: string;
  staged: number;
  status: string;
}

export async function printStatus(prisma: PrismaTransaction) {
  const res = await prisma.$queryRaw<DoltStatus[]>`SELECT * FROM dolt_status`;
  console.log("Status:");
  if (res.length === 0) {
    console.log("No tables modified");
  } else {
    res.forEach((row) => {
      console.log(`  ${row.table_name}: ${row.status}`);
    });
  }
}
const prisma = new PrismaClient();
printStatus(prisma);
The printed result will look like this:
Status:
  departments: modified
  dept_emp: modified
  employees: modified
Create a Dolt Commit
Next, we'll commit our new tables using the DOLT_COMMIT() procedure. If you're familiar with Git, you'll find Dolt's commands and procedures straightforward to use.
//in src/doltUtils.ts

export async function doltCommit(
  prisma: PrismaTransaction,
  author: string,
  msg: string
) {
  const result =
    await prisma.$executeRaw`CALL DOLT_COMMIT('--author', ${author}, '-Am', ${msg}) `;
  console.log("Created commit:", result);
}
const prisma = new PrismaClient();
doltCommit(prisma, "LiuLiu <liu@dolthub.com>", "Create tables");
Print the commit log
Let’s take a closer look at the Dolt commit log. You can view the commit log using the dolt_log system table, which is designed to function similarly to the git log and dolt log commands used on the command line.
// Define an interface for the commit log
interface CommitLog {
  commit_hash: string;
  committer: string;
  message: string;
}

export async function printCommitLog(prisma: PrismaTransaction) {
  const res = await prisma.$queryRaw<
    CommitLog[]
  >`SELECT commit_hash, committer, message FROM dolt_log ORDER BY date DESC`;
  console.log("Commit log:", res);
}

const prisma = new PrismaClient();
printCommitLog(prisma);
And it outputs:
Commit log: [
  {
    commit_hash: 'akgo0pgfau2kstciubbr1mhn36ne5evd',
    committer: 'LiuLiu',
    message: 'Create tables'
  },
  {
    commit_hash: 'qpfrtco9ivuur5ltlcm1gdj46kv4tl0b',
    committer: 'Dolt System Account',
    message: 'Initialize data repository'
  }
]
Change your schema
In this section, you will change your Prisma schema and then generate and apply the migration to your hosted database.
We want to add a new field for the manager in the Department model. This field will create a foreign key reference to the Employee model. Open your schema.prisma file and modify the Department model as follows:
model Department {
  dept_no    String    @id @db.Char(4)
  dept_name  String    @unique @db.VarChar(40)
  manager_id Int?
  manager    Employee? @relation(fields: [manager_id], references: [emp_no])
  dept_emps  DeptEmp[]
  @@map("departments")
}
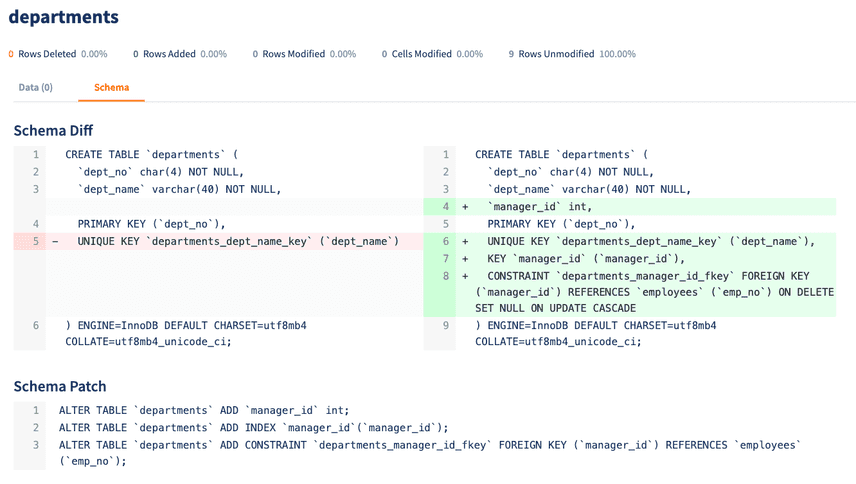
Once you have updated your schema, use Prisma's migration tool to apply this change to your database. Run the following command:
npx prisma migrate dev --name add_department_managerYou will see the schema change in your hosted working set:
Update data on a branch
In this section, we will create a branch named add-manager and switch to it. Then, we'll update the departments table by populating it with manager data on this active branch. Note that before doing this, we need to commit all the previous changes in the main branch so the schema migration is in.
Creating a branch is considered a write operation, which we perform using the procedure dolt_branch(). We then switch to this branch using dolt_checkout(). Alternatively, you can both create and switch to a new branch in one step with dolt_checkout('-b', 'newbranch').
When using dolt_checkout() to switch branches, it use a new connection because Dolt does not allow transactions across branches. For an in-depth discussion of how branch switching is handled in Dolt, refer to this blog post. To ensure that all operations are executed on the same database connection and within the same branch, we use Prisma's transaction API. This API enables a batch of operations to be executed within a single transaction, thus ensuring data consistency during the creation, viewing, and updating of tables.
Let's define a type called PrismaTransaction and use it to manage our transactions across various functions:
export type PrismaTransaction = Omit<
  PrismaClient<Prisma.PrismaClientOptions, never, DefaultArgs>,
  "$connect" | "$disconnect" | "$on" | "$transaction" | "$use" | "$extends"
>;

export async function createBranch(prisma: PrismaTransaction, branch: string) {
  const res = await getBranch(prisma, branch);
  if (res && res.length > 0) {
    console.log("Branch exists:", branch);
  } else {
    await prisma.$executeRaw`CALL DOLT_BRANCH(${branch})`;
    console.log("Created branch:", branch);
  }
}

export async function checkoutBranch(
  prisma: PrismaTransaction,
  branch: string
) {
  const res = await prisma.$executeRaw`CALL DOLT_CHECKOUT(${branch})`;
  console.log("Using branch:", branch);
}
Now that we're on a new branch, we can make modifications safely, knowing that the main branch remains unaffected. We will then update the departments table for the manager column we added in the last section:
async function updateDepartmentManagers(prisma: PrismaTransaction) {
  // Update Marketing
  await prisma.department.update({
    where: { dept_no: "d001" },
    data: { manager_id: 10001 },
  });

  // Update Finance
  await prisma.department.update({
    where: { dept_no: "d002" },
    data: { manager_id: 10002 },
  });

  // Update Human Resources
  await prisma.department.update({
    where: { dept_no: "d003" },
    data: { manager_id: 10003 },
  });

  // Update Production
  await prisma.department.update({
    where: { dept_no: "d004" },
    data: { manager_id: 10004 },
  });

  // Update Development
  await prisma.department.update({
    where: { dept_no: "d005" },
    data: { manager_id: 10005 },
  });

  console.log("Department managers updated successfully.");
}
The entire process, from creating and checking out branches to updating records, is now executed within a transaction:
async function updateManager() {
  const prisma = new PrismaClient();
  try {
    await prisma.$transaction(async (tx) => {
      await createBranch(tx, "add-manager");
      await checkoutBranch(tx, "add-manager");
      await updateDepartmentManagers(tx);
    });
    console.log("All operations completed successfully.");
  } catch (error) {
    console.error("An error occurred:", error);
  } finally {
    await prisma.$disconnect();
  }
}

updateManager();
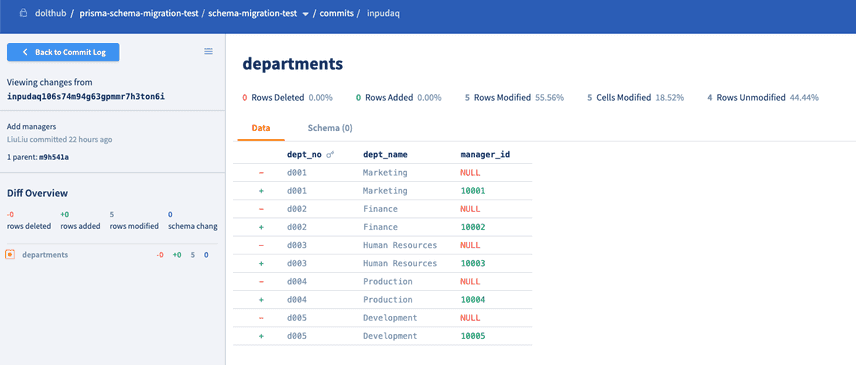
Let's inspect the specific row changes within our departments table to make sure our change looks right. In Dolt, you can view diffs in a couple of ways: through a dolt_diff_<table> system table designated for each user-defined table, or by using the dolt_diff() table function. Here we filter the diff output to only show WORKING changes, which allows us to see modifications that have not yet been staged or committed.
export async function printDiff(prisma: PrismaTransaction, table: string) {
  const query = Prisma.sql`SELECT * FROM ${Prisma.raw(
    "dolt_diff_" + table
  )} where to_commit = 'WORKING'`;
  const res = await prisma.$queryRaw(query);
  console.log(`Diff for ${table}:`);
  console.log(res);
}

const prisma = new PrismaClient();
printDiff(prisma, "departments");
Printed result:
Diff for departments:
[
  {
    to_dept_no: 'd001',
    to_dept_name: 'Marketing',
    to_manager_id: 10001,
    to_commit: 'WORKING',
    to_commit_date: null,
    from_dept_no: 'd001',
    from_dept_name: 'Marketing',
    from_manager_id: null,
    from_commit: 'm9h541a33e7kdr368urvdqudbqjrp1vf',
    from_commit_date: 2024-06-24T20:51:12.489Z,
    diff_type: 'modified'
  },
  {
    to_dept_no: 'd002',
    to_dept_name: 'Finance',
    to_manager_id: 10002,
    to_commit: 'WORKING',
    to_commit_date: null,
    from_dept_no: 'd002',
    from_dept_name: 'Finance',
    from_manager_id: null,
    from_commit: 'm9h541a33e7kdr368urvdqudbqjrp1vf',
    from_commit_date: 2024-06-24T20:51:12.489Z,
    diff_type: 'modified'
  },
  {
    to_dept_no: 'd003',
    to_dept_name: 'Human Resources',
    to_manager_id: 10003,
    to_commit: 'WORKING',
    to_commit_date: null,
    from_dept_no: 'd003',
    from_dept_name: 'Human Resources',
    from_manager_id: null,
    from_commit: 'm9h541a33e7kdr368urvdqudbqjrp1vf',
    from_commit_date: 2024-06-24T20:51:12.489Z,
    diff_type: 'modified'
  },
  {
    to_dept_no: 'd004',
    to_dept_name: 'Production',
    to_manager_id: 10004,
    to_commit: 'WORKING',
    to_commit_date: null,
    from_dept_no: 'd004',
    from_dept_name: 'Production',
    from_manager_id: null,
    from_commit: 'm9h541a33e7kdr368urvdqudbqjrp1vf',
    from_commit_date: 2024-06-24T20:51:12.489Z,
    diff_type: 'modified'
  },
  {
    to_dept_no: 'd005',
    to_dept_name: 'Development',
    to_manager_id: 10005,
    to_commit: 'WORKING',
    to_commit_date: null,
    from_dept_no: 'd005',
    from_dept_name: 'Development',
    from_manager_id: null,
    from_commit: 'm9h541a33e7kdr368urvdqudbqjrp1vf',
    from_commit_date: 2024-06-24T20:51:12.489Z,
    diff_type: 'modified'
  }
]
This is what this diff looks like on the workbench:
Finally, let's commit these changes so we can make different changes on another branch.
await doltCommit(prisma, "LiuLiu <liu@dolthub.com>", "Add managers");
await printCommitLog(prisma);
And you'll see our new commit in the log:
Commit log: [
  {
    commit_hash: 'inpudaq106s74m94g63gpmmr7h3ton6i',
    committer: 'LiuLiu',
    message: 'Add managers'
  },
  {
    commit_hash: 'akgo0pgfau2kstciubbr1mhn36ne5evd',
    committer: 'LiuLiu',
    message: 'Create tables'
  },
  {
    commit_hash: 'qpfrtco9ivuur5ltlcm1gdj46kv4tl0b',
    committer: 'Dolt System Account',
    message: 'Initialize data repository'
  }
]
Merge the changes into main
Now we will merge the add-manager branch into main branch using the procedure dolt_merge().
export async function doltMerge(prisma: PrismaTransaction, branch: string) {
  await prisma.$executeRaw`CALL DOLT_MERGE(${branch})`;
  console.log("Merge complete for ", branch);
}

async function mergeBranch() {
  const prisma = new PrismaClient();
  try {
    await prisma.$transaction(async (tx) => {
      await checkoutBranch(tx, "main");
      await printActiveBranch(tx);
      await doltMerge(tx, "add-manager");
      await printCommitLog(tx);
    });
    console.log("All operations completed successfully.");
  } catch (error) {
    console.error("An error occurred:", error);
  } finally {
    await prisma.$disconnect();
  }
}

mergeBranch();
This outputs the following.
Using branch: main
Active branch: [ { 'ACTIVE_BRANCH()': 'main' } ]
Merge complete for  add-manager
Commit log: [
  {
    commit_hash: 'inpudaq106s74m94g63gpmmr7h3ton6i',
    committer: 'LiuLiu',
    message: 'Add managers'
  },
  {
    commit_hash: 'akgo0pgfau2kstciubbr1mhn36ne5evd',
    committer: 'LiuLiu',
    message: 'Create tables'
  },
  {
    commit_hash: 'qpfrtco9ivuur5ltlcm1gdj46kv4tl0b',
    committer: 'Dolt System Account',
    message: 'Initialize data repository'
  }
]
All operations completed successfully.
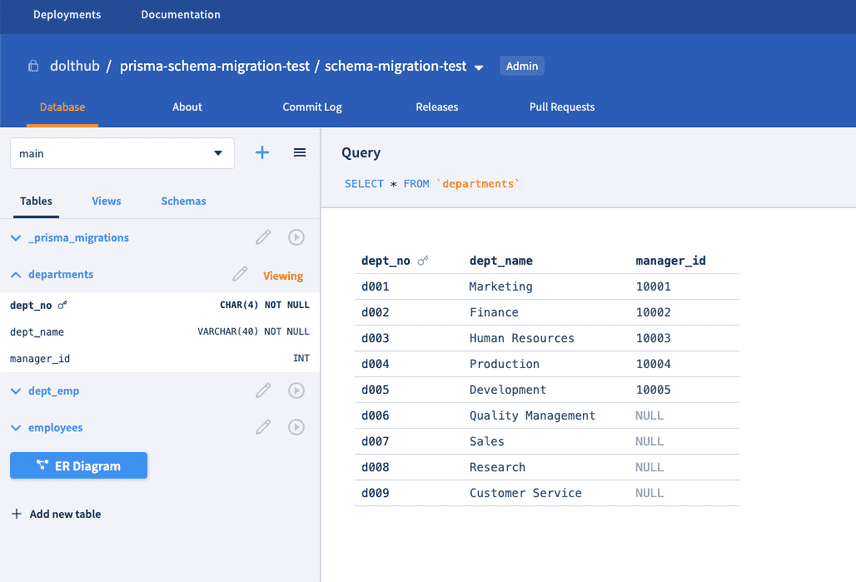
You'll also see the final results in the Hosted Workbench:
Rolling back a mistake
Dolt offers robust rollback features that can be a lifesaver in scenarios where you might accidentally delete a table. Consider a situation where I inadvertently drop the dept_emp table:
await prisma.$executeRaw`DROP TABLE dept_emp`;After running this, checking the database status and tables shows that dept_emp is gone:
await printTables(prisma);
await printStatus(prisma);
Tables in database: [
{ 'Tables_in_schema-migration-test': '_prisma_migrations' },
{ 'Tables_in_schema-migration-test': 'departments' },
{ 'Tables_in_schema-migration-test': 'employees' }
]
Status:
dept_emp: deletedIn traditional databases, such a mistake could be irreversible. However, with Dolt, we can easily restore the table by resetting to a previous state using call dolt_reset('hard'). This function takes an optional commit, if not provided, it defaults to the latest commit (HEAD):
export async function doltResetHard(
  prisma: PrismaTransaction,
  commit?: string
) {
  if (commit) {
    await prisma.$executeRaw`CALL DOLT_RESET('--hard', ${commit})`;
    console.log("Resetting to commit:", commit);
  } else {
    await prisma.$executeRaw`CALL DOLT_RESET('--hard')`;
    console.log("Resetting to HEAD");
  }
}

const prisma = new PrismaClient();
doltResetHard(prisma);
Resetting to HEAD
Rolled back to the previous commit.To execute database operations (create tables, commit changes, etc.) using src/index.ts, run:
npx ts-node src/index.tsThis capability ensures that operating databases with Dolt is less prone to irreversible errors. You can confidently revert changes or restore your database to a previous, stable state whenever needed.
Conclusion
Integrating Dolt with Prisma adds a safety layer to managing databases by allowing you to view detailed diffs and easily roll back changes. This ensures more control during tasks like schema migrations and query executions. If you're interested in how Dolt handles schema migrations, check out our blog on schema migrations in Dolt. If you have any questions or suggestions, feel free to reach out on GitHub or join our Discord to chat. We're here to help make your experience smooth.

